
If you operate a WordPress site, you might need to migrate it at some point. There are several reasons behind migrating your site. It can be your hosting provider that’s not serving you with enough storage or speed. You might also want to rebrand your entire site with new features and improvements.
WordPress migration must be smooth whether you’re upgrading the hosting provider or recreating it. It's a complex task that requires your focus and proper guidance if you want your site to work smoothly. You can also rely on WordPress migration services to get everything done by professionals.
In this article, we’ll walk you through the Complete Guide to WordPress Website Migration process. You will learn both manual and automated WordPress migration processes and some post-migration tasks. So, let’s learn the process to re-establish your WordPress site.
Understanding the WordPress Migration Process
When it comes to the website migration process, you are simply moving your website from one server or domain to another. It's like changing your website location virtually but keeping its elements intact. In WordPress, you need to move your site’s files, databases, and configuration to another location. So, understanding the ins and outs of the migration process is essential if you want a fully functional website after the process.
Types Of WordPress Migration Process
There are several ways to migrate a WordPress site from one location to another. Here are some common processes:
Local Server Migration: This type of migration happens when you are transferring a website from a local environment to a live server. Developers utilize this process to test their site in a local environment and make it live when it's ready to launch. Everyone can access that website after transferring it to the live server.
Server-to-Server Migration: This type of WordPress migration happens if you transfer your website from one hosting provider to another. Let’s say you are willing to get a better hosting provider since it's not providing you with better speed or storage. Then, the only option is to go with a server-to-server migration process with a better provider.
Domain Changes: This process is ideal for those who want to change the domain name while keeping the same hosting provider. During this migration process, You must be careful about your website's redirects and SEO factors.
Reasons For WordPress Migration
Understanding the reason behind the website migration is as important as knowing the migration process. There can be multiple reasons behind a WordPress migration process. Here are some common reasons behind it:
-
The hosting provider is not offering enough speed.
-
The hosting provider is not offering enough security
-
The hosting provider is not providing reliable support.
-
You are not satisfied with the hosting provider's pricing plan.
-
You want more features from the hosting provider but not getting it.
-
You want to completely rebrand your website.
-
You want to change the domain name for any reason.
You can prepare more adequately when you specifically know the reason behind the migration. Let’s learn about the necessary steps that you need to take before conducting the WordPress migration process.
Checklist Before WordPress Website Migration
You can ensure a smooth website migration process with thorough preparation before the process. Your pre-migration checklist should be organized so that you don't miss any crucial steps. Here are the steps that you must take before migrating your WordPress site:
Backup Your WordPress Site
First of all, you must create a backup of your WordPress site before beginning the migration process. The backup should accurately include all the files, databases, and settings of your website. The backup file of your website will help you restore your site in case anything goes wrong during the migration process.
You can choose between manual and automated processes to back up your website. For manual processes, you can use FTP clients such as FileZilla. It allows you to download all the necessary files for your WordPress site. Moreover, you can use PhpMyAdmin to export the entire WordPress database for migration purposes.
You can utilize backup plugins to minimize the effort of backing up your entire WordPress site. Plugins like UpdraftPlus, BackupBuddy, and Duplicator can automate the entire backup process. Plus, you can back up your website with cloud servers, Google Drive, Dropbox, and other services.
Select A Hosting Provider
You’ve obviously selected a hosting provider to launch your WordPress site to live. If you are unhappy with your current hosting provider, you can go through the WordPress migration process. Thus, you need to change your hosting provider and select one that meets all your business requirements.
Here are some criteria that you need to focus on while selecting your next hosting provider:
-
Optimized performance via SSD storage and content delivery network (CDN).
-
Robust security measures for your site. It should offer an SSL certificate, malware scanner, and antispam protection.
-
Free migration so you can do it without considering the budget.
-
Complete eCommerce support to run your online shop effortlessly, even after migration.
-
Quick and reliable support to resolve any issue during the WordPress migration process.
Here are some renowned hosting providers
|
Hosting Provider |
Best For |
|
Fast loading speed and customer support |
|
|
Reliable services, features, competitive pricing |
|
|
Robust features for WordPress sites |
Plan WordPress Migration Timing
You shouldn’t start the WordPress migration process whenever you see fit. There are some considerations to make before starting the process. You can choose a timeframe when you have minimum traffic on your site.
It's best to start the process late at night or on the weekend to ensure you have minimum downtime. You won't lose potential customer visitors or sales if you select a perfect time for migration.
Always inform your visitors that they will face downtime due to migration. Showing them the courtesy helps you earn their trust. You can either email your customers or place a notice on your website about the migration.
Prepare Your Site For Migration
You must deactivate caching plugins such as W3 Total Cache or WP Super Cache before migrating your site. This is helpful because deactivating these plugins allows you to stop caching your site's old data. The same goes for security plugins like Wordfence since they can block access to your site’s necessary data during migration.
You can also put in maintenance mode on your site so that users can't access it before it's fully ready. You can showcase a message on your website that it's going through maintenance and unavailable for a certain period.
After going through these checklists, it will be easy for you to successfully migrate your WordPress site.
Manual WordPress Migration Process
With a manual approach, you won't use any plugin to migrate your WordPress site. This process may seem complex to you, but it gives you more control over the migration process. Here is a step-by-step WordPress migration guide on how you can migrate the site manually:
Export The Database
Firstly, you need to export the database of your WordPress site using the following steps:
-
Log in to your WordPress site’s hosting account and navigate to phpMyAdmin.
-
Select your WordPress site's database from the list on the left side.

-
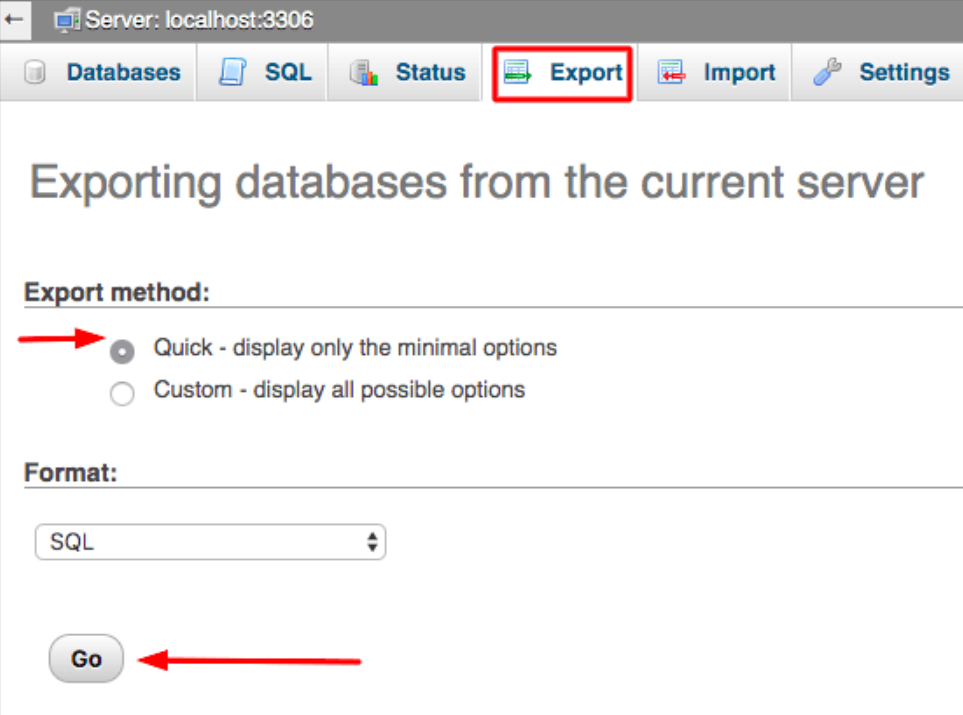
Now, click the Export tab, select the Quick export method, and choose the SQL format.
-
Click the Go to download the database file on your device.
Download Your WordPress Site
The second step is downloading your entire WordPress site before migrating. Here are the steps to follow:
-
You can use an FTP client such as FileZilla to connect to your current server.
-
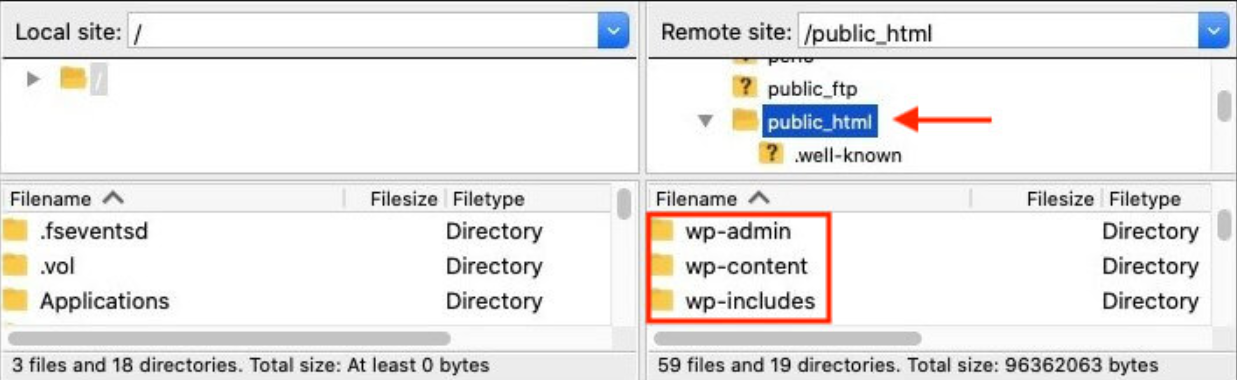
Go to the root directory of your WordPress installation, which is usually available in public_html.
-
Then download all the files and folders, including wp-content, wp-admin, and wp-includes, to your device.
Upload Files to the New Server
You need to upload the files to the new servers you recently downloaded from your previous site. Here are the steps you can follow:
-
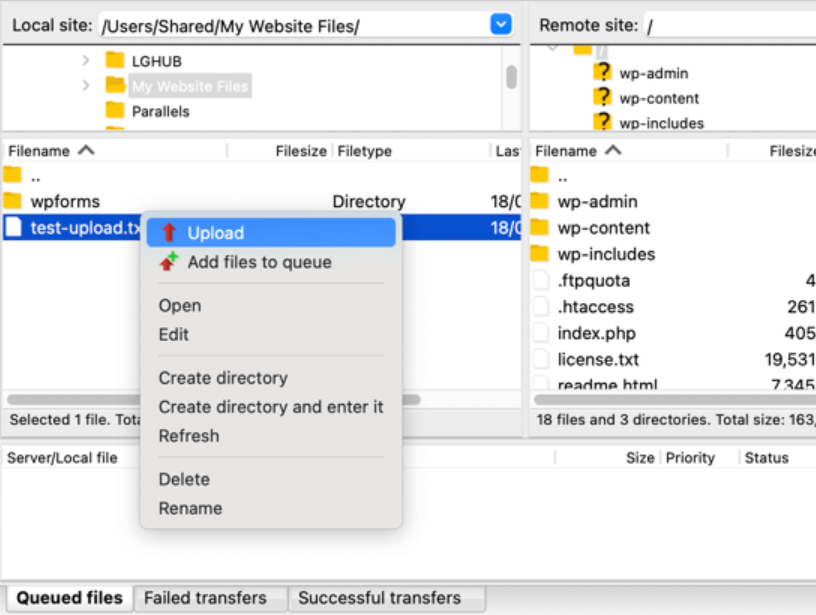
Use FTP and connect to the new hosting provider where you want to establish your WordPress site.
-
Now, upload all of the WordPress files you have downloaded in the new root directory of the new server.
Import Your WordPress Database
At this stage, you need to import the database of your previous WordPress site into a new database. Follow these steps to complete the process:
-
Log in to phpMyAdmin on your new hosting provider account for your website.
-
Now, you need to create a new database for your WordPress site. Thus, you must note down the database name, username, and password.
-
Select the new database and click on the Import tab
-
Then, choose the Database (SQL file) you exported earlier and click Go.
Update The wp-config.php File
Now, you need to update the most crucial file of your latest site for a successful WordPress migration process. Here are the steps to follow:
-
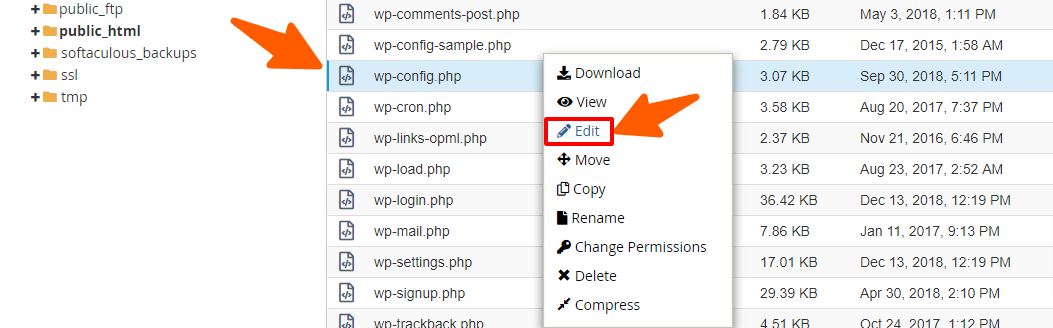
Find out the wp-config.php file in your uploaded files and edit the file using a text editor.
-
Now, change the file's database name, username, and password. All this information must match with the new database information. These are the data that you need to update using the text editor:

Update URLs if Necessary
You must update the URLs If you are doing this WordPress migration process due to domain name change. Updating the URLs is necessary if you’ve changed them during migration. However, you can use plugins like Replace DB or execute SQL queries directly within the phpMyAdmin.
Using Plugins For the WordPress Migration Process
You can rely on plugins if you lack the technical expertise to follow the manual approach to site migration. So, Plugins can minimize the effort of migrating your entire WordPress site with minimal effort and time. Here are the two best migration plugins and processes to use for migrating a WordPress site:
Duplicator
Duplicator is a well-known plugin that simplifies the WordPress migration process with its top-notch features. You will get guides on creating a backup package and installation script using the plugin. Thus, you can quickly restore your site to a new server without any interruption or error.

The plugin also lets you create a site backup and store it in cloud storage, such as Google Drive, Dropbox, and Amazon S3. The migration process becomes more enhanced with the Pro version of the plugin.
Using Duplicator for WordPress Migration Process
Duplicator gives you reliable and simple WordPress migration capabilities. Here are the steps to use this tool to migrate your site smoothly:
-
Login to your WordPress site, click Plugins > Add New, and then search for Duplicator. Then, install and activate the plugin on your site.
-
Now go to Duplicator > Packages and click Create New. Follow the prompts to create a package for your WordPress site.
-
Then, download the installer file and the package file.
-
Use the FTP to upload the installer.php and archive.zip files to the root directory of your new server.
-
Access the http://yournewdomain.com/installer.php using a web browser
-
Then, follow the prompts to complete the installation process.
-
When the installation process is complete, log into your new WordPress dashboard. Then go to Settings > Permalinks. Click Save Changes to refresh permalinks.
Here are some more plugins for WordPress Migration processes:
|
Migration Plugin |
Best For |
|
All-in-One WP Migration and Backup |
Easily migrating your entire WordPress site, including your database, files, and theme |
|
User-friendly interface and extensive backup options. |
|
|
|
Simple and intuitive interface to migrate the site using basic backup functionality |
The next process is for you If you don't want to handle the WordPress migration process by yourself at all.
Use Professional Migration Services
Consider hiring a professional for the WordPress migration process If you own a large site. The same goes for eCommerce websites since you need to handle a lot of sensitive data. Most of the top-rated hosting providers offer migration services in their packages.
However, you can hire professional WordPress migration services to handle complex sites. It helps if your site includes a lot of data to handle. It also helps you handle the migration service if your site is custom-made and has many plugins installed.
Professional services have the expertise to properly handle different types of migration processes. You can focus on essential business objectives while the professionals handle the entire migration process. Services such as ThemePaste can help you migrate your WordPress site within your budget.
Post Migration Checklist
Now that you are done with the WordPress migration process, make sure everything is functioning properly. You need to go through a post-migration checklist since some of the features may not work as you expect. Here is the checklist that you need to take care of after the migration process:
Pages: Make sure every page of your website is loading properly.
Menu and Buttons: Make sure all the menu items and buttons are working and redirecting properly.
Media Files: Click all the images, videos and other media files and make sure they are loading with the correct dimension on all devices. You have to re-upload the media files that are missing from your website.
Links: Check whether all the links are clickable or redirect you to the proper page.
Plugins and Themes: Check whether all the installed plugins and themes are functioning properly in the new server environment.
User registration and Login: You may have multiple users registered to your WordPress site. Thus, you need to check the login process and ensure users are able to access their accounts on your website.
Missing Content: Some pages or posts may appear without any content in the new server environment. In that case, you need to database file uploads and make sure everything has been transferred from your previous website.
Error Messages: You need to fix issues with permalinks or missing files if you are seeing 404 error messages on your site.
Site URL settings: Log in to your WordPress site and go to Settings> General. Then, make sure the WordPress Address (URL) and Site Address (URL) are showing the correct domain. This is crucial if you’ve changed it during the WordPress migration process.
301 Redirects: You may have changed your new website’s URLs or domains. In that case, you must set up 301 redirects from the old URLs to the new ones. In this way, you can keep the SEO rankings intact by redirecting visitors and search engines to the latest pages of your site.
Wrapping Up
WordPress migration is an important when it comes to owning and maintaining it successfully. First of all, you need to understand the pre-migration checklist and then select either the manual approach or use a plugin.
We’ve covered all the processes in this guide so that you can select the best method that suits you. We highly recommend you rely on professional services to avoid any issues during the process.
- Content Marketing in E-Commerce Success
- WordPress restrict content access
- Weekly vs monthly WordPress maintenance
- E-Commerce Development
- WooCommerce
- WordPress Development
- Best Loginizer Alternatives
- WordPress plugin installation
- reCAPTCHA validation failed
- WooCommerce Product Page Optimization
- Google voice search optimization
- email delivery failure in WordPress


