Shipping plays a crucial role in the buying journey of today’s eCommerce marketplace customers. With the proper shipping strategies, you can prevent 70% of customers from leaving their carts. Thus, the shipping method should be fast, accurate, and cost-effective to keep your store ahead of the competition.
Luckily, you can automate the entire shipping process with the right plugin as a WooCommerce store owner. Shipping Manager is the tool that will automate and enhance Shipping with its essential set of features. This WooCommerce shipping plugin makes the shipping process easier and simpler for customers. As a result, they will complete the purchase process without thinking about a better option.
In this guide, we’ll walk you through some easy steps to automate shipping for your WooCommerce store using the Shipping Manager plugin. By the end, you’ll be able to provide seamless shipping options, reduce operational costs, and improve customer satisfaction.
What is WooCommerce Shipping?
WooCommerce comes with default shipping features that allow you to send the product from your store to the customer’s doorstep. WooCommerce plugin already includes some basic shipping options for store owners to manage their shipping process effectively. There are options for calculating shipping costs, setting shipping zones, and offering different shipping methods to customers.
The main objective of WooCommerce shipping is to make the logistics for eCommerce easier for businesses. It enables store owners to deliver the products to their customers promptly and within their budget.
Setting Up WooCommerce Shipping Options
Setting up the WooCommerce shipping option may seem overwhelming to you. For your convenience, we’ve shown the process in some easy steps. Keep in mind that your shipping strategy may not be the same as that of other stores. That is because every store has its unique settings, products, and locations.
Your WooCommerce shipping process should offer a variety of options so that you can apply different strategies. One such option is free shipping, which attracts most of the customers online. Let’s explore all the shipping options that you will get within your WooCommerce store.
General WooCommerce Shipping Options
To set up the WooCommerce shipping process for your online store, you need to configure key shipping settings. These settings are available within your WordPress dashboard. First, log into your WordPress admin panel and navigate to WooCommerce > Settings > General.
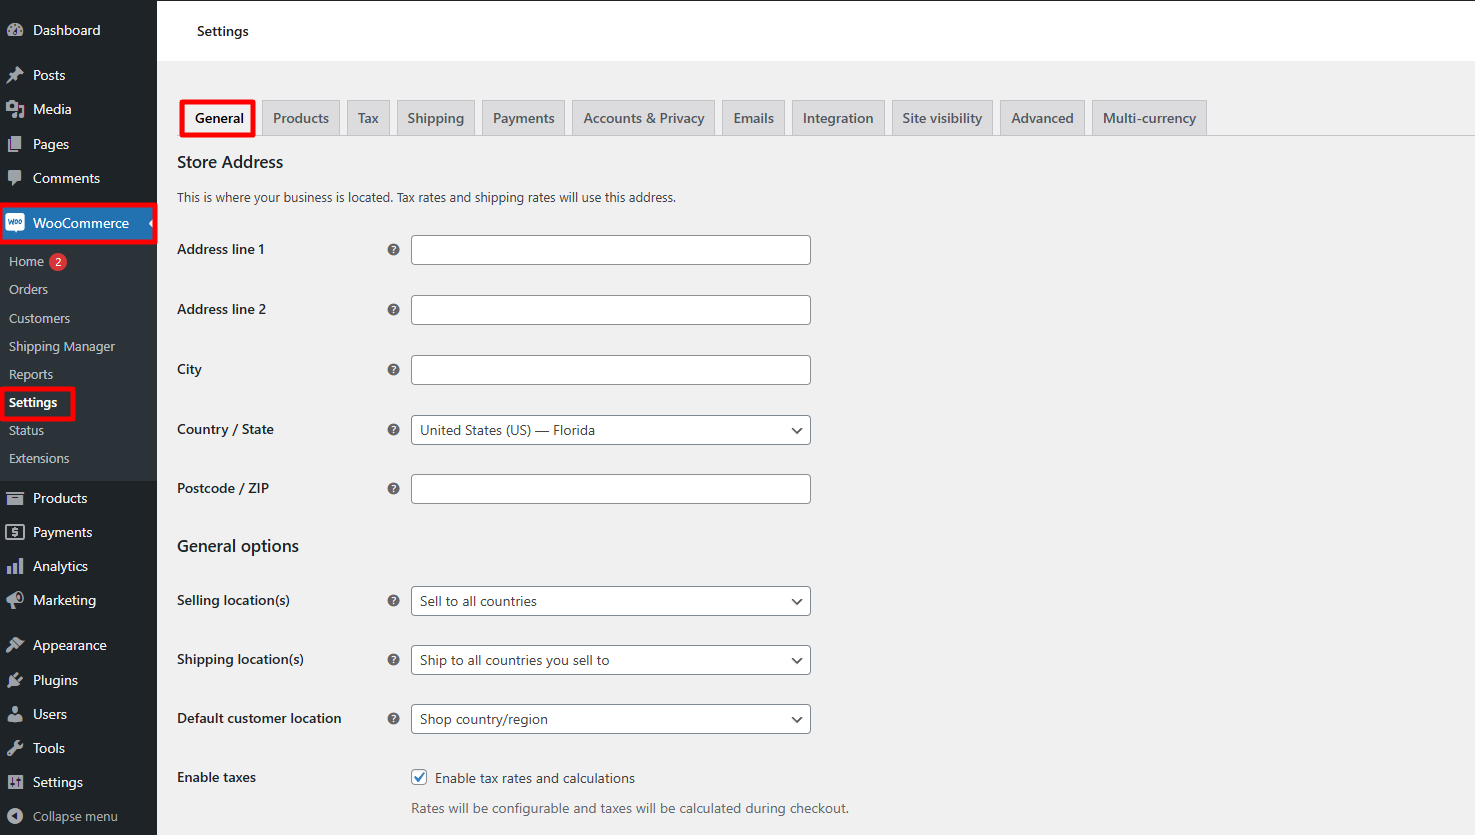
Store Address: Input your store's address, which serves as the base location for calculating shipping costs.
Selling Locations: Under General > General Options, set the selling location for your WooCommerce store. You can choose to sell to all countries, specific countries, or exclude certain regions.
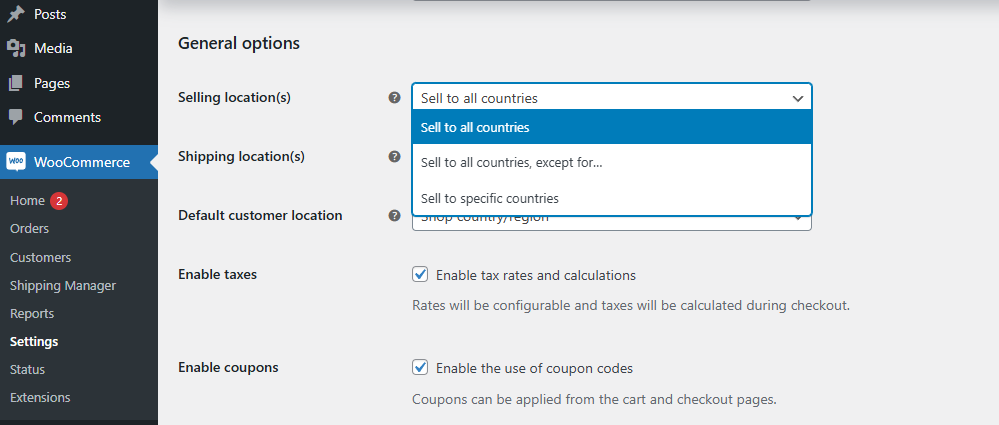
Shipping Locations:
Configure Shipping Location(s) by selecting from the following options:

-
Ship to all countries you sell to
-
Ship to all countries
-
Ship to specific countries only
-
Disable shipping and shipping calculations
Typically, you’ll want to ship to the same countries you sell to, but you can limit shipping or offer local pickup options from nearby locations, which we'll cover later.
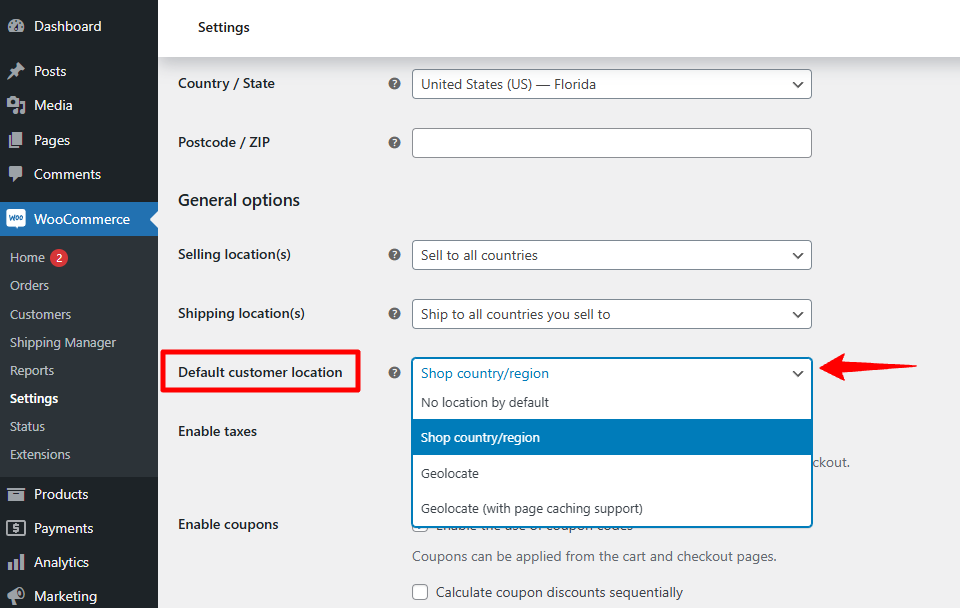
Default Customer Location:
The Default Customer Location setting determines how WooCommerce calculates shipping for customers before they enter their shipping details. Options include:
-
No location by default
-
Shop base address
-
Geolocate
-
Geolocate with page caching support
If you select Geolocate, WooCommerce will use the customer's IP address to estimate their location automatically. To enable this, WooCommerce periodically downloads the MaxMind GeoLite Database, which is stored in your site’s wp-content directory. This database helps accurately detect customer locations for shipping cost calculations.
With these basic settings, you can easily set up shipping for your WooCommerce store.
Default WooCommerce Shipping Options
Now, you can move on to the default WooCommerce shipping settings and start configuring different options.
Navigate to WooCommerce > Settings and click the Shipping tab.
From the shipping Tab, you can configure the following options:
-
Shipping Zones
-
Shipping Settings
-
Classes
-
Local Pickup
Let's check out these shipping settings separately in the next section. We will start with the shipping settings first and then move on to the shipping zone.
Configuring Shipping Settings
This option lets you enable shipping calculators on your cart pages and set a default shipping address.
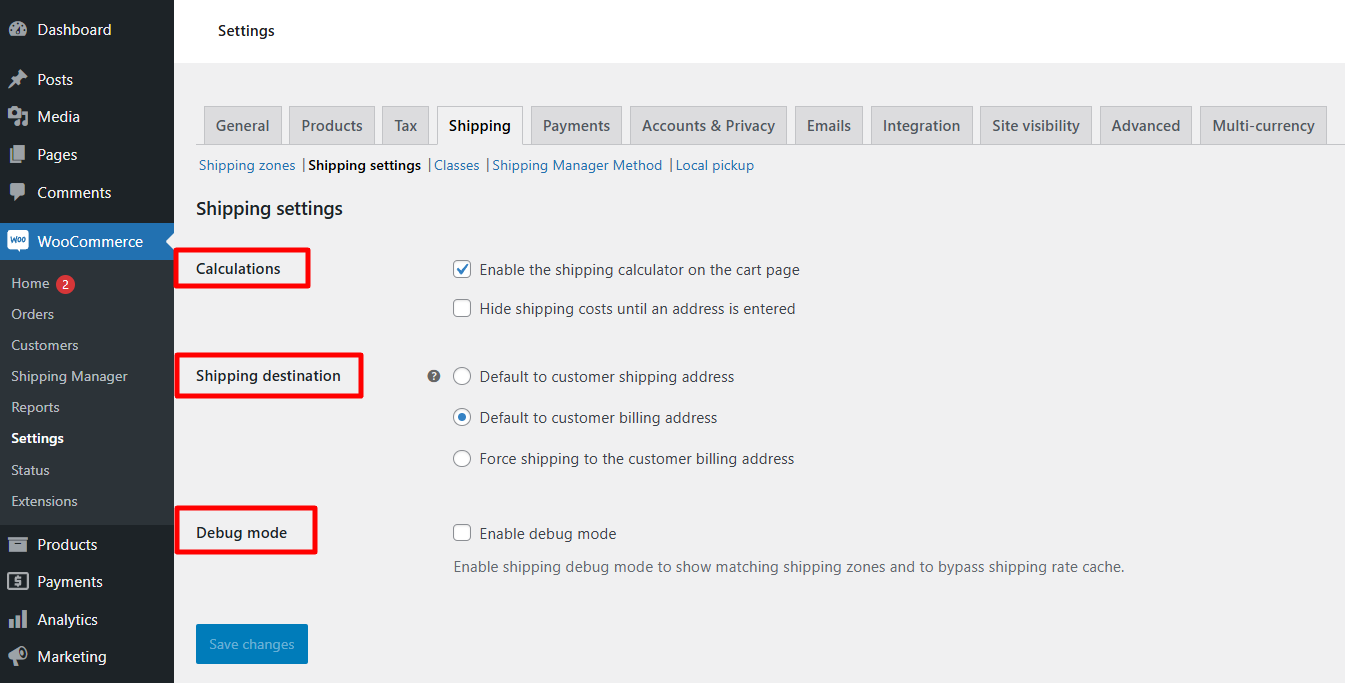
Here’s what you can choose for the default address:
-
Customer's shipping address
-
Customer's billing address
-
Force shipping to the billing address
You can also enable Debug mode, which does two things:
-
Shows which shipping zones apply to specific areas, helping you see where your shipping options are available.
-
Bypasses the shipping rate cache, meaning it fetches real-time shipping rates instead of using saved ones.
Note: Debug mode is useful for testing your shipping setup.
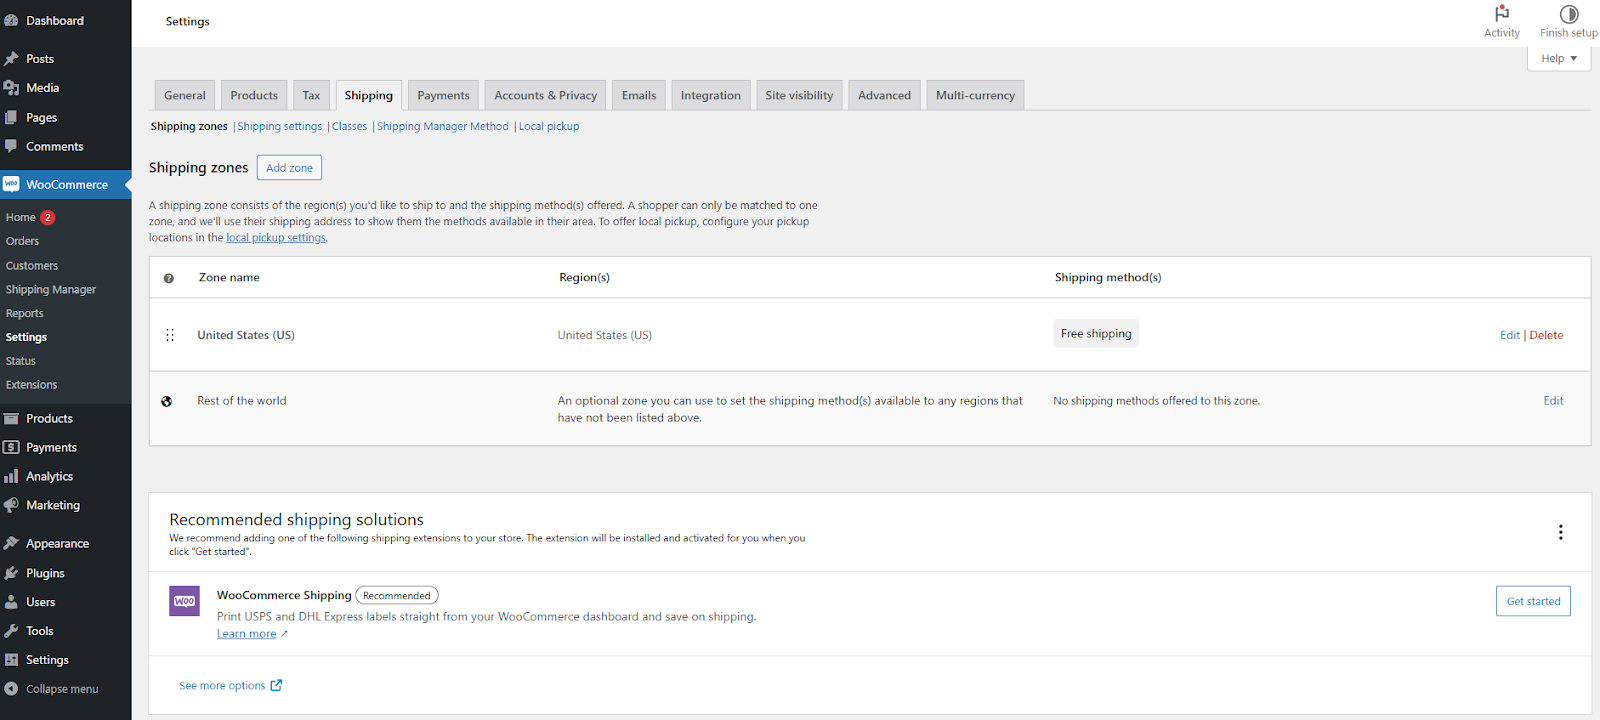
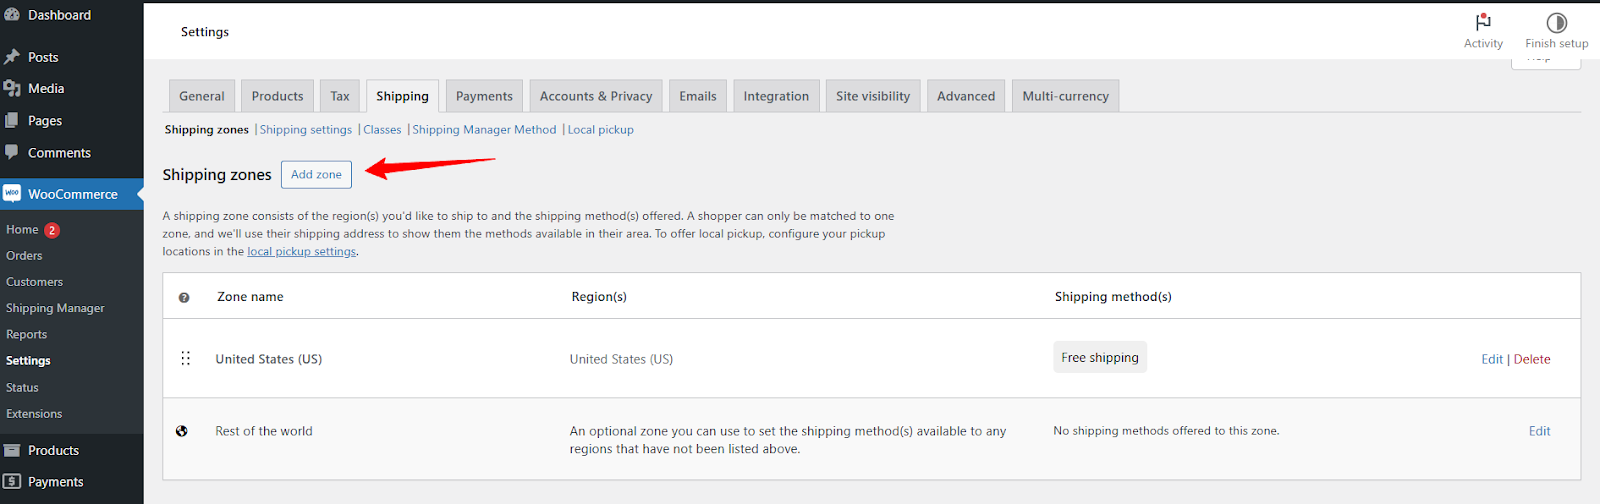
Selecting Shipping Zones
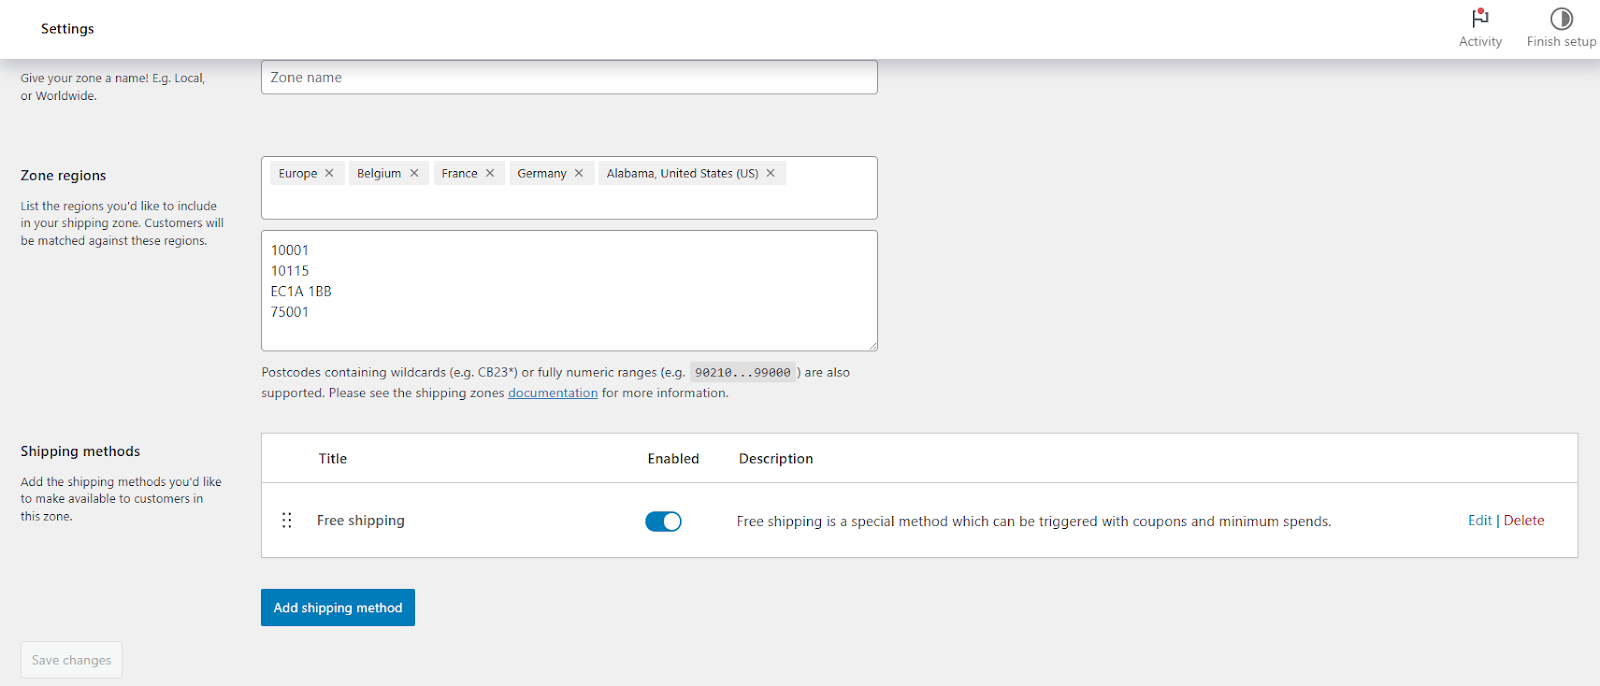
After configuring the general settings, create shipping zones to define the areas you ship to. Shipping zones let you set different shipping rates and methods for specific regions. It's the geographical area (country, region, or part of the world) where you can ship your products.
For example, if your store is based in the U.S. but also ships to Europe, you'll have two shipping zones: America and Europe.
Now, Click on the Add New button to add your preferred shipping zones.
From here, you can configure the following options:
-
Zone Name: Name the zone (e.g., Europe).
-
Zone Regions: Choose the locations (e.g., countries, states) for this zone.
-
Shipping Methods: Select the shipping methods and prices specific to this zone.
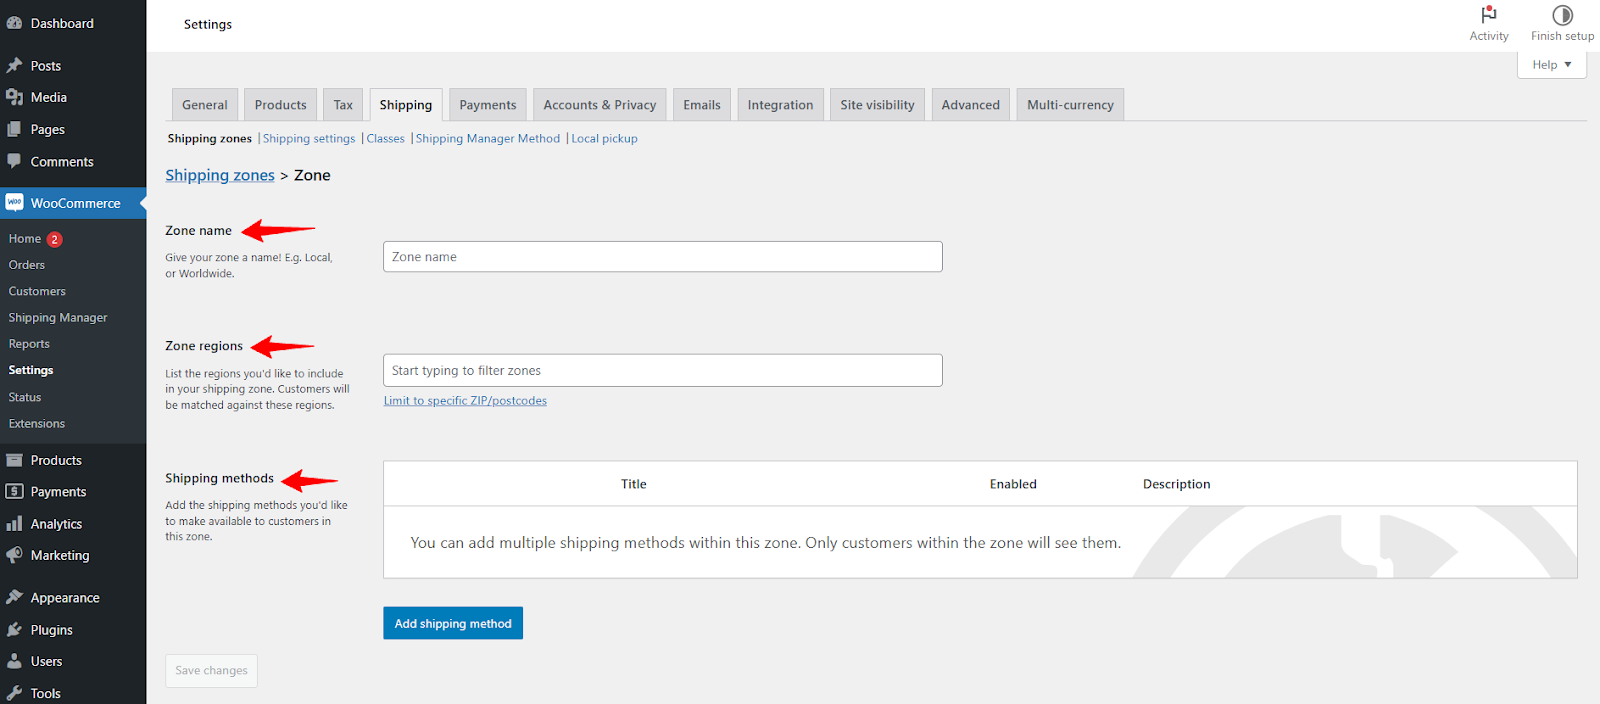
From the dropdown, you can filter locations by continent, country, city, or even zip code. This allows you to control where your store ships and customize shipping rates based on location.
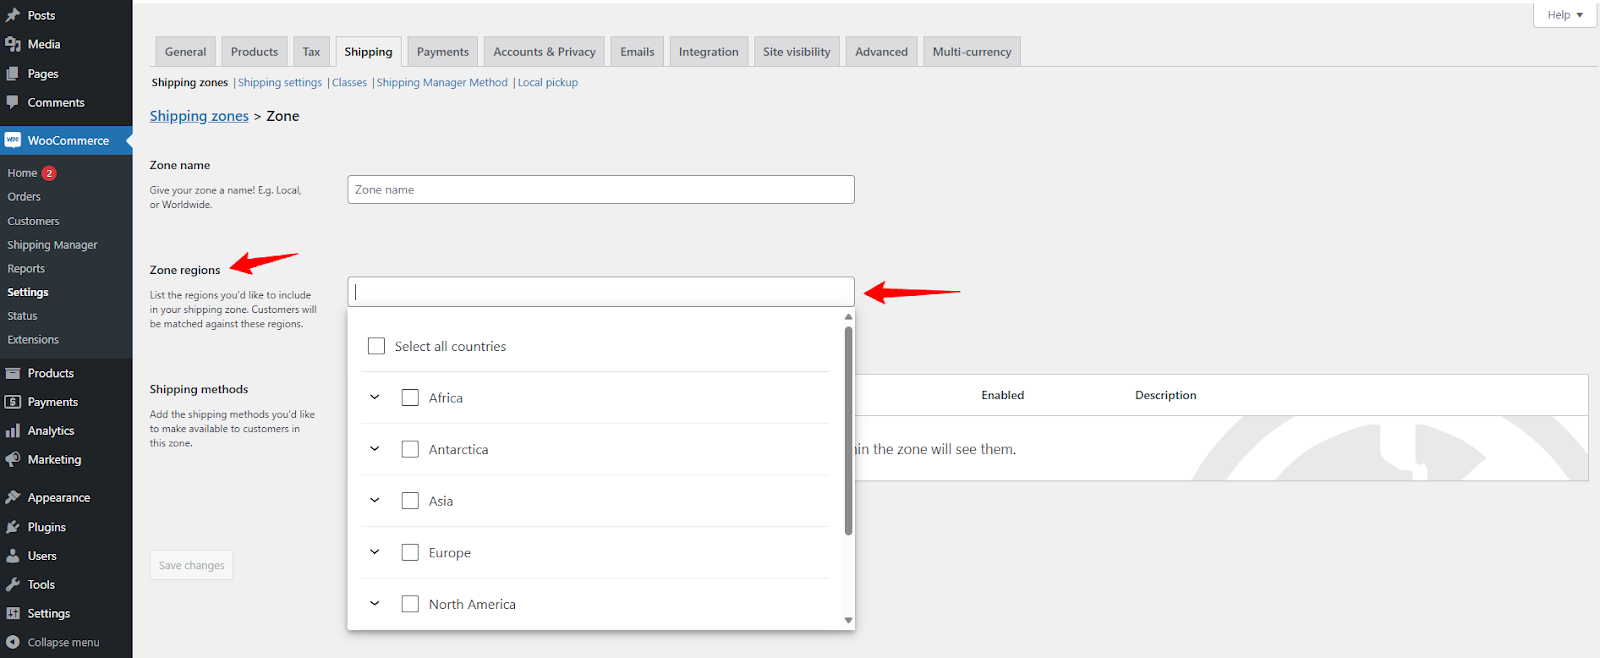
You can also narrow down or limit your WooCommerce shipping locations by setting specific zip codes. This gives you precise control over where your products can be shipped.

Adding WooCommerce Shipping Methods
Now you can add shipping methods to the zones you’ve added to the previous settings. To start, click the Add Shipping Method button.
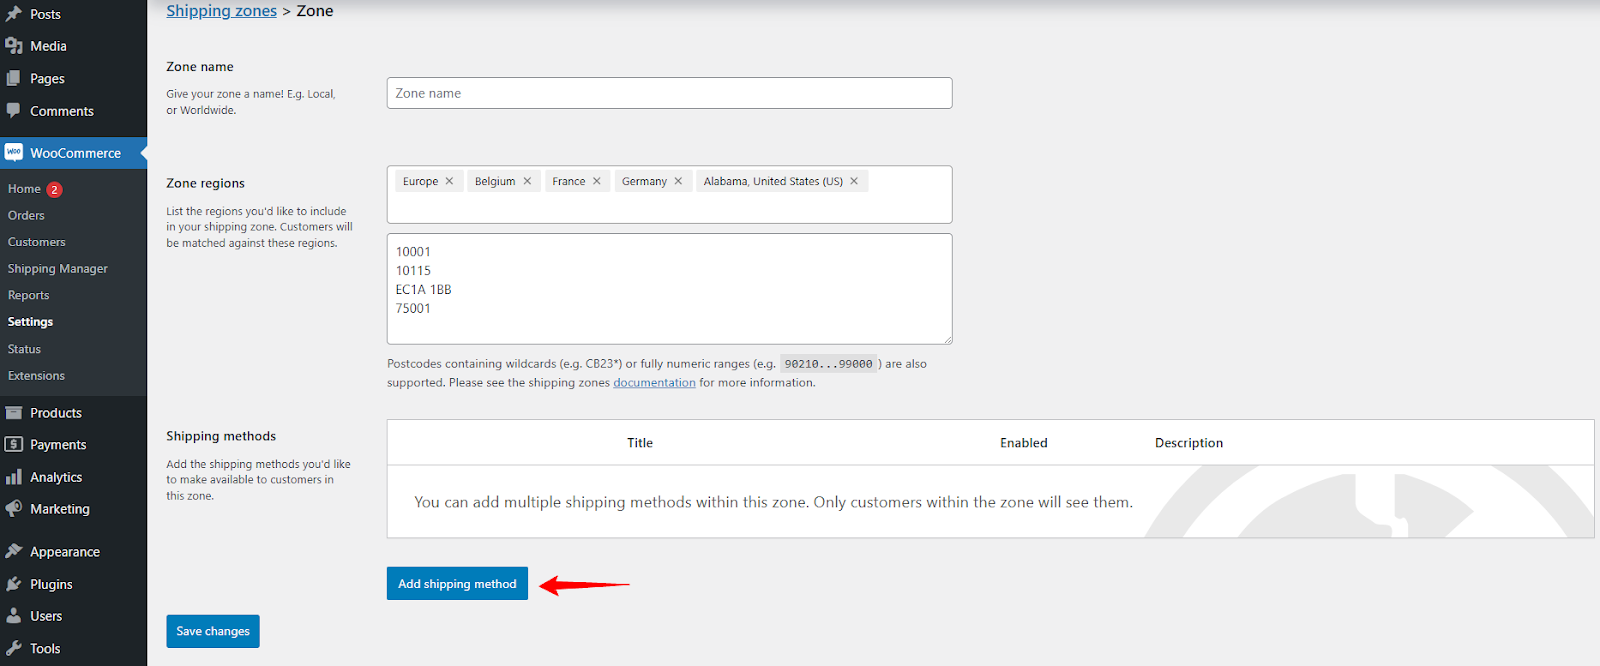
A new window will appear showing the available shipping methods in WooCommerce.
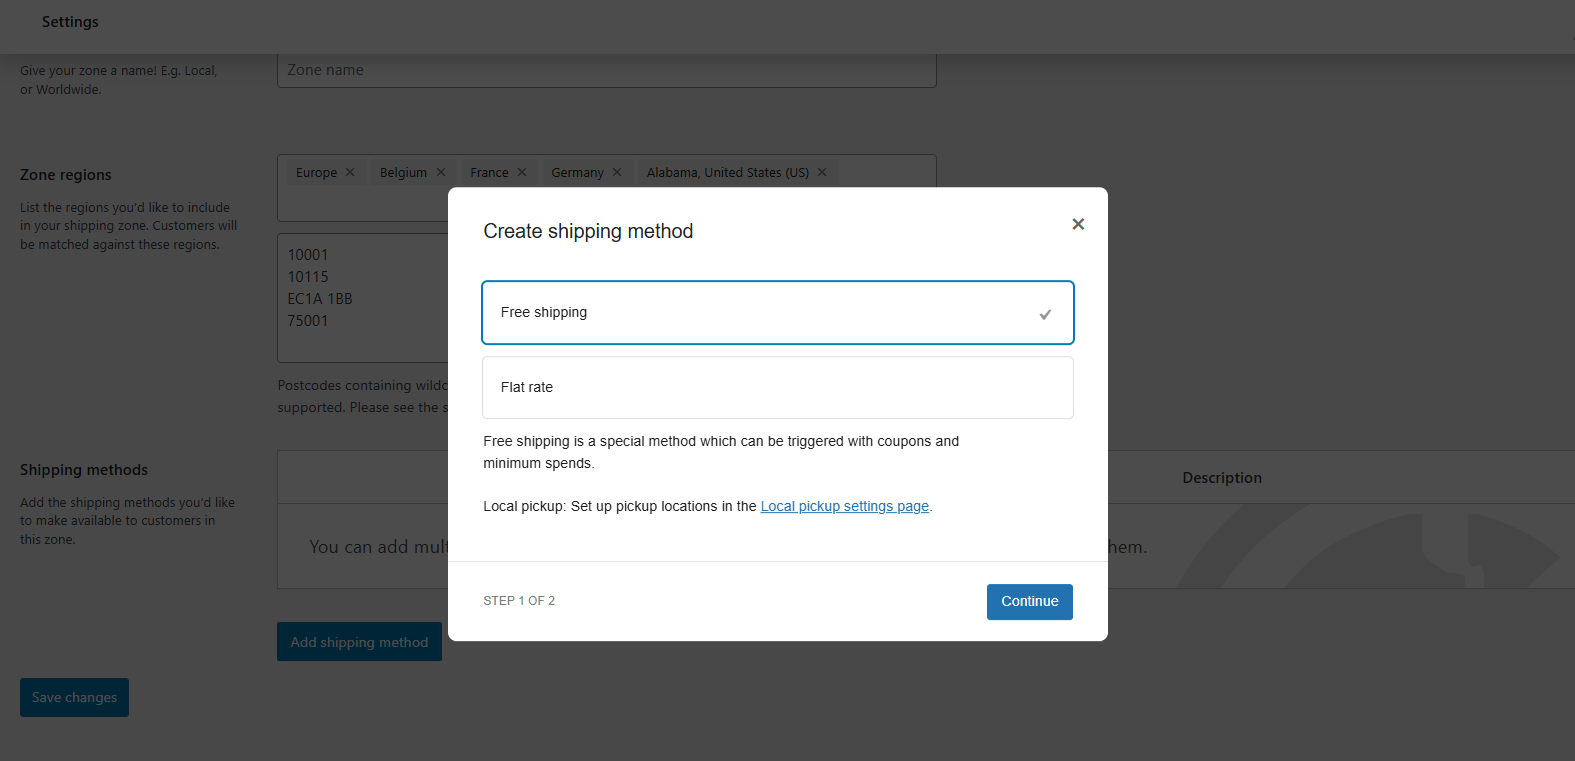
Since we will begin with the Free Shipping option, select the Free Shipping Option and click continue.
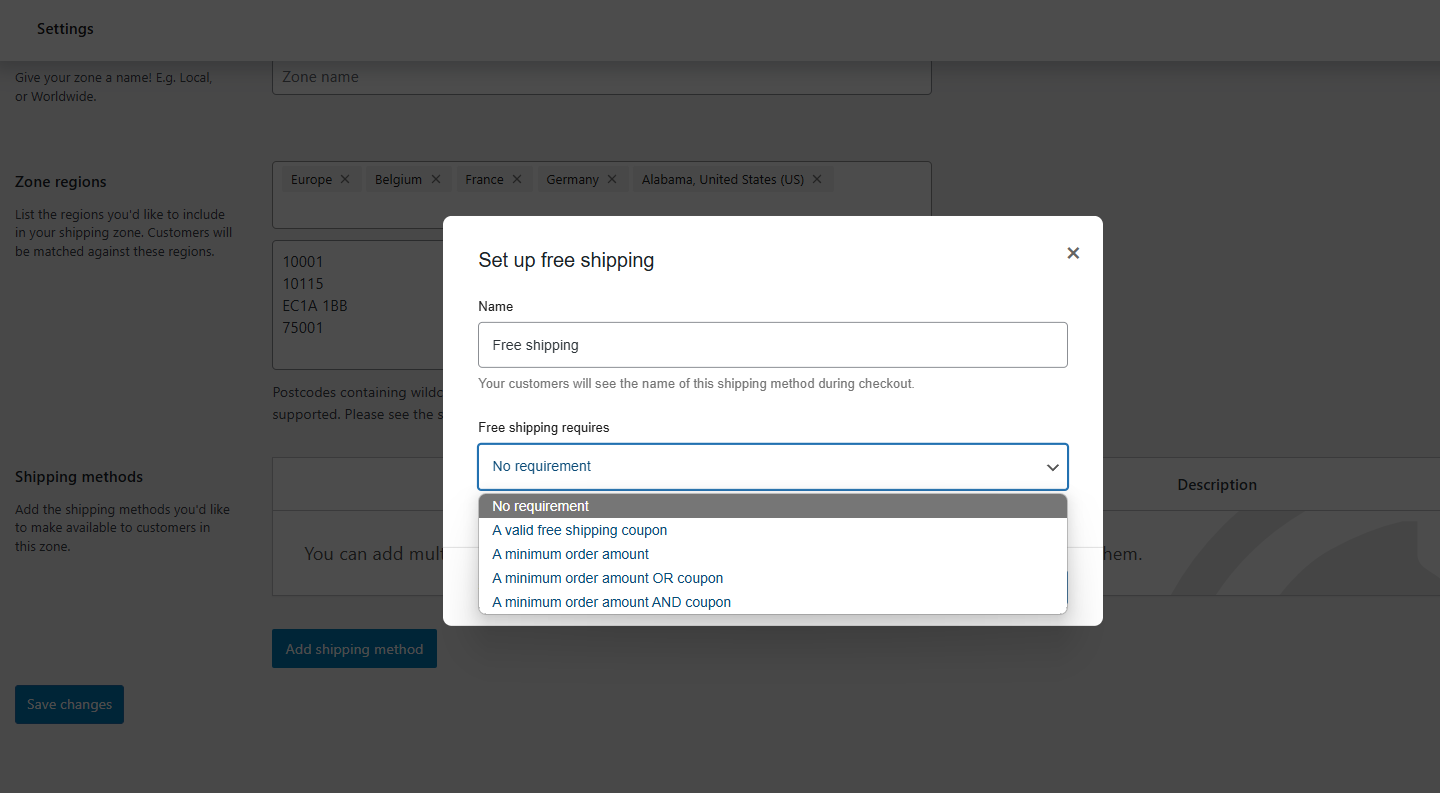
In the next window, choose one of these conditions for free shipping:
-
No requirement: Free shipping applies automatically; no conditions are needed.
-
Free shipping coupon: Customers must use a specific coupon code at checkout.
-
Minimum order amount: Free shipping is available when customers spend a set amount, like $100.
-
Coupon OR minimum order: Customers can qualify by either using a coupon or meeting the minimum amount.
-
Coupon AND minimum order: Both conditions must be met—customers need a coupon and must spend a certain amount.
For example, if you choose “Minimum order OR coupon,” set free shipping at $100. Customers need to spend $100 or more to get free shipping.
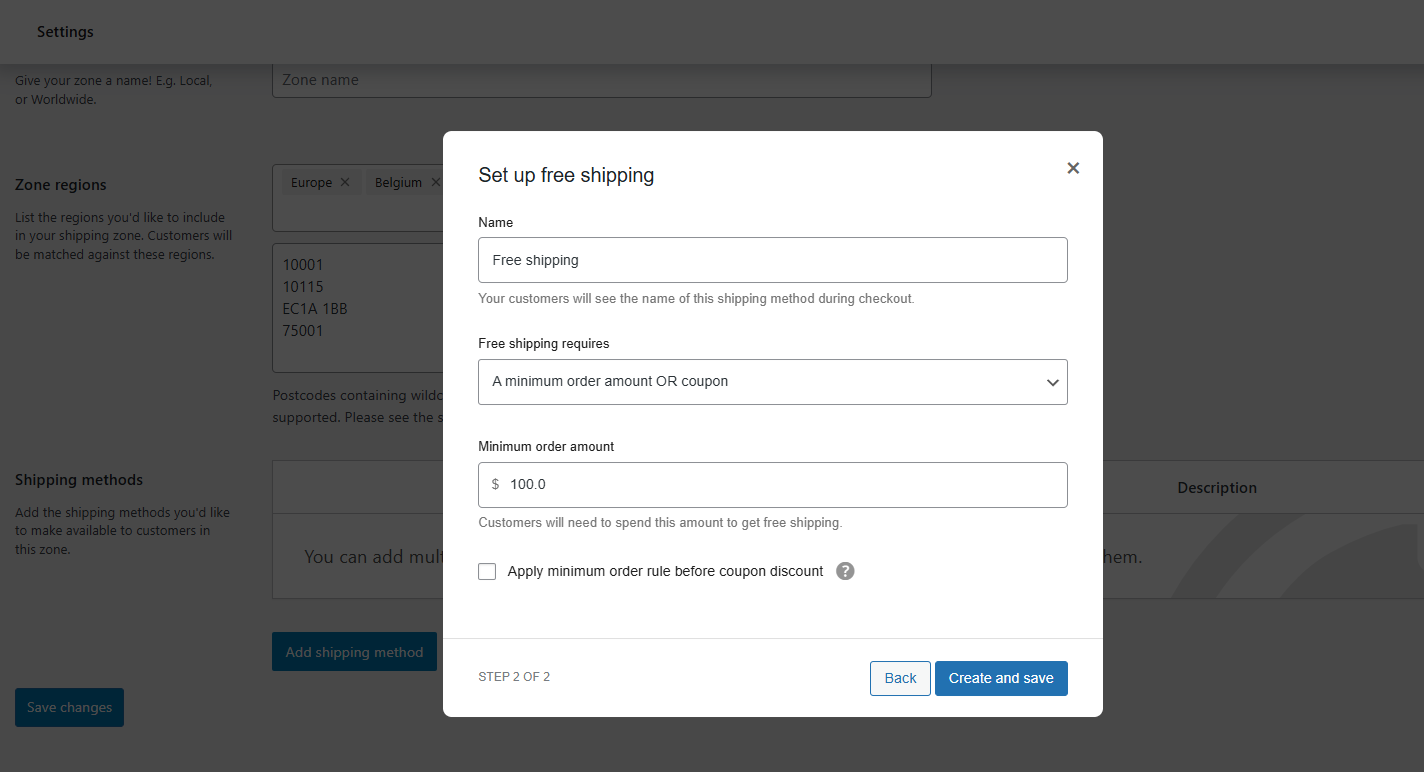
You can also check the box for “Apply minimum order rule before coupon discount.” This ensures that even if a coupon lowers the total below $100, free shipping still applies if the original order meets the minimum.
Once done, click Create and Save.
Flat Rate WooCommerce Shipping Method
Click the Add Shipping Zone button, and choose Flat Rate.

Here’s what you can configure:
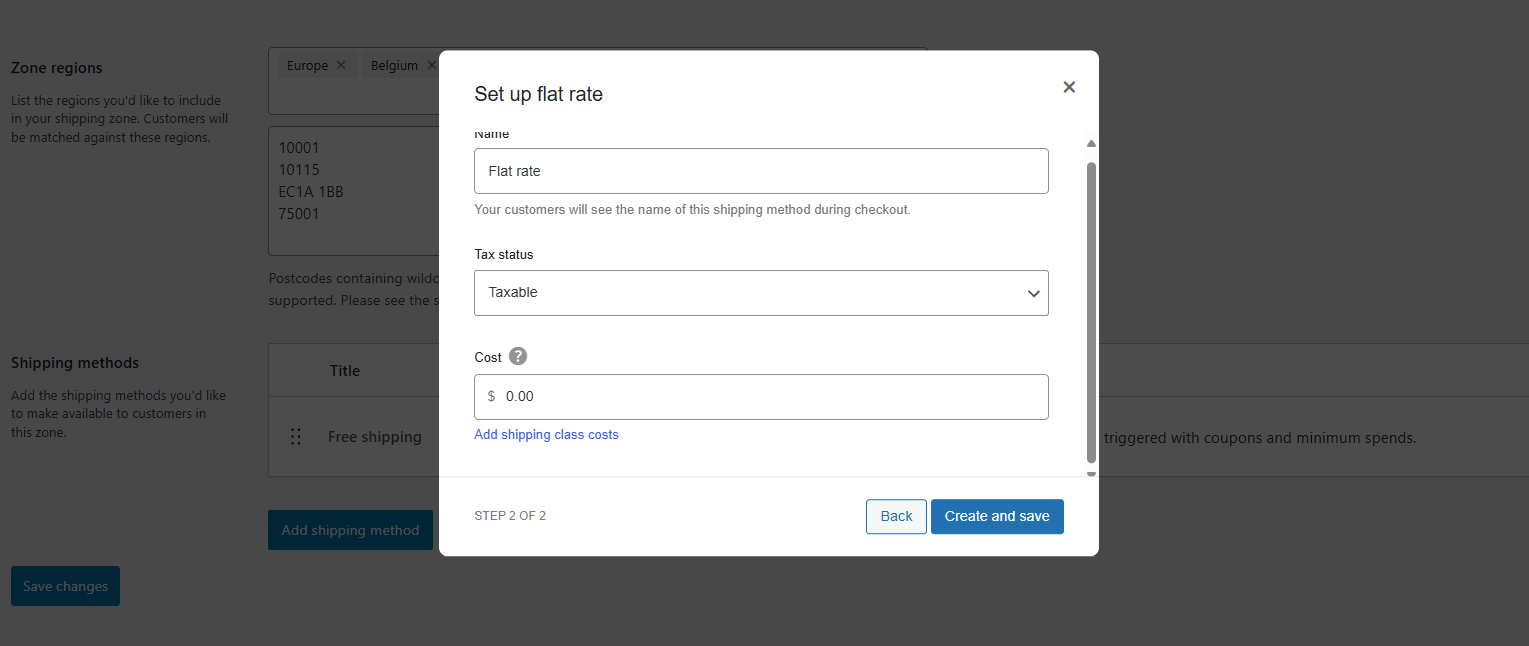
-
Name: This is what customers will see at checkout, like “Standard Shipping.”
-
Tax Status: Choose if the shipping cost is taxable or not.
-
Cost: Set the flat shipping fee, e.g., $10 per order.
You can also add extra costs for specific product types using shipping classes. For example, if “Heavy Items” have a $2 extra charge, two heavy items will add $4 to the shipping total.
Additional Flat Rate Options:
You can create flexible pricing rules using placeholders:
-
[qty]: Represents the number of items in the cart.
-
[fee percent="value"]: Adds a shipping fee based on a percentage of the total order.
-
min_fee="value": Sets a minimum shipping fee.
-
max_fee="value": Sets a maximum shipping fee.
This allows you to customize your flat rate shipping to fit different order sizes and values.
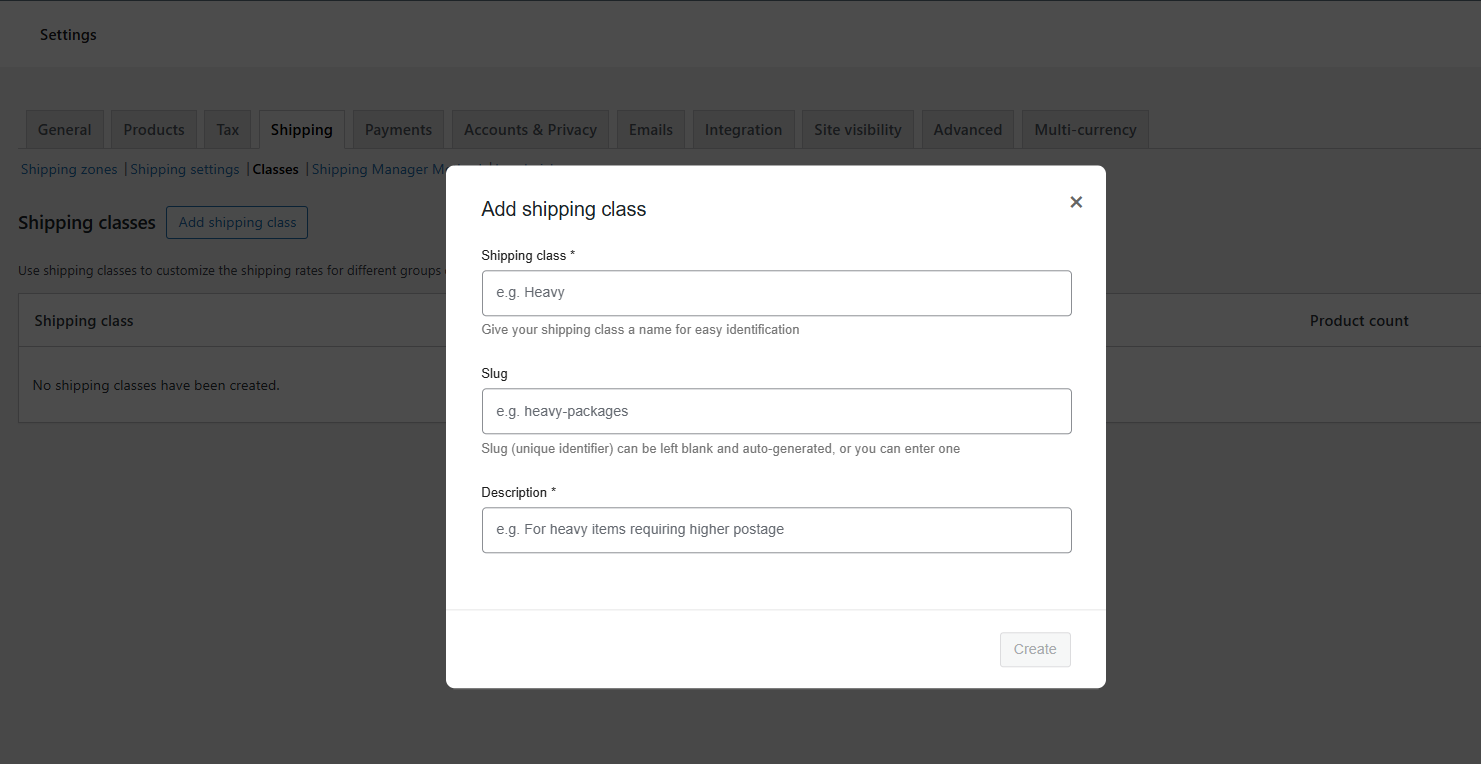
Setting Up Shipping Classes
If your products vary significantly in size, weight, or shipping requirements, shipping classes can help you assign different rates to specific groups of products. You can define classes for light, medium, and heavy items, making it easier to charge accurate shipping fees. Here’s how:
Go to WooCommerce > Settings > Shipping > Shipping Classes.
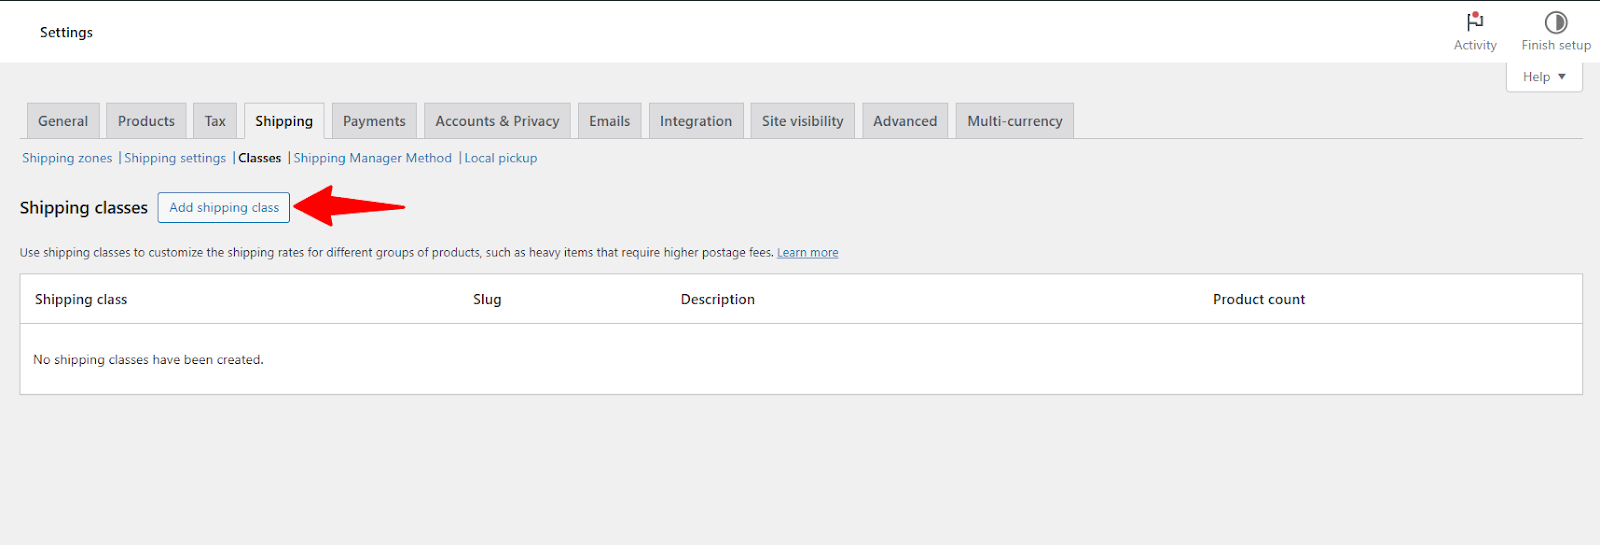
Click “Add Shipping Class” to create new classes and assign them to specific products through the product editing page.
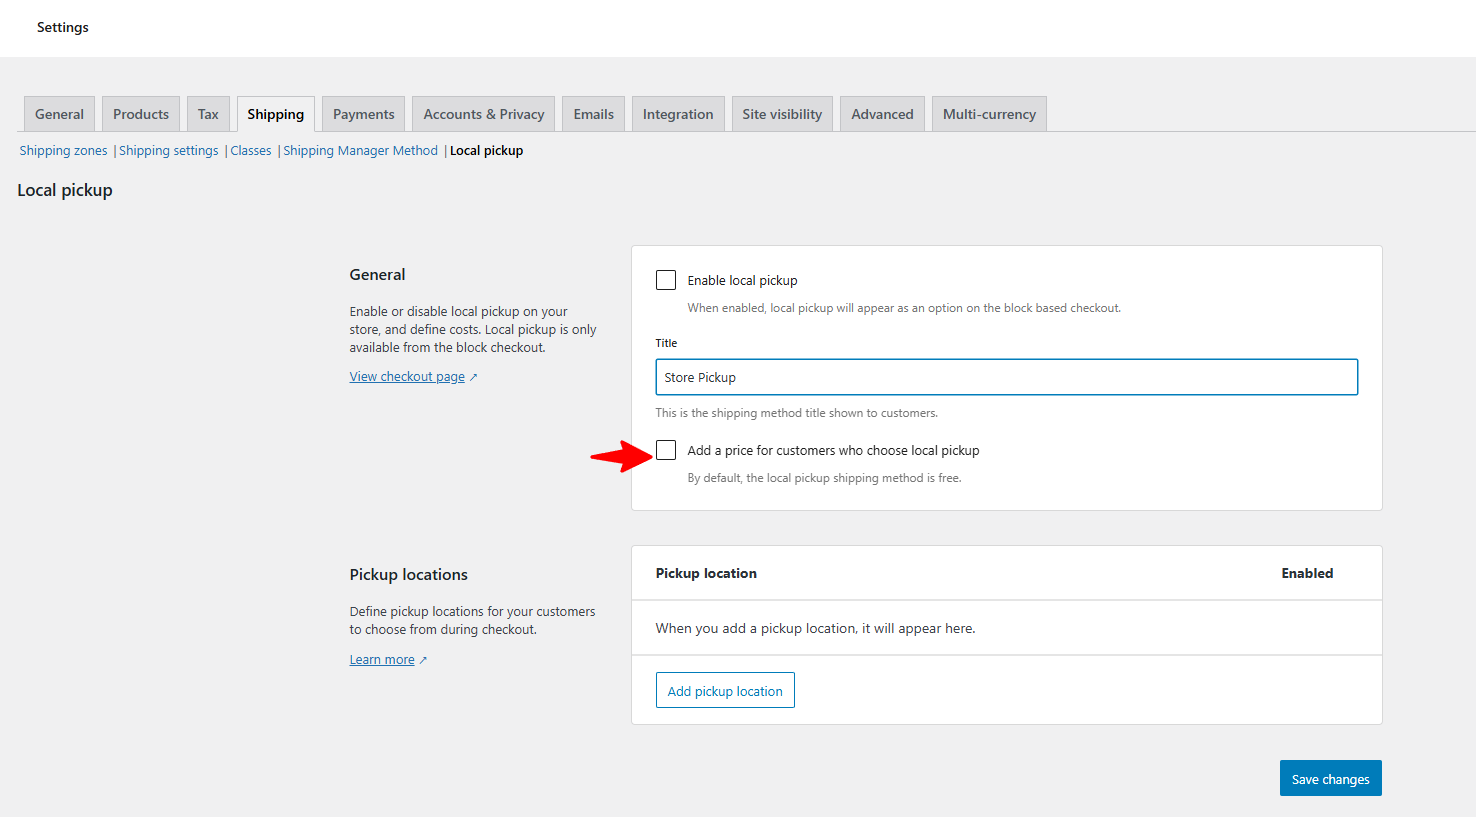
Setting Up Local Pickup
With Local Pickup, you can let customers collect their orders from your store or warehouse. Previously grouped with Flat Rate and Free Shipping, it now has its own dedicated settings tab.
The local pickup was previously set under the regular shipping methods. Currently, it is available in a separate tab in WoooCommerce shipping options.
To enable it:
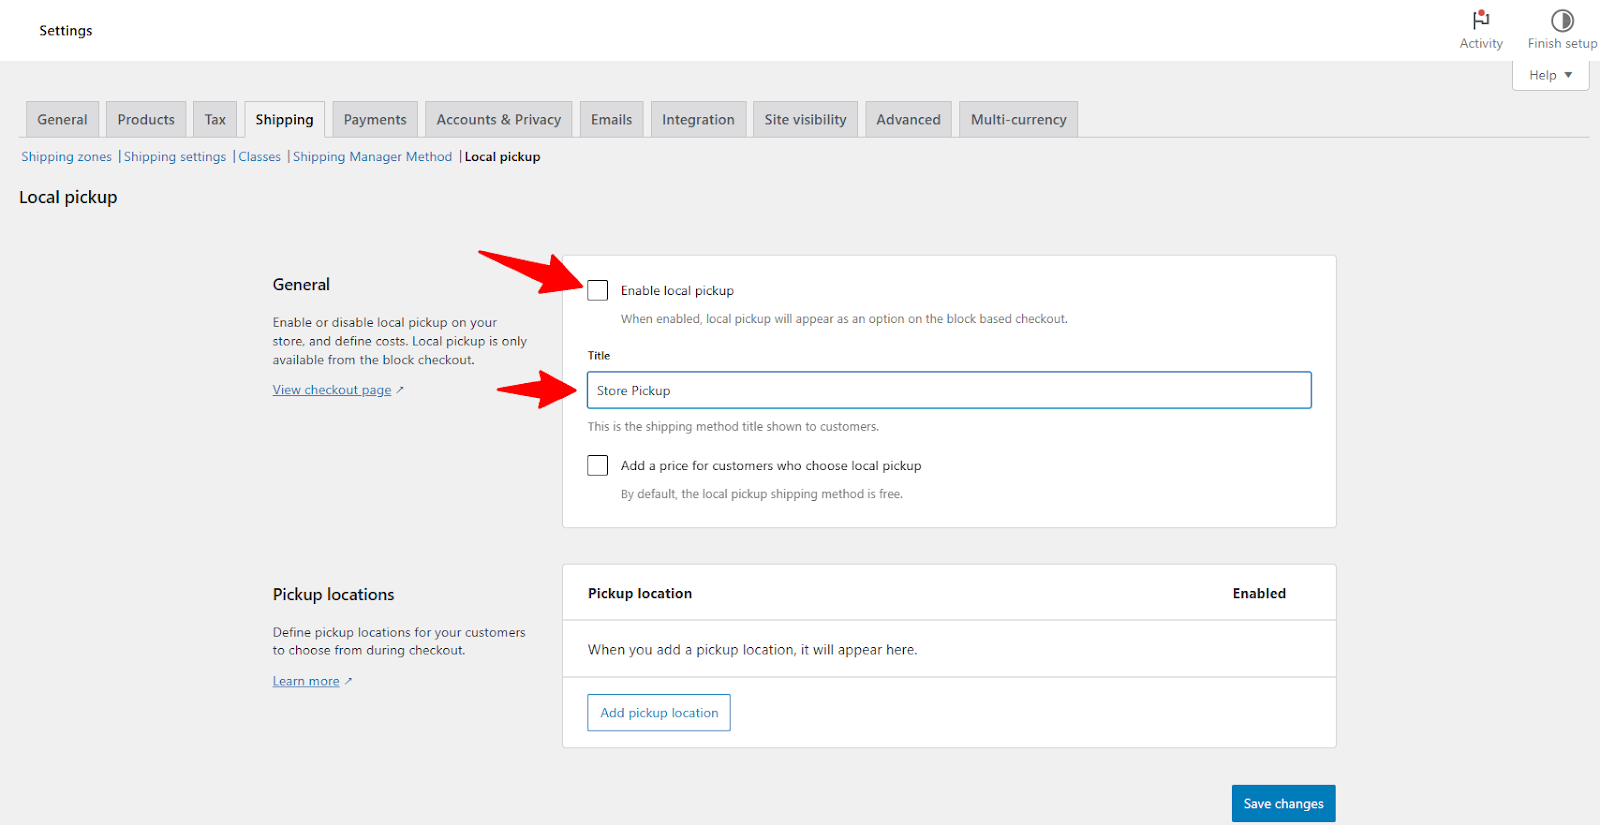
-
Check the box to activate the method.
-
Set the name that customers will see at checkout (e.g., "Store Pickup").
By default, Local Pickup is free, but you can add a cost if needed.
In the Pickup Locations section, enter the details of your store or warehouse where customers will collect their orders.
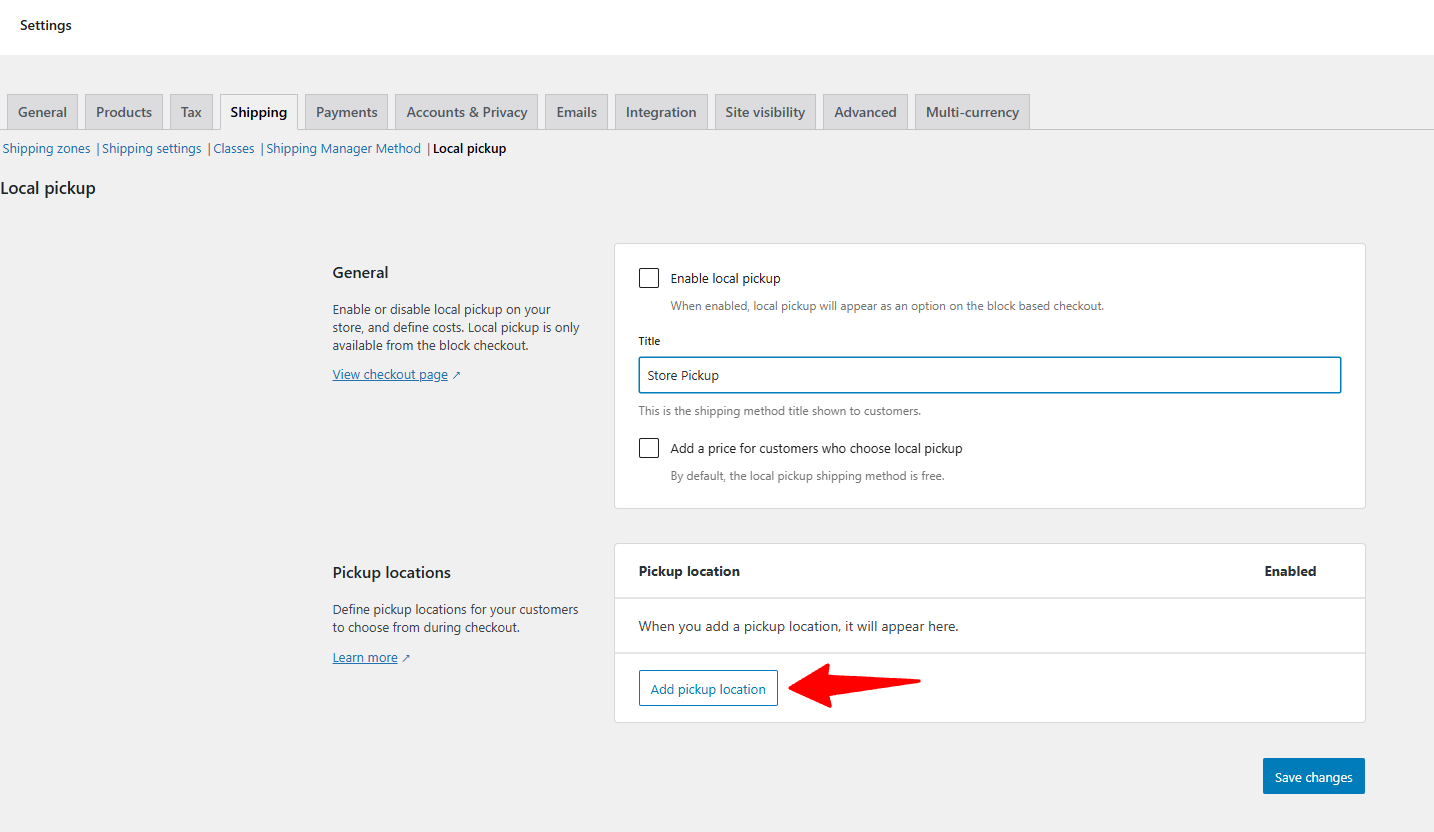
Click the Add pickup location, which will open a new window where you can enter the pickup location details.
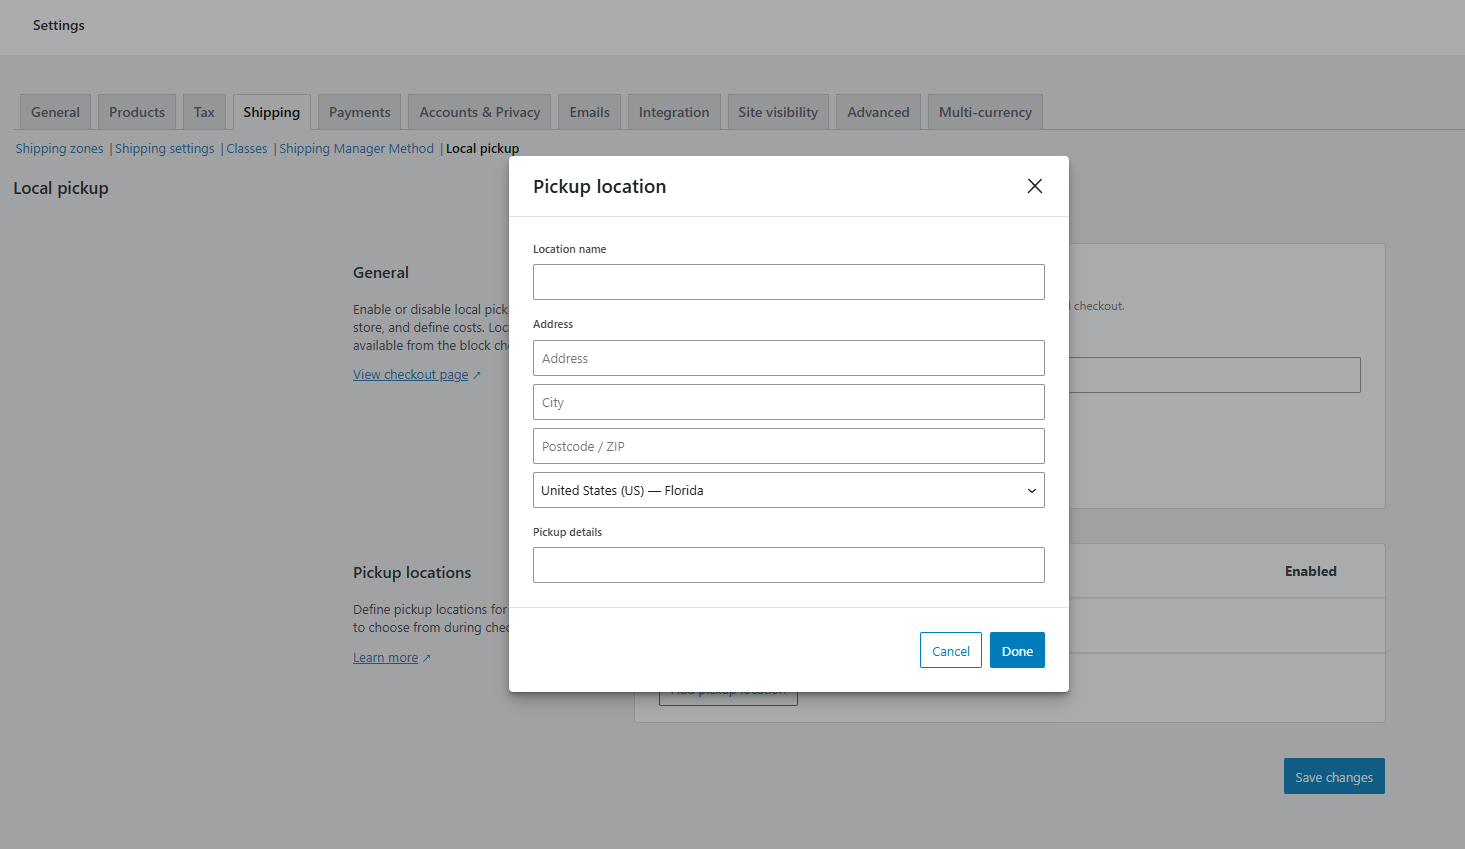
However, If you have multiple locations, you can add them here.
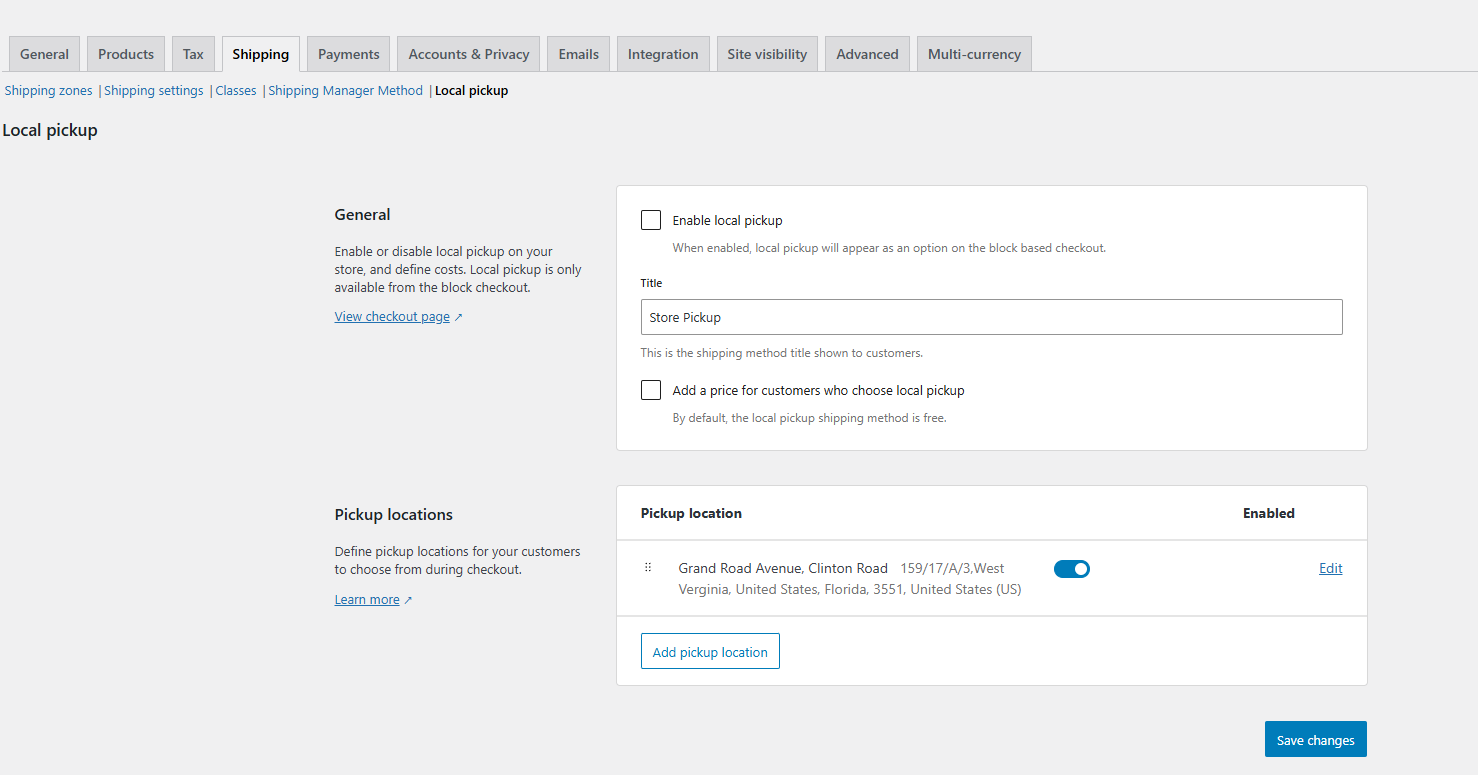
Don’t forget to save your changes for the settings to apply.
WooCommerce Shipping Using Plugin
WoCommerce shipping features offer all the basic shipping options that you need for your online store. However, they are not enough since you will need more shipping options as your store evolves over time. This is where the Shipping Manager plugin comes in with its vast array of features.
Shipping Manager is an all-in-one solution designed to simplify your shipping processes, boost customer satisfaction, and, ultimately, drive more sales. With both free and premium features, it caters to businesses of all sizes and shipping requirements, offering full control and flexibility over shipping logistics.
Note: Download the free version to extend your default WooCommerce shipping options.
Key Features of Shipping Manager Plugin
We will now explain the primary features that Shiping Manager offers over WooCommerce shipping options. You will get the following options in the free version of the Shipping Manager plugin:
-
Shipping Fees
-
Free Shipping
-
Per Product Shipping
-
Product Page Shipping
Let’s explore what each option has to offer when it comes to extending the default WooCommerce Shipping options.
Shipping Fees
Go to WooCommerce > Shipping Manager and click the Shipping Fees option.
The Shipping Fees tab in the Shipping Manager plugin offers the following fee options:
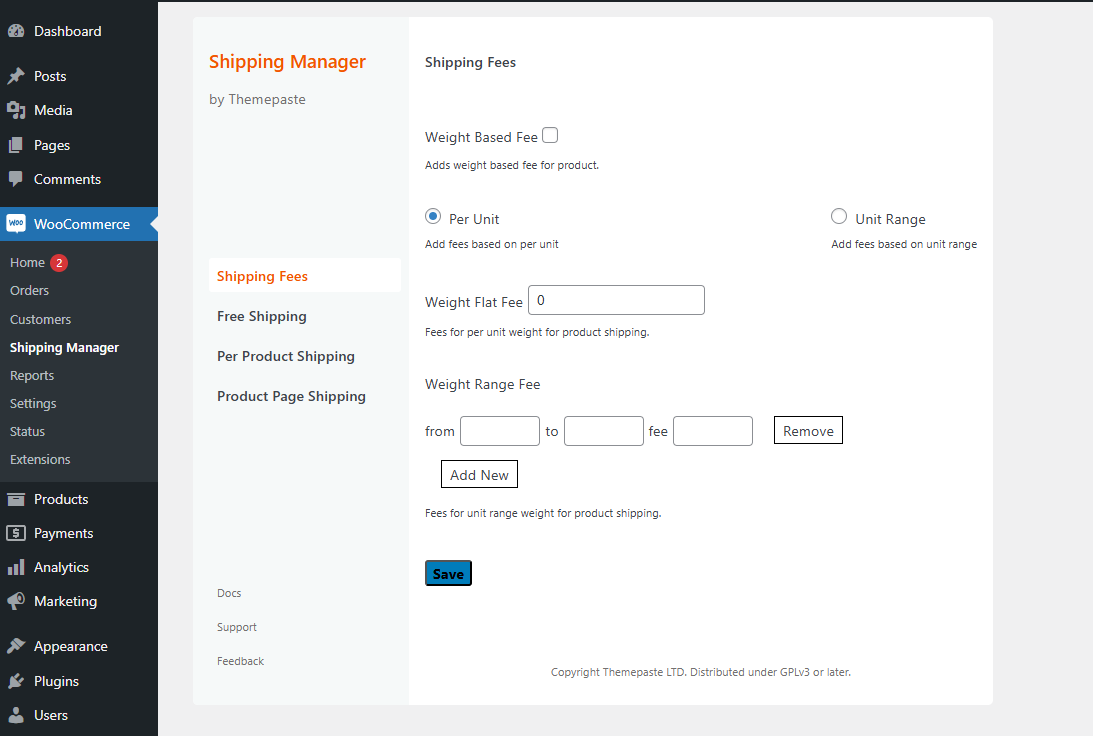
-
Weight-Based Fee: A shipping fee is added based on the product's total weight.
-
Per Unit: Fees are charged for each unit of the product.
-
Unit Range: Allows you to set fees for a specific range of units purchased (e.g., 1-5 units have a set fee).
-
Weight Flat Fee: Charges a flat fee per unit of weight for shipping.
-
Weight Range Fee: Let you set shipping fees based on weight ranges (e.g., 0-10 kg has a certain fee, 10-20 kg has a different fee). You can add or remove ranges as needed.
Free Shipping Features
Go to WooCommerce > Shipping Manager and click the Free Shipping options.
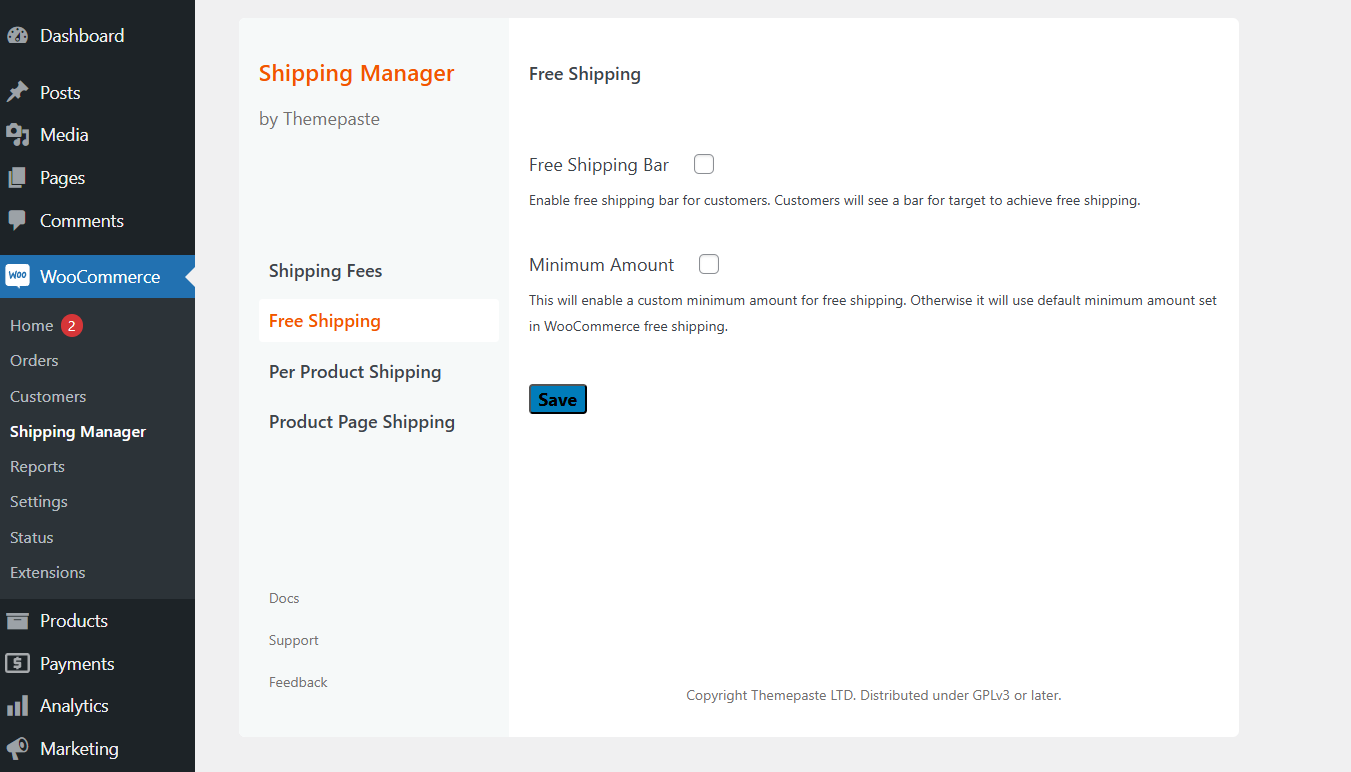
-
Free Shipping Bar: This option allows you to enable a free shipping bar for customers. It displays a progress bar showing how much more they need to spend to qualify for free shipping.
-
Minimum Amount: Here, you can set a custom minimum purchase amount required to qualify for free shipping. It will use the default minimum amount set in the WooCommerce free shipping settings if not specified.
Per Product Shipping
Go to Per Product Shipping and explore the following options:
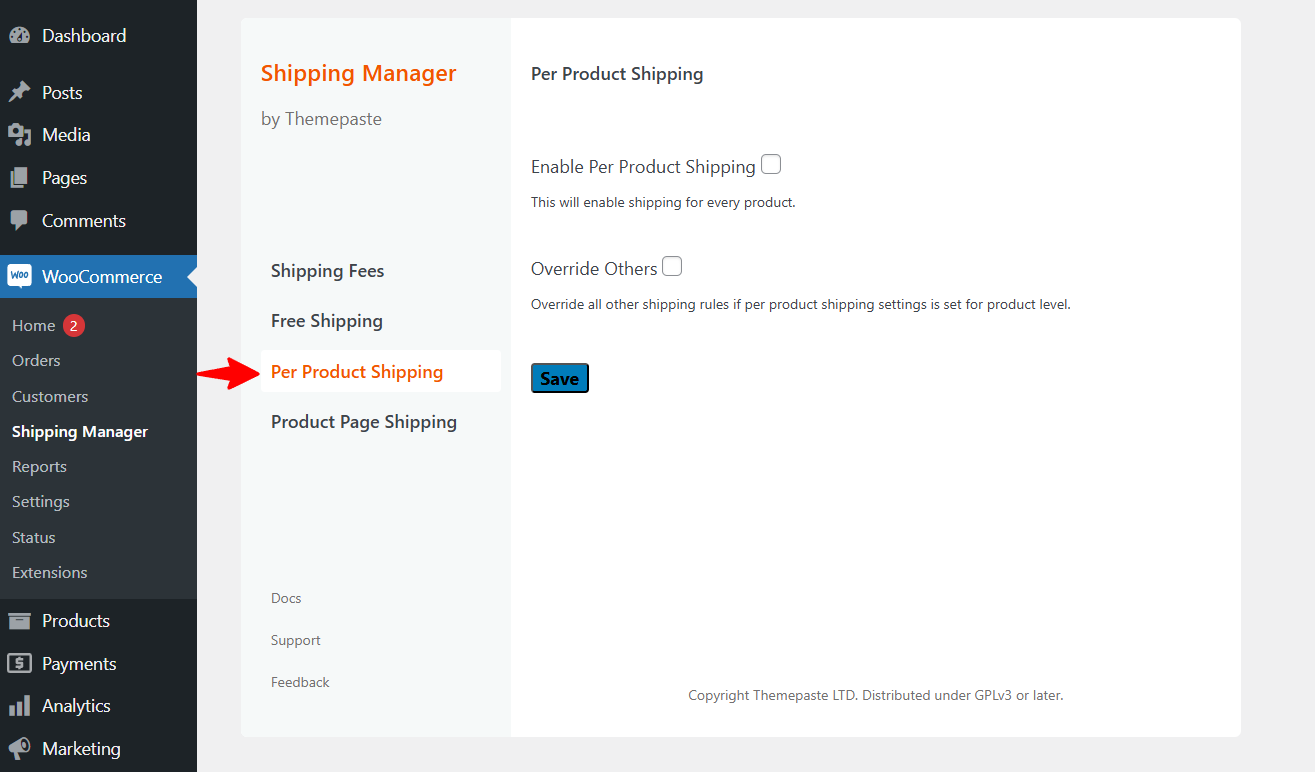
-
Enable Per Product Shipping: This feature allows you to set shipping costs for each individual product. Each item can have its own specific shipping fee.
-
Override Others: If enabled, this option allows the per-product shipping settings to take precedence over all other shipping rules. This means that the shipping fee specified at the product level will override any global or zone-based shipping settings.
Product Page Shipping
The next stop is Product Page Shipping, where you configure the following settings.
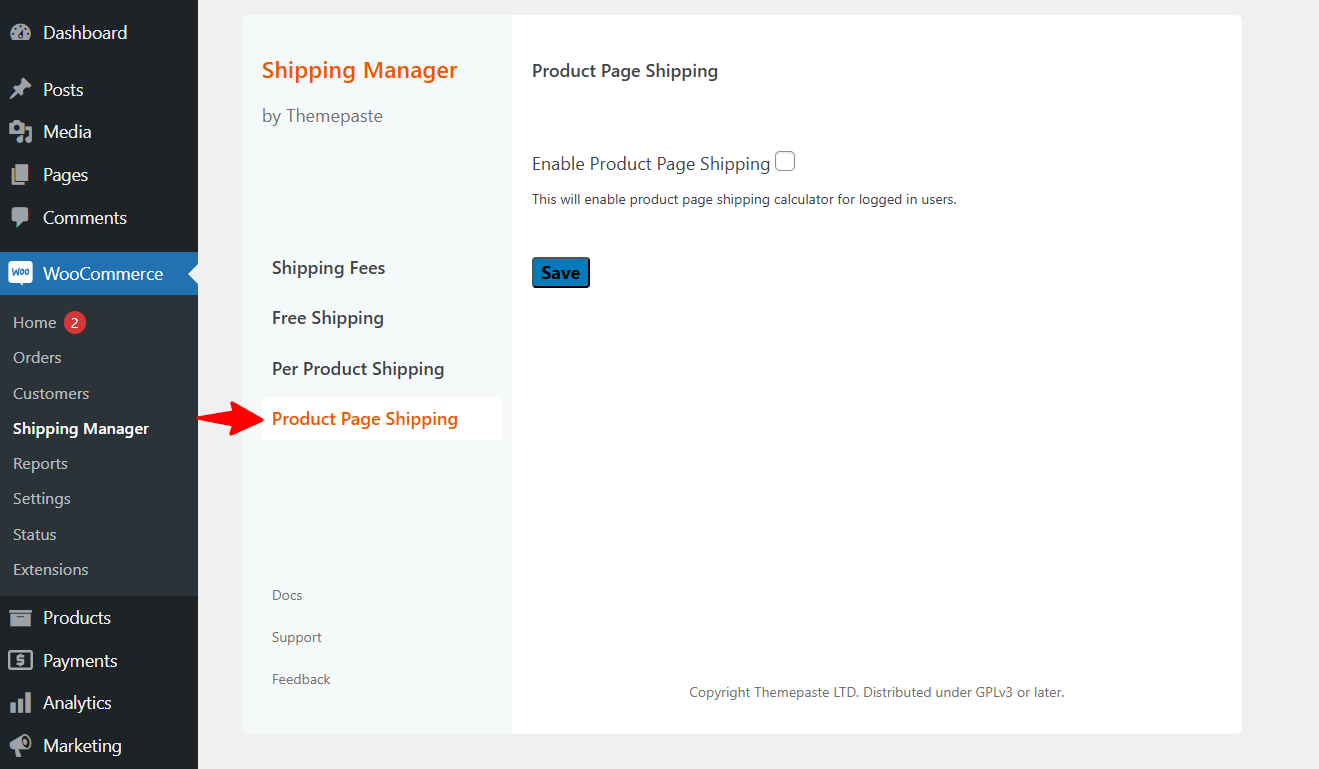
Enable Product Page Shipping: This feature activates a shipping calculator on the product pages for logged-in users. It allows them to see shipping costs based on their location before adding items to their cart, improving the shopping experience by providing transparency on shipping fees.
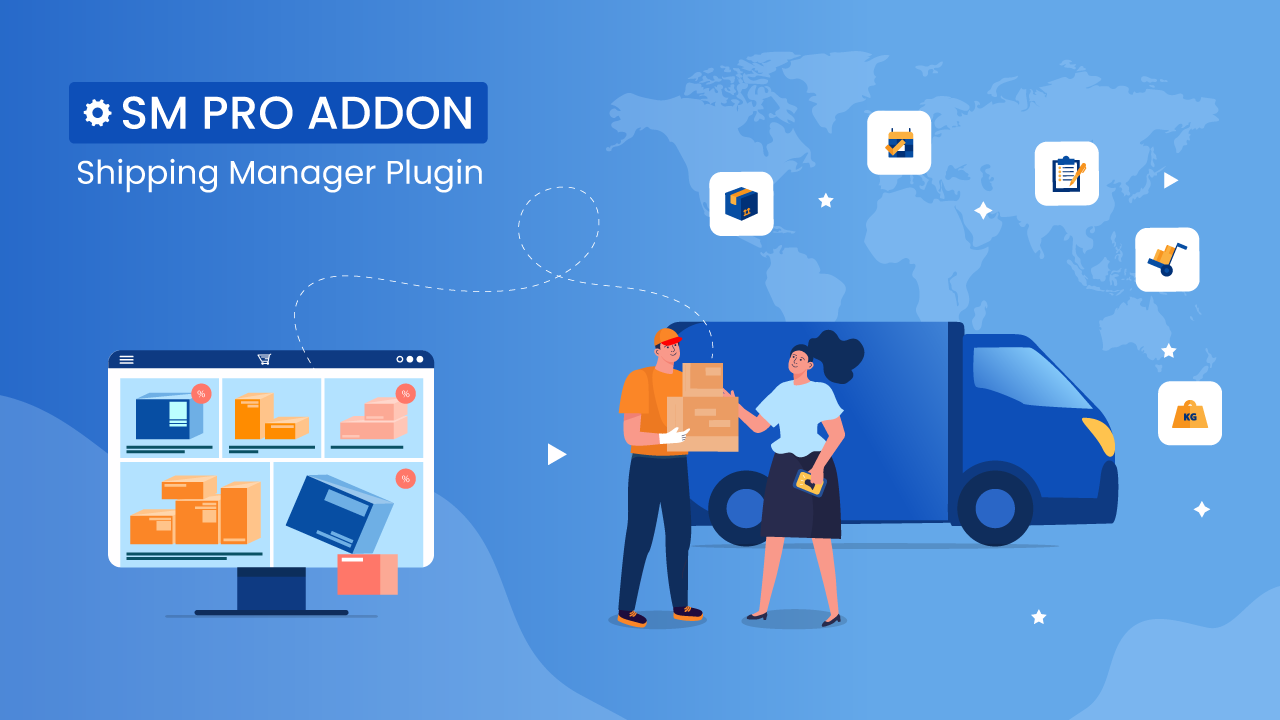
Shipping Manager Plugin Premium Features
The premium Shipping Manager or SM Pro takes your shipping automation to the next level with advanced features. These features support larger or more complex WooCommerce shipping operations for your eCommerce store:
-
Advanced Processing Fees: Apply customized handling fees to ensure all order-related costs are covered.
-
Create Multiple Rulesets: Manage different shipping scenarios for various products or regions effortlessly.
-
Dynamic Shipping Zone Selection: Choose multiple shipping zones, tailoring shipping methods for different geographic locations.
-
Coupon Integration for Minimum Amount Calculation: Ensure accurate shipping fees when coupons are applied.
-
Delivery Date & Time Selection: Allow customers to select their preferred delivery date, enhancing customer experience.
-
Real-Time Shipping Tracking: Provide customers with shipment tracking updates in real-time, improving transparency and trust.
Benefits Shipping Manager For WooCommerce Shipping
By installing Shipping Manager into your WooCommerce store, you will get the following advantages:
Flexible Shipping Fee Management: Configure fees based on weight, distance, or product categories to ensure precise shipping costs.
Customizable Processing Fees: Add processing fees per order to cover all handling costs while maintaining transparency.
Multiple Ruleset Creation: Easily create multiple rules for different shipping scenarios, offering flexibility for any situation.
Real-Time Shipping Tracking: Keep customers informed with real-time tracking for improved trust and satisfaction.
Free Shipping Options: Boost sales with features like the free shipping bar, encouraging customers to add more items to their cart.
Enhanced Customer Experience: Features like delivery date selection and real-time tracking lead to higher customer satisfaction and repeat business.
Conclusion
Automating your shipping processes in WooCommerce doesn't have to be overwhelming. Following our steps will make it easier for every user to set up WooCommerce shipping.
On the other hand, leveraging the power of the Shipping Manager gives you more control over shipping management. You can simplify your logistics, reduce manual errors, and provide a better shopping experience for your customers.
From setting up shipping zones and methods to automating calculations and offering real-time tracking, every aspect of your shipping can be optimized to save you time and money.
Install the Shipping Manager plugin today and watch your logistics transform into a seamless, automated system. Ultimately, enhanced customer satisfaction will drive your business where you want it to be.
- WooCommerce Shipping Classes Explained
- WooCommerce shipping method
- Common WordPress error
- Website GDPR compliance tips
- Fixing WooCommerce Shipping Issues
- Implementing WooCommerce Subscription
- Best free WordPress 2FA Plugin
- WordPress Site Maintenance Approaches
- WordPress plugin installation
- AI SEO tools vs traditional tactics


