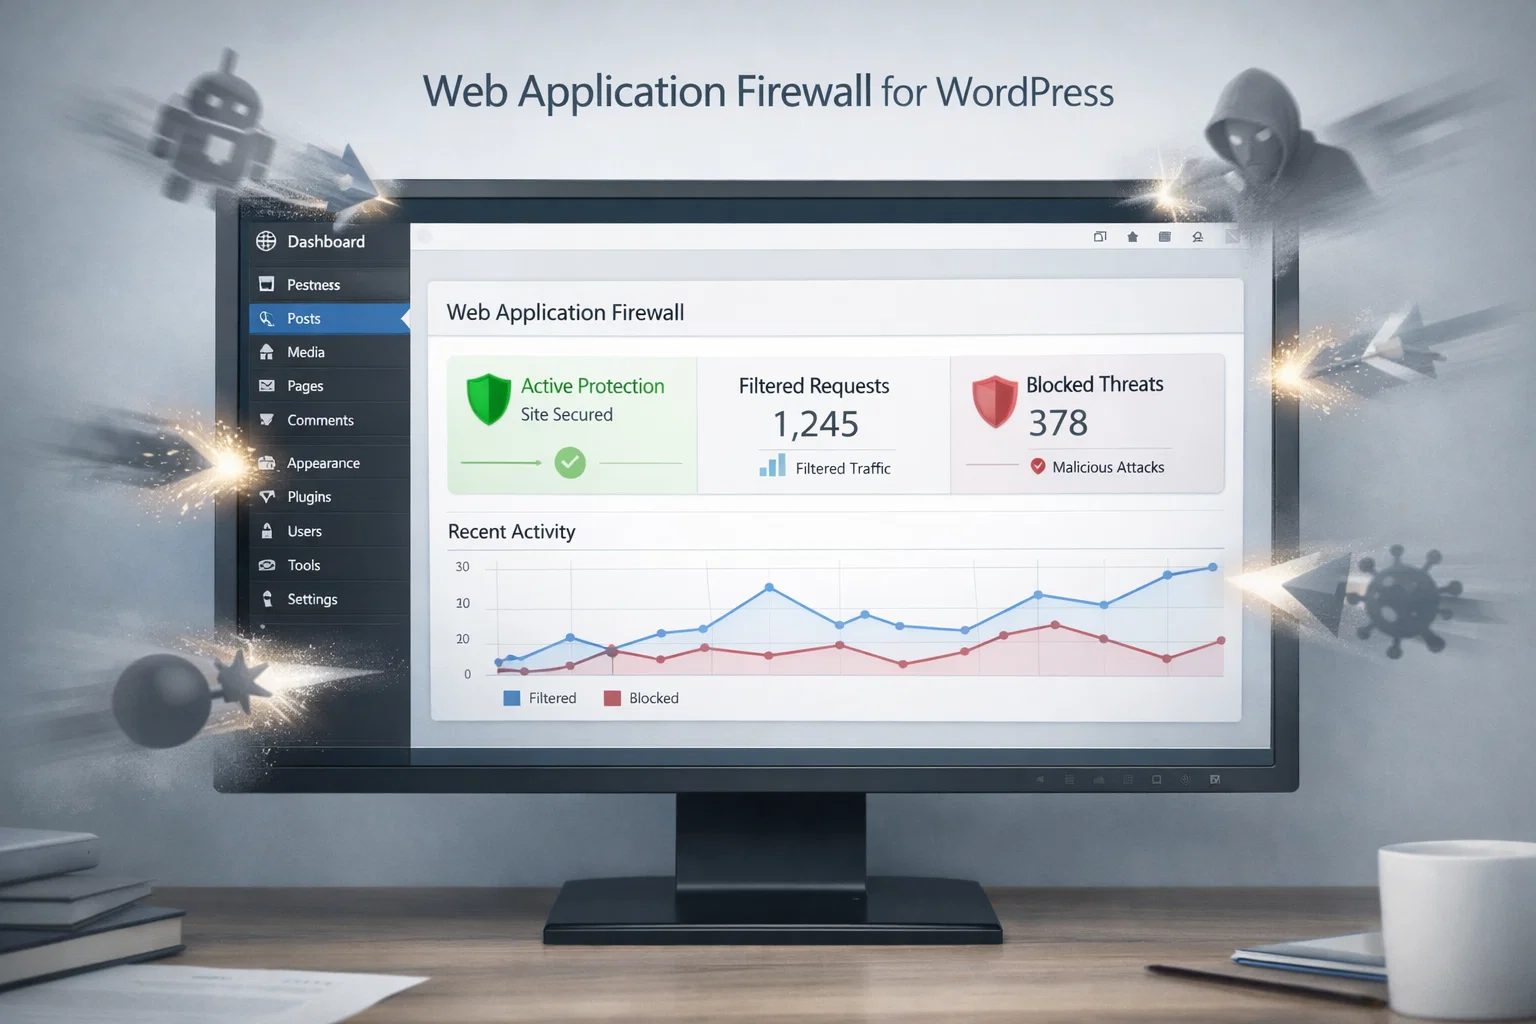
Hackers are constantly probing for weak spots in websites through automated bots. You are a target, whether you run a small blog or a business site. Especially WordPress sites are prime targets, as they power 43% of sites on the web. Thus, a web application firewall for WordPress sites becomes an essential security option.
Most site owners believe that a strong password and updating the site are sufficient. WAF works as a digital bouncer for your site. It screens every visitor and blocks malicious activity before it harms your server. In this guide, we dive deep into why you need a web application firewall as the first line of defense for your WordPress site.
A web application firewall for WordPress (WAF) is a security tool designed to monitor, filter, and block HTTP traffic as it travels to your web application. Think of it as a sophisticated filter sitting between the open internet and your website’s database.
A web application firewall for WordPress won’t work like a standard network firewall that blocks ports. WAF is “application-aware which understands the specific language of WordPress.
This security mechanism recognizes a legitimate login from a hacker attempting to inject malicious code into your comment section. Besides, it identifies and blocks sophisticated attacks by inspecting the “Payload” of every request. This is where traditional antivirus software might miss the catch.
If you think your small blog or local business site is “too small to hack,” the data suggests otherwise. Hackers rarely target individuals; they use “botnets” to scan the entire internet for vulnerabilities. This is where a web application firewall for WordPress becomes essential.
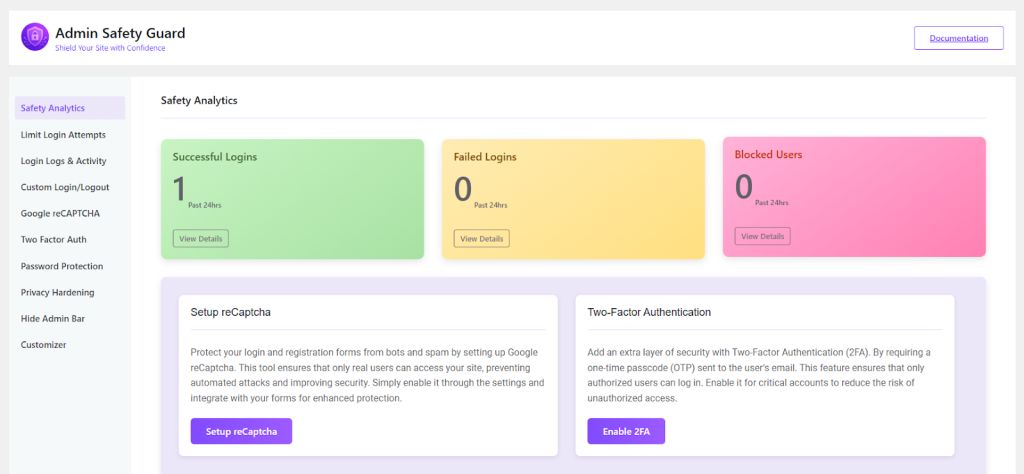
These numbers highlight a sobering reality: manual security cannot keep up with the speed of automated attacks. You need a proactive system like Admin Safety Guard, Malcare that works 24/7.
Sources for these stats: Patchstack, Buddyboss, AutomataLabs.
A web application firewall for WordPress is specifically developed to defend against the top three web vulnerabilities.
SQL injection is one of the most dangerous threats. A hacker inserts malicious SQL code into a form field. The field can be a search bar or a contact form. This is used to “trick” your database into revealing sensitive information.
For example, admin passwords or customer credit card data. Web application firewall for WordPress identifies these patterns and neutralizes the code before it reaches your database.
A hacker injects a malicious script into your website through an XSS attack. The script executes in the user’s browser whenever an innocent visitor loads your page.
Next, the script steals the user’s login cookies or redirects them to a phishing site. The web application firewall for WordPress filters out these scripts at the entry point.
Bots can attempt to guess your password thousands of times per minute. The web application firewall for WordPress can detect this “high-velocity” behavior. Then it blocks the IP address entirely, even before the bot gets to its tenth attempt.
When looking for a web application firewall for WordPress, you’ll generally find two flavors. Choosing the right one depends on your technical comfort level and your site’s traffic.
| Feature | Cloud-Based WAF (DNS-Level) | Endpoint WAF (Plugin-Level) |
| Location | Sits at the network edge (e.g., Cloudflare) | Lives on your WordPress server |
| Performance | Reduces server load by blocking traffic early | Uses your server’s CPU/RAM to scan |
| Setup | Requires DNS changes | Easy “Install Plugin” setup |
| Best For | High-traffic sites and DDoS protection | Small to medium sites and deep site-scanning |
The Case for Cloud-Based Firewalls
Cloud firewalls (like Sucuri or Cloudflare) are often preferred because they stop the “garbage” traffic before it even reaches your hosting environment. This keeps your site fast and prevents your server from crashing whenever a bot attack takes place.
The Case for Endpoint Firewalls
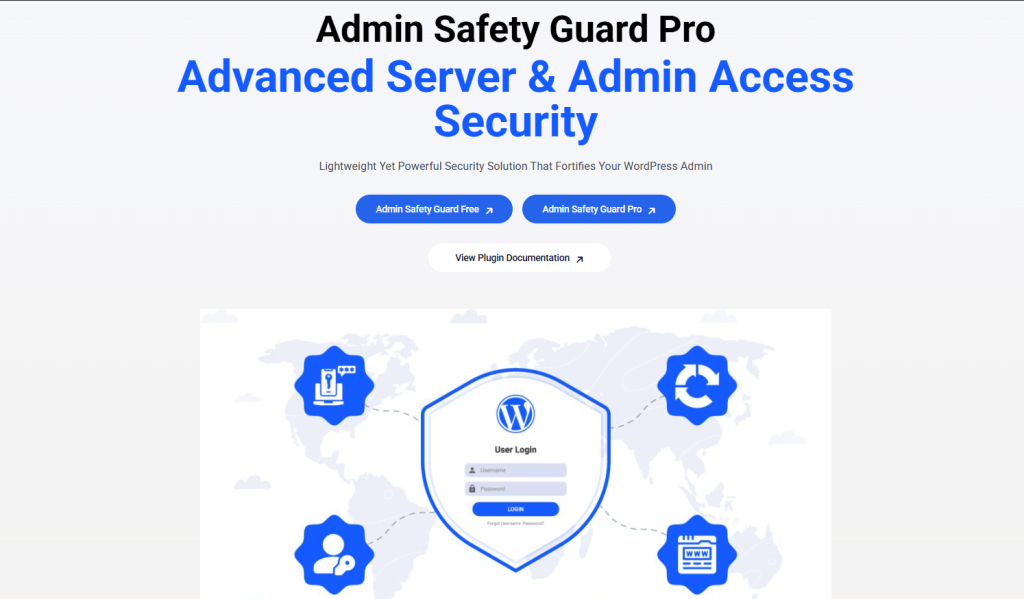
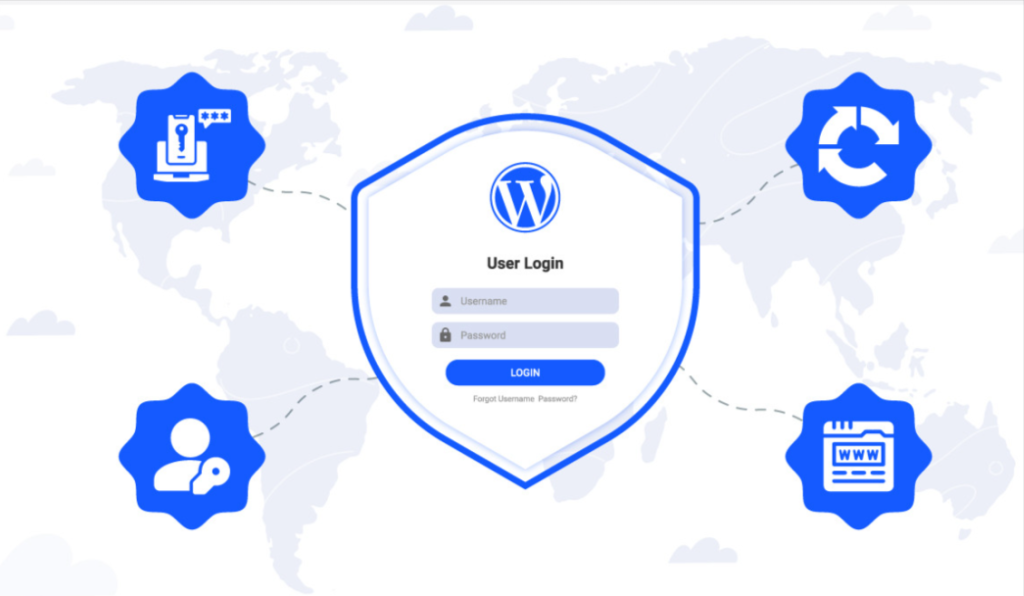
Plugins like Admin Safety Guard Pro or MalCare provide an “Endpoint” web application firewall for WordPress. These are excellent because they have “context.” They know exactly which user is logged in and what their permissions are, allowing for much more granular security rules.

One of the biggest headaches for WordPress users is the constant stream of plugin updates. Sometimes, a vulnerability is discovered, but a patch isn’t released for days. Or worse, you’re on vacation and can’t update your site immediately.
Virtual Patching is a feature found in high-quality web application firewalls for WordPress. Let’s say a new vulnerability is discovered in a popular plugin like WooCommerce or Elementor. The Web application firewall for WordPress provides a way to write a rule to block any attempt to exploit that specific flaw.
This is how WAF protects your site instantly, even if you haven’t updated the actual plugin yet. It buys you time and provides peace of mind.
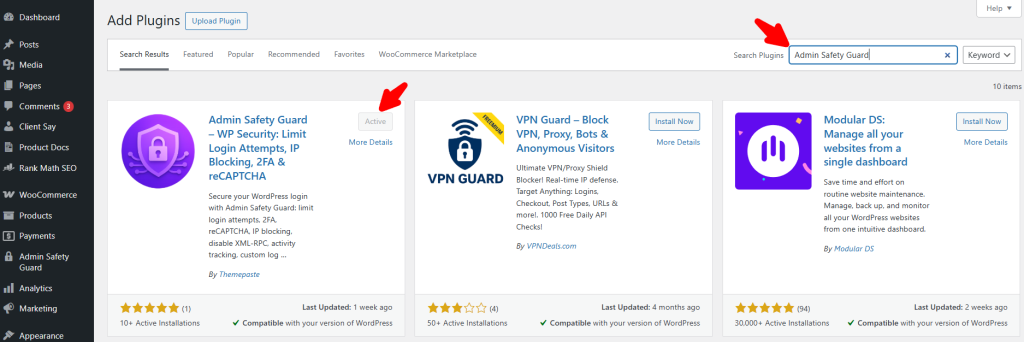
Setting up a web application firewall for WordPress may sound complex. However, it’s an easy task when you have the best WordPress malware scanner installed.
While most of the security plugins are cluttered with complex features, the latest solutions like Admin Safety Guard Pro prioritize a “set it and forget it” approach that begins protecting you the moment it’s activated.
Note: Learn about the best WordPress malware scanner to get the features that fit your site’s requirements.
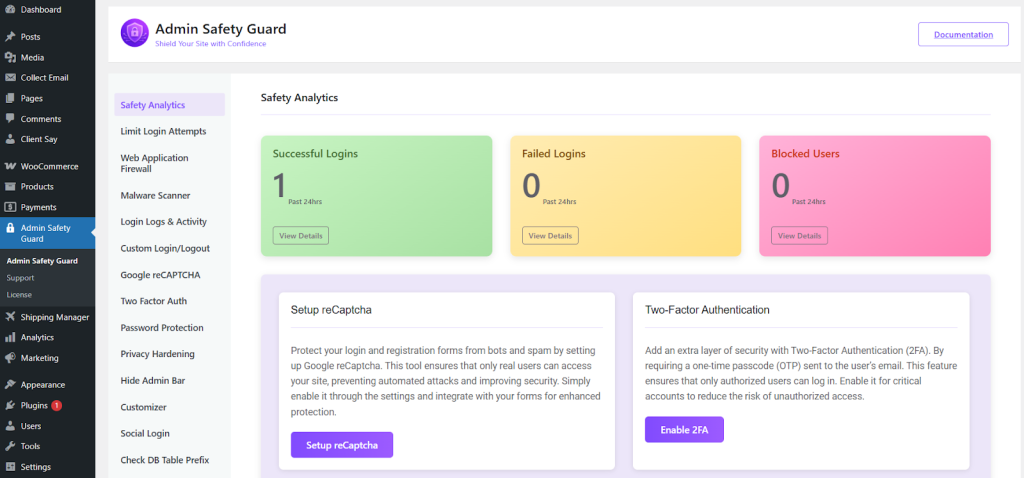
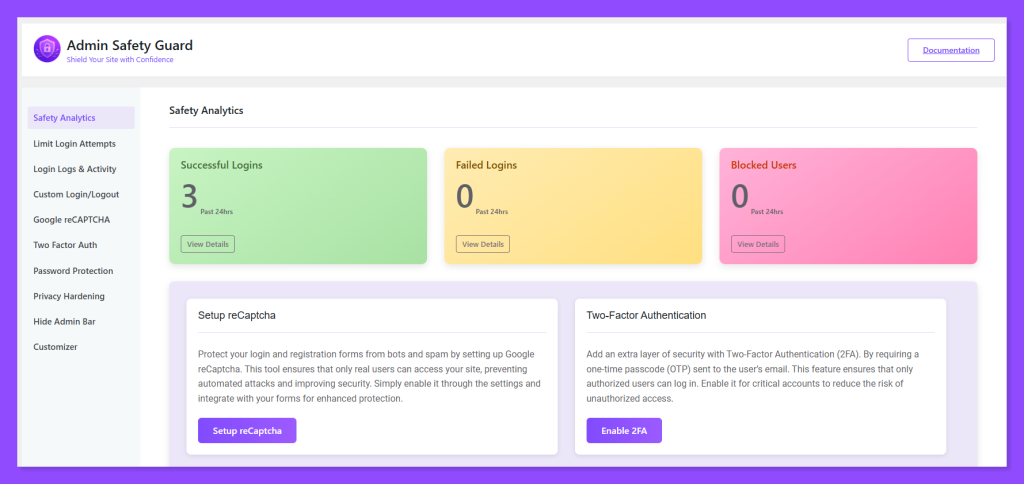
The Pro version of Admin Safety Guard offers the WAF, and the Malware Scanner works together to provide a proactive shield. Here is how to manage your defense system effectively:
Once you have the Pro version of your security plugin installed, the first step is to wake up the guardian.
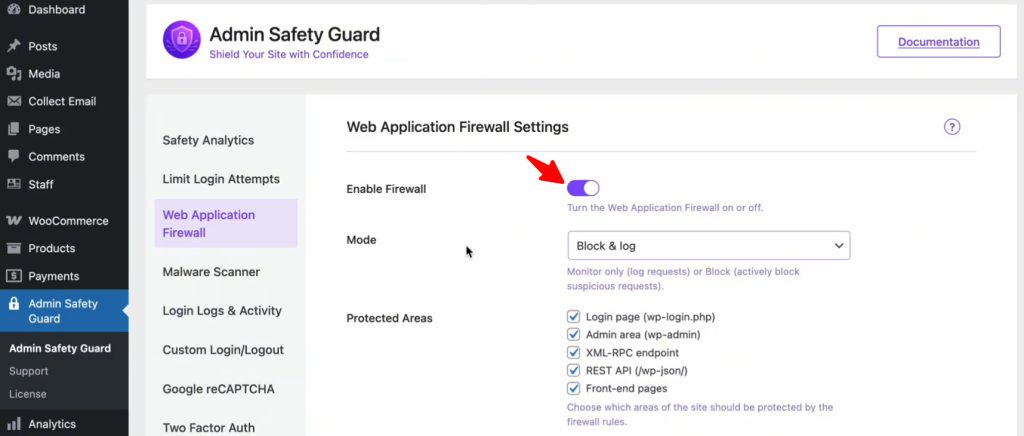
This instantly activates a protective layer that filters every incoming request, checking for common attack signatures like SQL Injections and XSS payloads.
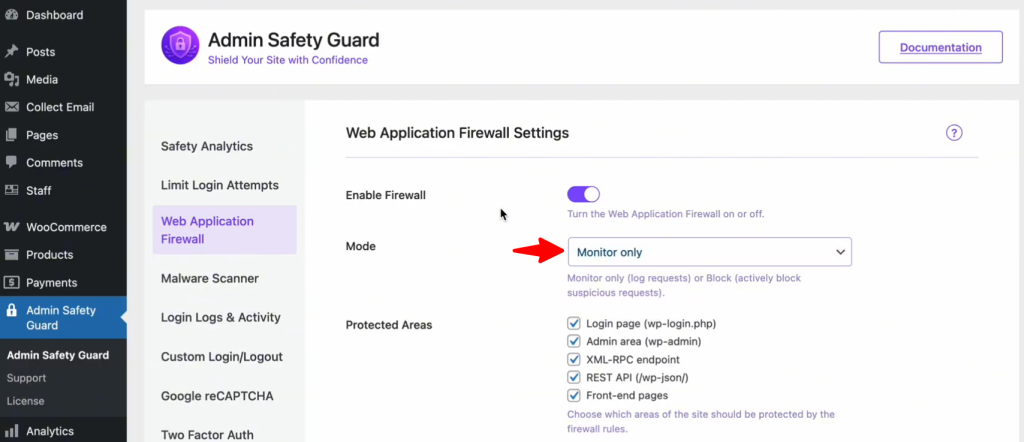
Step 2: Choose Your Defensive Mode
Depending on your comfort level, you can decide how the WAF reacts when it spots trouble:

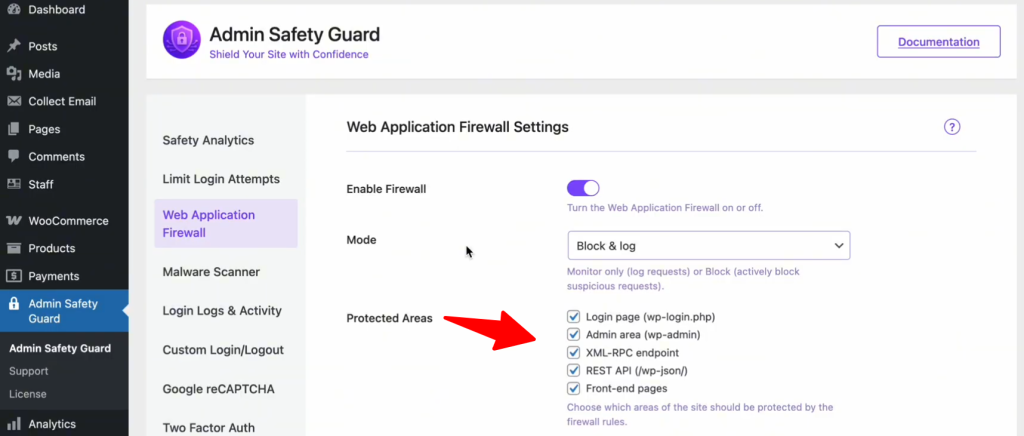
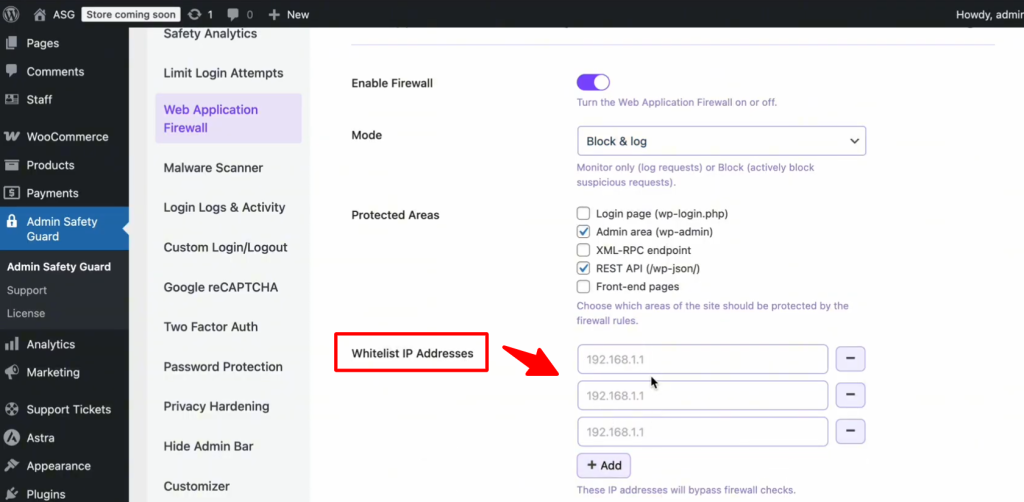
Not all pages on your site are equal. Hackers focus on specific “doors” to gain entry. In your WAF settings, ensure you have enabled protection for these critical areas:
One of the most common fears is being “locked out” of your own website. To prevent this, always use the Whitelist IP Address feature. By adding your home or office IP address to this list, you tell the firewall: “This is the owner; never block this person.” This ensures that even if you accidentally trigger a security rule while making heavy edits, your access remains uninterrupted.
For those who want granular control, look into these specialized settings:
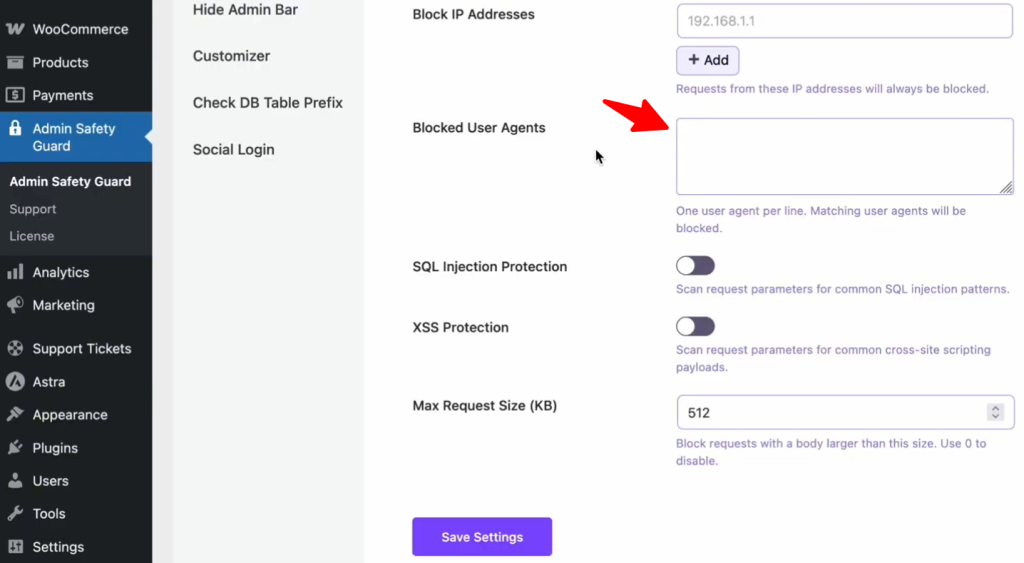
SQL Injection is a devastating attack where malicious actors insert SQL code into your input fields to “query” your database without permission. If successful, they could download your entire user list or even delete your site’s content.
The SQL Injection Protection section in Admin Safety Guard blocks common patterns used in these attacks. By detecting and neutralizing these malicious queries, the web application firewall for WordPress ensures that your database remains protected from unauthorized access and data breaches.
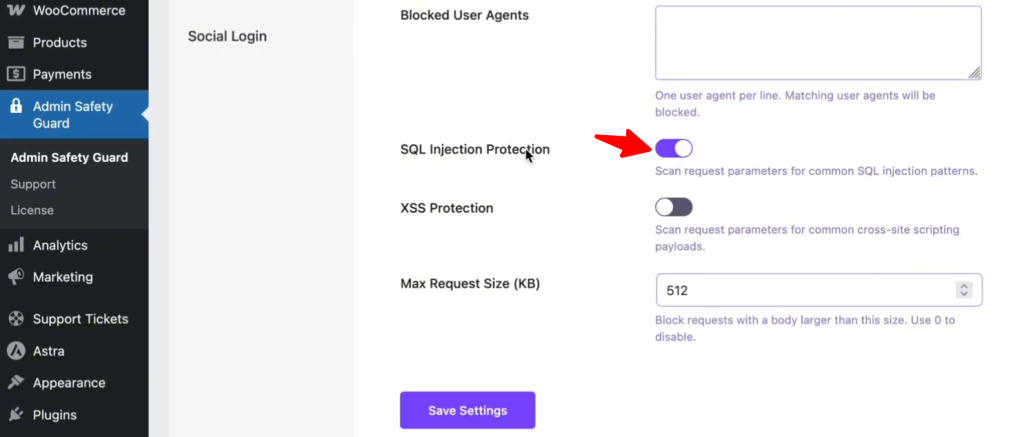
How to Enable SQL Injection Protection:
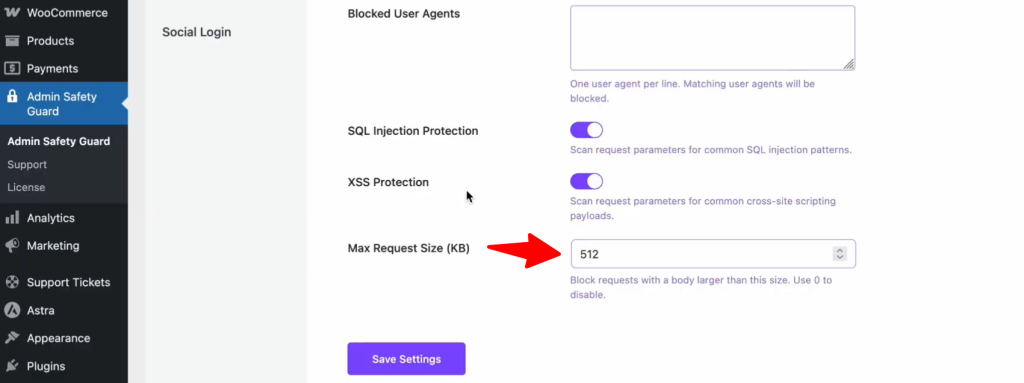
Cross-Site Scripting (XSS) is a front-end attack. In this scenario, a hacker injects a script into your site so that when other users visit the page, the script runs in their browser. This is often used to steal session cookies or redirect your customers to malicious websites.
Enabling the XSS Protection option ensures that these scripts are effectively blocked. The firewall scans all request parameters for common XSS payloads, preventing malicious code from being injected and executed. As a result, your website remains secure from potential vulnerabilities, safeguarding both your sensitive data and your user experience.
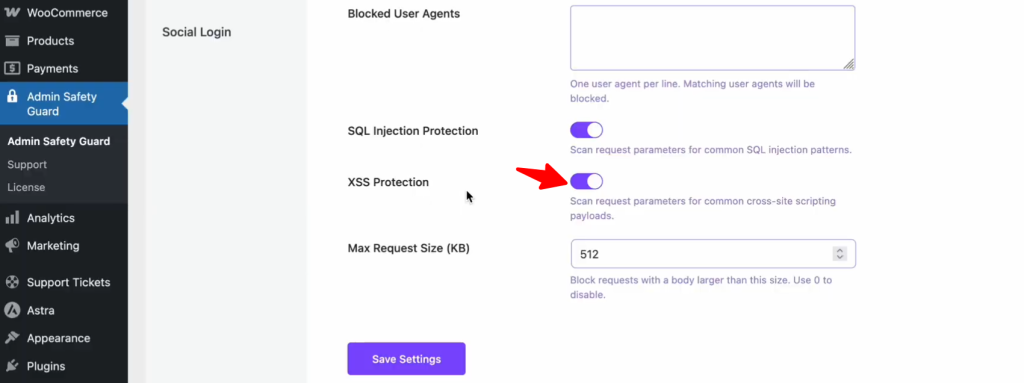
How to Enable XSS Protection:
Protecting your website with a web application firewall for WordPress isn’t just a one-time task; it’s an ongoing journey. There is no such thing as a “100% hack-proof” site or solution since the types of threats are constantly evolving. Implementing a web application firewall for WordPress is the single most effective step you can take to protect your hard work.
The WAF allows you to focus on your content and business growth by filtering out malicious traffic. Therefore, don’t wait for the “Site Hacked” notification to appear and fortify your site today.
Best WordPress Malware Scanners That Won’t Crash Your Website (2025 Benchmarks)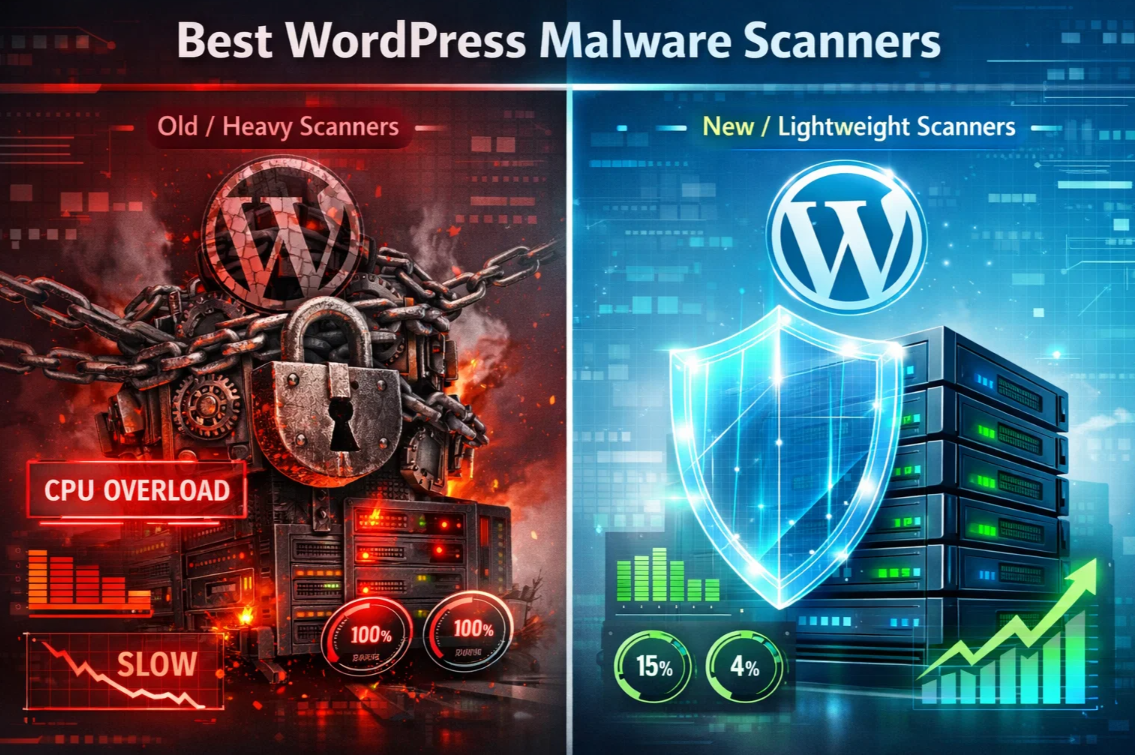
It’s a nightmare for every site owner to see their site hacked and blacklisted by Google. Your site needs a reliable WordPress malware scanner to keep hackers at bay. However, you need to check whether the scanning process is not consuming excessive server resources.
If your site is on shared hosting, you may encounter a “Resource Limit Reached” error. This means your site will go offline before the hacker attempts to gain access.
In 2025, security shouldn’t be a trade-off when it comes to performance. You should know that Core Web Vitals directly impact Google rankings. Thus, a “heavy” security plugin is almost as damaging as the malware it’s trying to find.
In this article, we break down the best lightweight WordPress malware scanners that prioritize both site integrity and server speed. We maintained real-world benchmarks to come to a conclusion.
To understand why your site crashes, we need to dig into the root cause. Most traditional WordPres malware scanners are “server-side” or “on-box” applications. Therefore, they use your hosting resources. The server handles the CPU and RAM resources meant for your visitors and represents them.
When a WordPress malware scanner runs, it goes through every line of PHP, JS, and CSS code on your server. This process becomes expensive or resource-hungry if your site is large and includes thousands of images or complex plugins.
Traditional WordPress malware scanners, such as older versions of Wordfence or BPS, can often cause “Timeout” errors. This happens when they exceed your host’s PHP max_execution_time. In recent times, faster NVME is not enough when the scan is not optimized, which bottlenecks your PHP file execution
The cost is not only the files related to your website. Advanced malware can also intrude on your database. It can hide in the wp_options or wp_posts tables. A reliable WordPress malware scanner can run complex SQL queries to identify any malicious patterns.
With improper query indexing, tables containing malicious data can become locked. This will display the “Error Establishing a Database Connection” screen.
To avoid crashes, you must understand a key technical distinction: where the “brain” of the scanner operates. Learning this single factor is critical for performance, stability, and overall reliability.
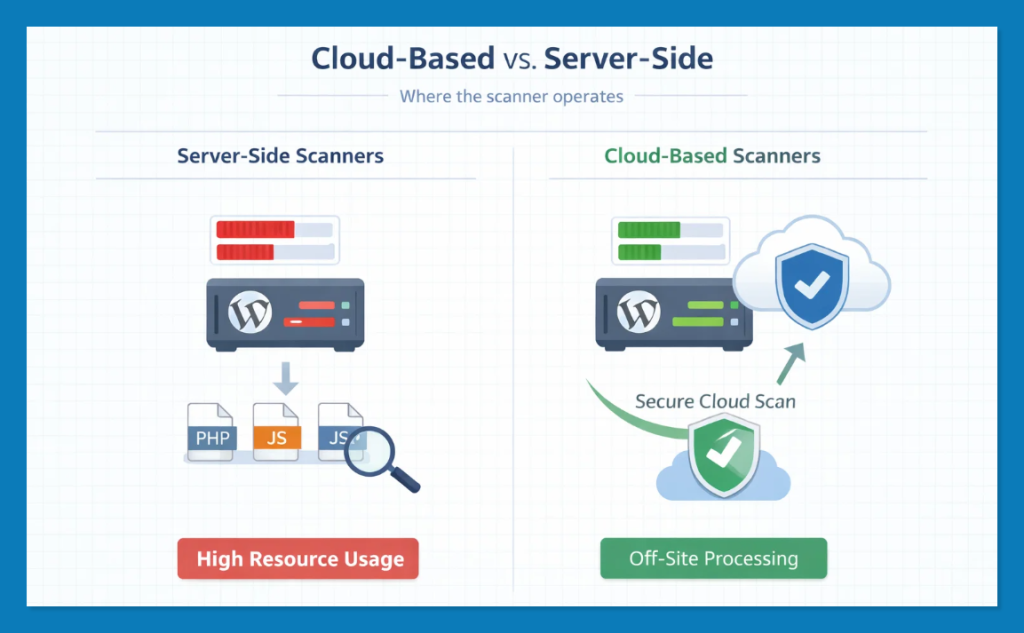
Server-Side Scanners (Resource Hogs): These plugins run on your server and consume your RAM and CPU. These plugins work well for “all-in-one” protection, but can cause site slowdowns during scans if not optimized.
Cloud-Based/API Scanners (The Speed Kings): These plugins act as a secure “bridge” between your website and a dedicated, high-performance security server. They capture a snapshot of your files and send it for analysis. All the heavy lifting happens on that security server and off-site. This means cloud-based WordPress malware scanners remain lightweight, fast, and always ready for visitors.
The “Information Gain” Reality
Recent security audits reveal that 64% of WordPress sites have experienced a complete breach at some point. Since cyberattacks are occurring every 39 seconds, you shouldn’t skip scans due to performance issues. The real goal is to find the best WordPress malware scanner that detects the most threats with minimal impact on speed.
We’ve tested the top contenders and an alternative option (Admin Safety Guard) in a standard shared hosting environment. Thai hosting comes with 1 vCPU and 2GB of RAM, and we assess its impact on Time to First Byte (TTFB) and CPU Utilization.
| Scanner Name | Average CPU Impact | TTFB Change (During Scan) | Scanning Methodology |
| Patchstack | < 1% | +0.01s | Vulnerability Focused |
| MalCare | < 2% | +0.02s (Negligible) | Cloud-Based (SaaS) |
| Sucuri | < 3% | +0.05s | Remote API |
| Admin Safety Guard | 3% – 5% | +0.01s to +0.05s | Server-Side (Optimized) |
| Solid Security | 8% – 12% | +0.18s | Hybrid / Hardening |
| Wordfence | 15% – 40% | +0.45s | Server-Side (On-Box) |
Note: This WordPress malware scanner data is collected through our personal benchmarking. This data may vary depending on resource utilization.
MalCare is the industry leader for high-traffic sites and WooCommerce “beasts” because it removes the scanning burden from your server entirely. It uses a specialized sync technology that replicates your site data to its dedicated security cloud.

This means even if you have a massive database or 40+ plugins, your WordPress malware scanner won’t consume a single cycle of your server’s CPU during the actual analysis phase.
One-click removal (premium) allows you to nuke threats without manual code editing surgically.
Pros:
Cons:
Pricing: Free daily scans; Premium (Cleanup + Firewall) starts at $99/year.
Pro Tip: Ideal for WooCommerce sites or large blogs where downtime equals immediate revenue loss.
Admin Safety Guard (ASG) bridges the gap for users who prefer server-side scanning but want to avoid the “Wordfence crash.” It utilizes high-confidence regex and a unique background throttling engine.
Our 2025 benchmarks show that ASG is the fastest “on-box” WordPress malware scanner, capable of processing 60,000 files in roughly 15 minutes without allowing CPU usage a exceed 5%.
Pros:
Cons:
Pricing: Affordable access via the ASG Pro plugin. Monthly subscriptions start at $48.72 and include access to the WordPress Malware scanner.
Pro Tip: Best for privacy-focused owners who want deep, internal scanning without the overhead of a bloated security suite.
Patchstack is the lightest WordPress malware scanner on this list because it works differently: it stops malware before it arrives. Instead of constantly crawling your files, it monitors your site’s “surface area” for vulnerabilities.
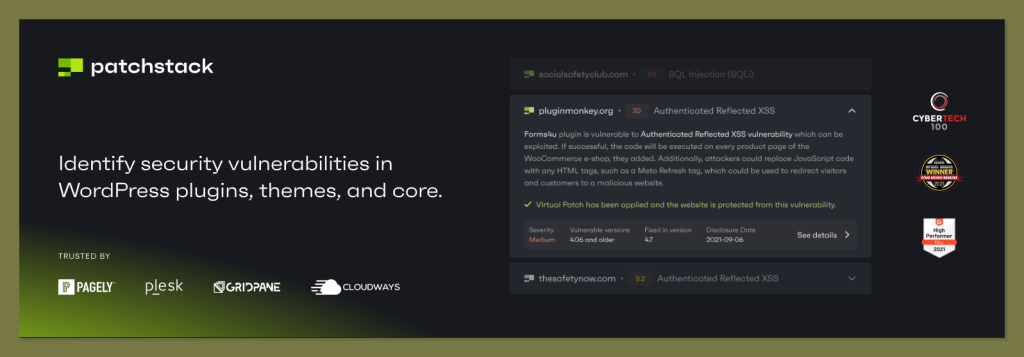
If a plugin you use has a known bug, Patchstack “virtually patches” it at the edge, making it impossible for hackers to inject code.
Pros:
Cons:
Pricing: Free for basic alerts; Premium virtual patching starts at $99/year.
Pro Tip: A “must-have” for agencies managing dozens of sites; it provides a bird’s-eye view of every site’s risk level.
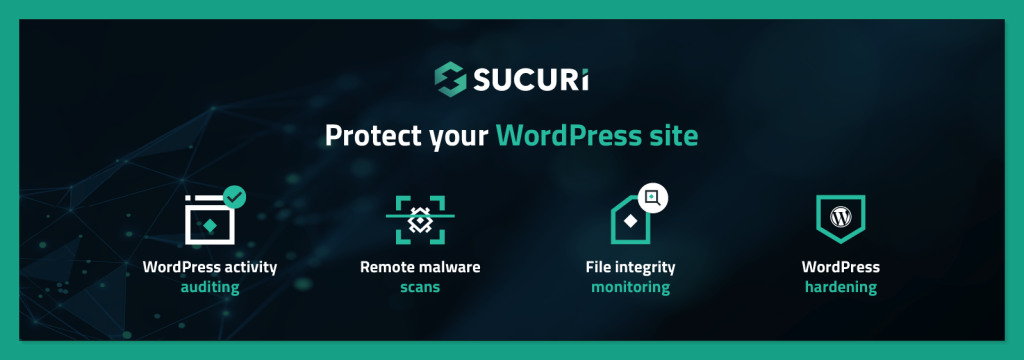
Sucuri is a hybrid solution that focuses on “Remote Scanning.” By scanning your site from the outside, it sees what a hacker sees. Their premium service includes a powerful Web Application Firewall (WAF) that lives on their servers, meaning most malware is blocked before it even touches your hosting.
Pros:
Cons:
Pricing: WordPress Malware Scanner features come with the package starting at $229/yr
Pro Tip: This is the best choice for high-profile sites that are frequent targets of DDoS or sophisticated bot attacks.
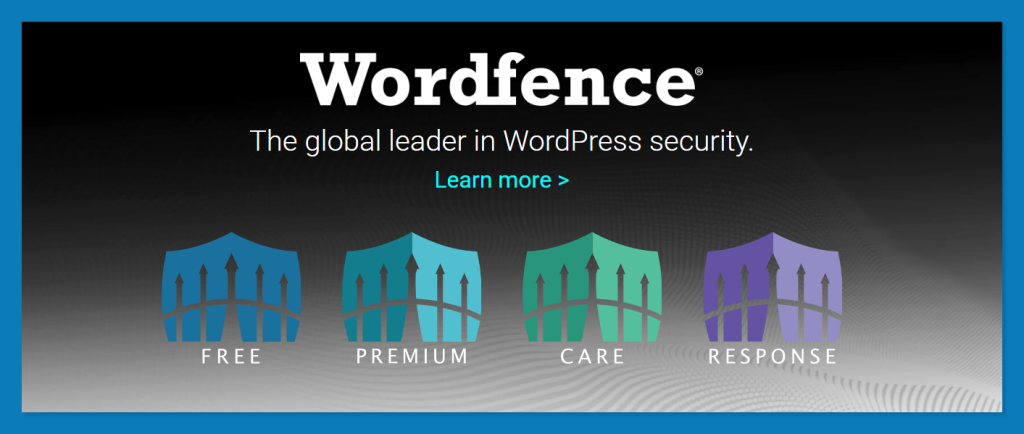
Wordfence is the most popular WordPress malware scanner because it offers the most “free” protection. While it is resource-intensive, its “Low Resource Mode” is a lifesaver for shared hosting. It leverages its massive network of 4+ million sites to feed its real-time threat intelligence.
Pros:
Cons:
Pricing: Robust free version; Premium is $149.00 USD / Year.
Pro Tip: If you are on a budget, use Wordfence but disable “Scan Images as PHP” and “High Sensitivity” to keep your CPU usage low.
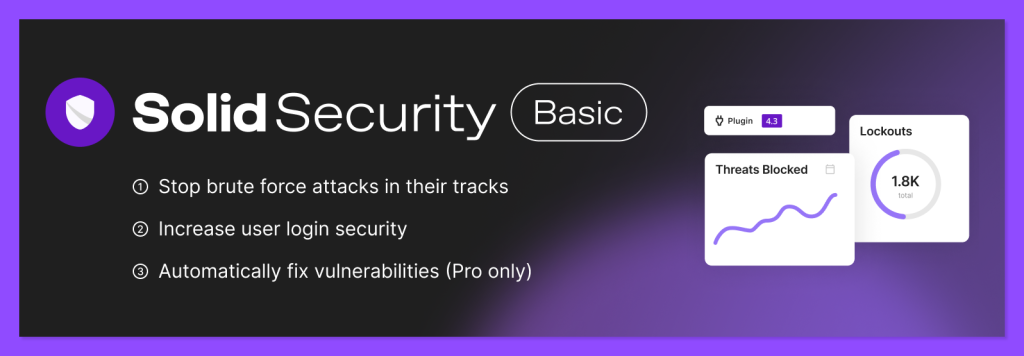
Solid Security focuses on security “Hardening” rather than just constant scanning. Its philosophy is: why scan for malware if you can make it impossible for the malware to get in? It’s a low-resource WordPress malware scanner that focuses on monitoring file changes rather than deep pattern matching.
Pros:
Cons:
Pro Tip: Perfect for sites with multiple authors; the activity logging ensures you know exactly when a vulnerability was introduced.
Selecting the right WordPress malware scanner depends on your specific hosting environment and privacy needs:
Let’s avoid using a heavy WordPress malware scanner that could affect your SEO. Protect your rankings and your revenue by choosing a performance-first solution today.
Limit Login Attempts in WordPress to Block Brute Force Attacks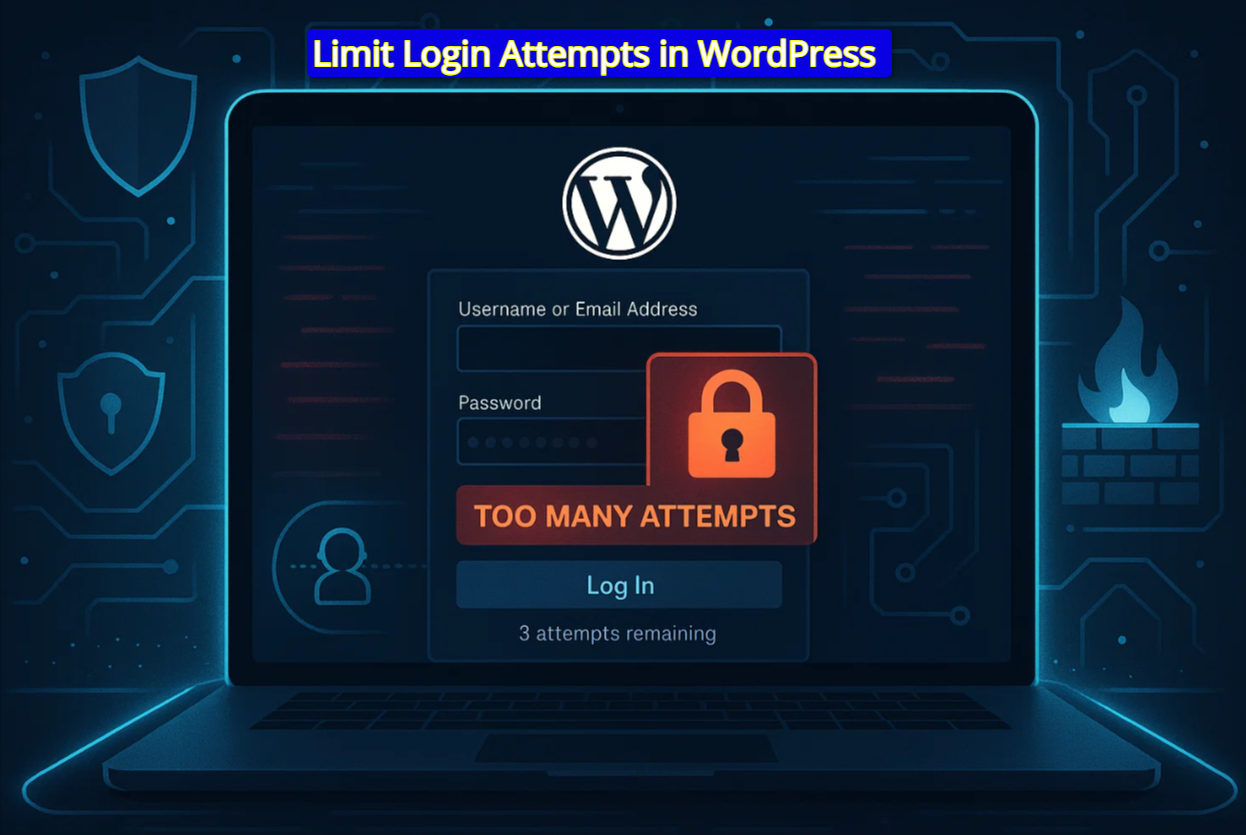
While running a WordPress site, you might think, “Who’d bother hacking my site?” You will realize the truth after seeing hundreds of failed login attempts on your site with a proper tool. WordPress allows unlimited login attempts, which makes it an open target for brute-force attacks.
The attacks usually occur through the WordPress administrator login or any other WordPress login form. Thus, learning how to limit login attempts in WordPress has become a mandatory step to secure your site.
This article will show you why limiting login attempts matters and how you can easily implement it. Plus, you’ll learn additional measures to lock out the bots and prevent malicious login attempts WordPress-wide.
According to a 2025 security report, attacks per domain increased by 120% in the past year. Besides, Security providers blocked over 55 billion password attacks in 2024 alone across the WordPress ecosystem.
Because WordPress powers a large share of the web, attackers see value in trying to break into even simple sites. A bot could try thousands of username-password combinations in minutes and ultimately breach your site.
When someone tries to log into WordPress, the server checks the submitted credentials. If they fail, the user can try again immediately. A human might give up after five or ten tries, but a malicious bot doesn’t.
Brute force attacks are pure trial-and-error. They exploit the open-door policy of the standard WordPress login screen:
A successful breach is the worst possible situation for a site owner. It comes with malware, data theft, SEO poisoning, and complete loss of control. However, even after blocking malicious login attempts, WordPress causes significant problems:
This is why the strategically deploying limit login attempts in WordPress mechanism is the single most effective first-line defense for securing your WordPress administrator login.
The most practical and user-friendly way to implement this essential security feature is by using a dedicated, well-maintained plugin. While code-based solutions exist, they risk breaking your site with an incorrect snippet. Plus, they require ongoing maintenance that most site owners simply don’t have time for.
While Limit Login Attempts Reloaded is the undisputed champion of limit login attempts in WordPress. But is it enough to protect the login page? No, because WordPress administrator login often requires more comprehensive features that typically reside behind a premium paywall.
This is where Admin Safety Guard Pro emerges as an excellent, budget-friendly alternative that bundles “premium” features into its free core offering.
Admin Safety Guard focuses on hardening the entire admin area and login flow. It allows you to limit login attempts in WordPress with layered protection against malicious login attempts. So, you won’t require multiple plugins to safeguard your site. The plugin shifts the defensive strategy from solely limiting attempts to making the login page itself harder to find and crack.
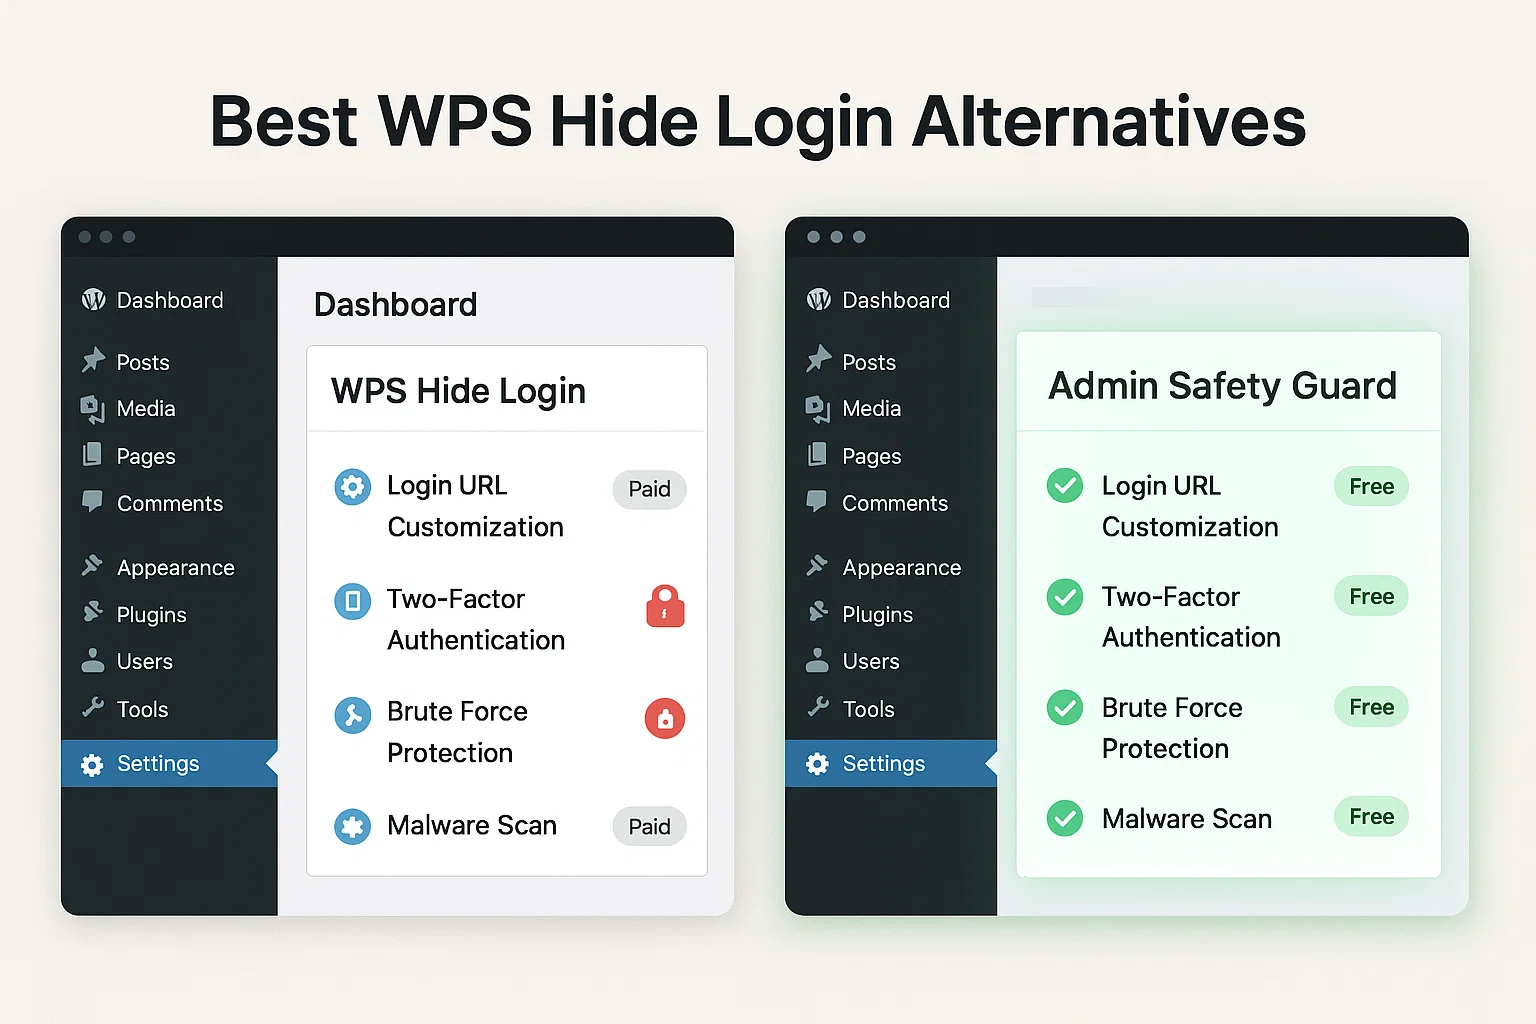
Here is what you will get when compared to Limit Login Attempts Reloaded in its free version
| Feature Category | Limit Login Attempts Reloaded (Free) | Admin Safety Guard (Free) | Advantage for Admin Safety Guard |
| Login Attempt Limit | ✅ Yes (Core Feature) | ✅ Yes | Equal core brute force protection. |
| Change Login URL | ❌ No | ✅ Yes | Hides the default /wp-admin URL instantly, stopping automated bots. |
| Two-Factor Auth (2FA) | ❌ No | ✅ Yes | Adds a vital second layer of security (often a premium feature elsewhere). |
| CAPTCHA Protection | ❌ No | ✅ Yes | Stops bots before they even hit the attempt limit. |
| Disable XML-RPC | ❌ No | ✅ Yes | Closes a major backdoor used for amplification attacks. |
| IP Blocking/Whitelisting | ✅ Yes (Free) | ✅ Yes | Essential control over access. |
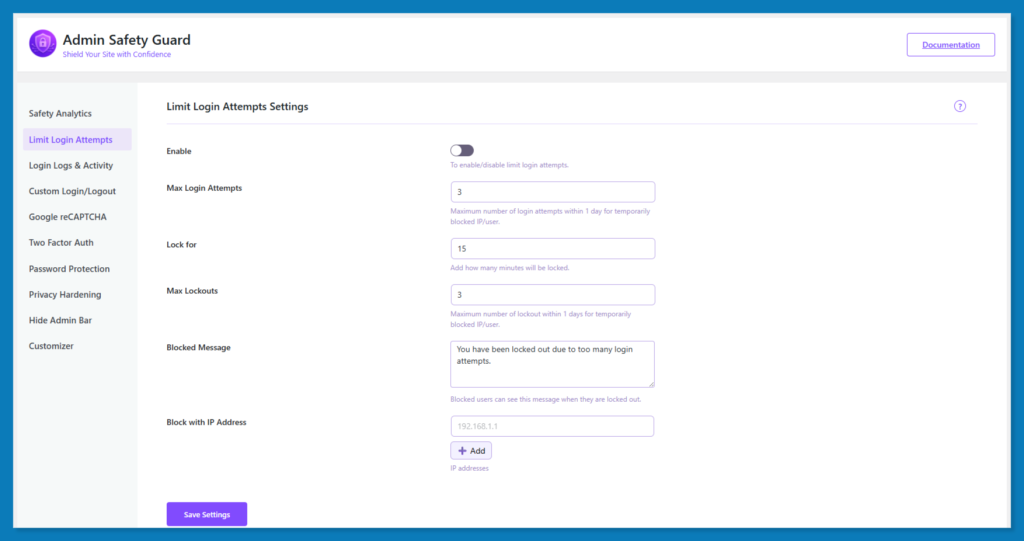
Here is the detailed step-by-step guide to enable limit login attempts in WordPress using the Admin Safety Guard plugin.
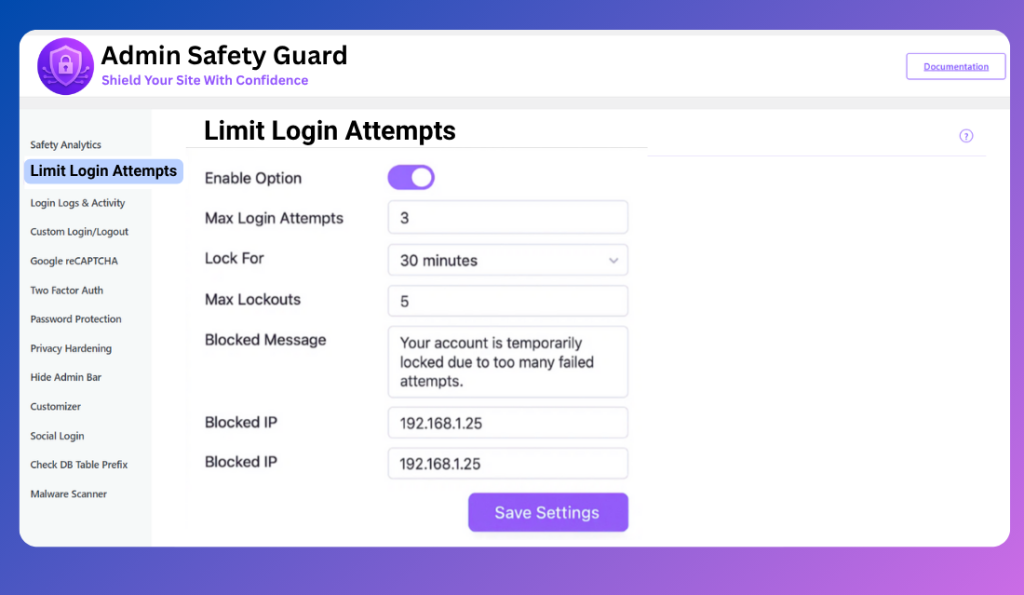
First, you need to activate the primary functionality of the security plugin you’re using.

Once enabled, the system is ready to enforce your security rules, which you will set in the following steps.
This setting defines the threshold for the first, temporary lockout.
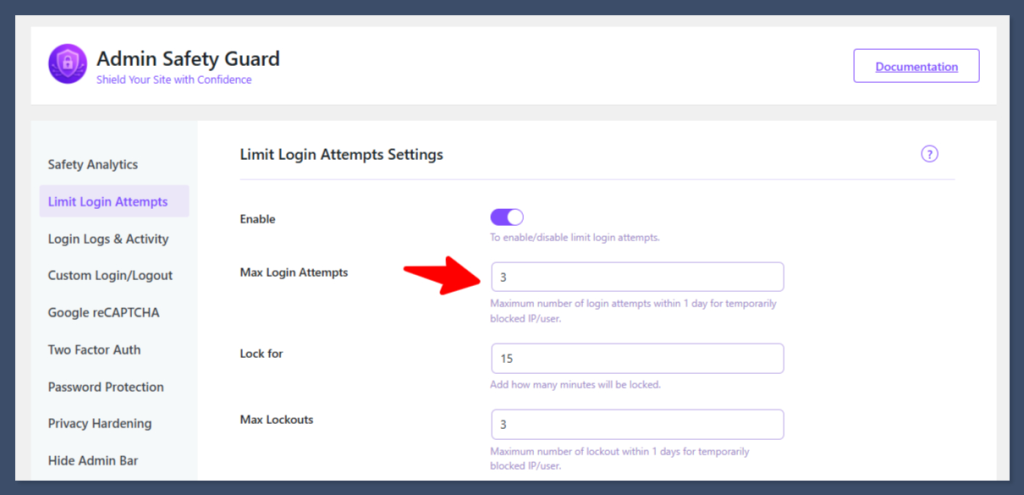
Verification: You can now test this. Navigate to your website’s login area and attempt to log in with incorrect credentials three times. You will be locked out of the website, which brings us to the next step: setting the duration.
This specifies how long an IP address is blocked after hitting the Max Login Attempts limit.
Example: Specify 15 minute (or ideally, 20–60 minutes for stronger security).
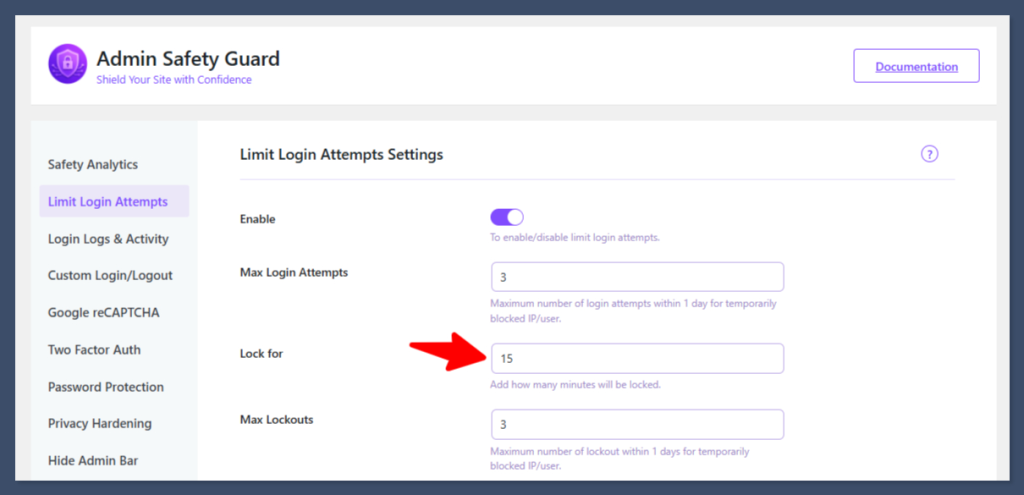
Verification: If you attempt to log in three times (as previously set in Step 2), you will be blocked from the site for the specified duration (e.g., 1 minute). You must wait this time to re-enter the site using the proper credentials.
This option prevents relentless, sustained attacks by setting a limit on how many temporary lockouts an IP can incur before facing a permanent or very long-term block.
Example: If you set this to 3, it means the user can be temporarily blocked three times.
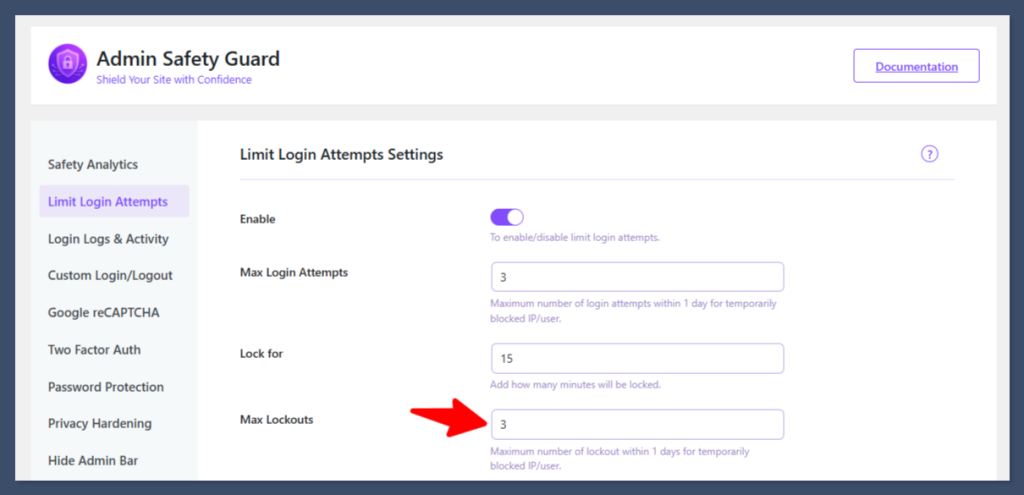
Result: Now, if the same user attempts to log in incorrectly, gets locked out, and repeats this process a total of 2 times, they will trigger the Max Lockouts rule, resulting in a significantly longer block (often 1 day or permanent).
Note: People blocked for a short duration (e.g., 1 minute) are typically not listed in the Login Logs & Activity tab; only those blocked by the Max Lockouts rule will be logged for administrative review.
Setting a clear message can inform legitimate users what happened and deter malicious users.
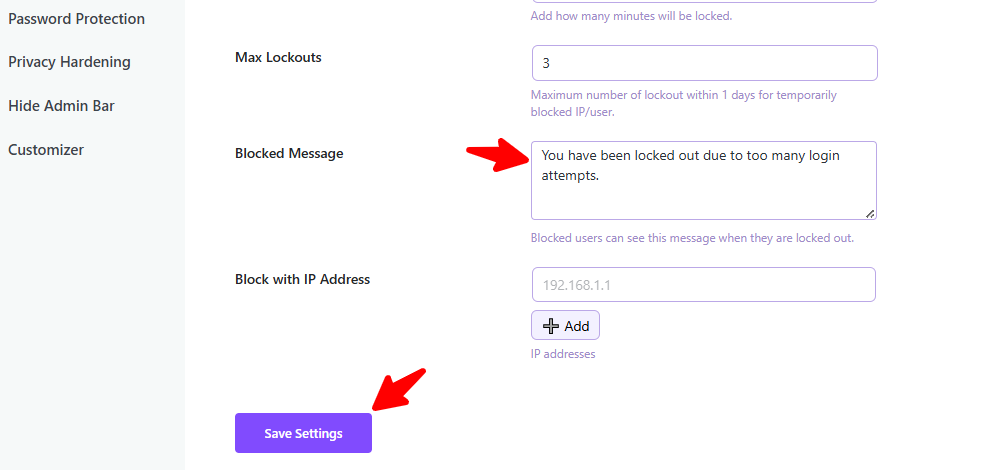
Verification: After two consecutive failed login attempts that lead to a lockout, an attempting user will see this custom blocked message on the login WordPress screen.
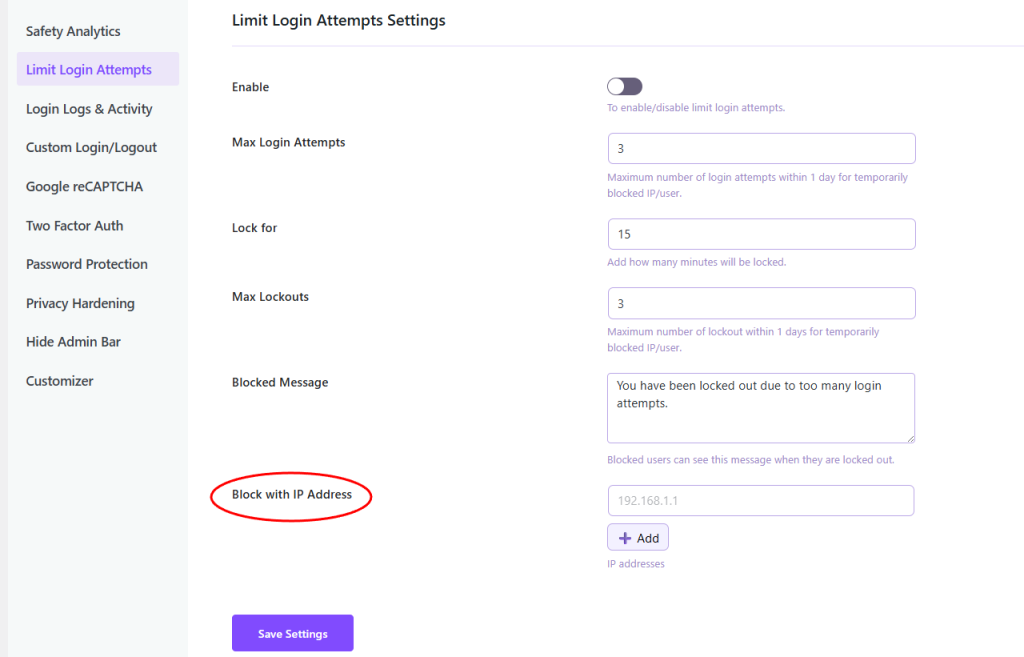
This feature allows you to manually and instantly block known malicious IP addresses detected from your Login Logs or other security monitoring tools.
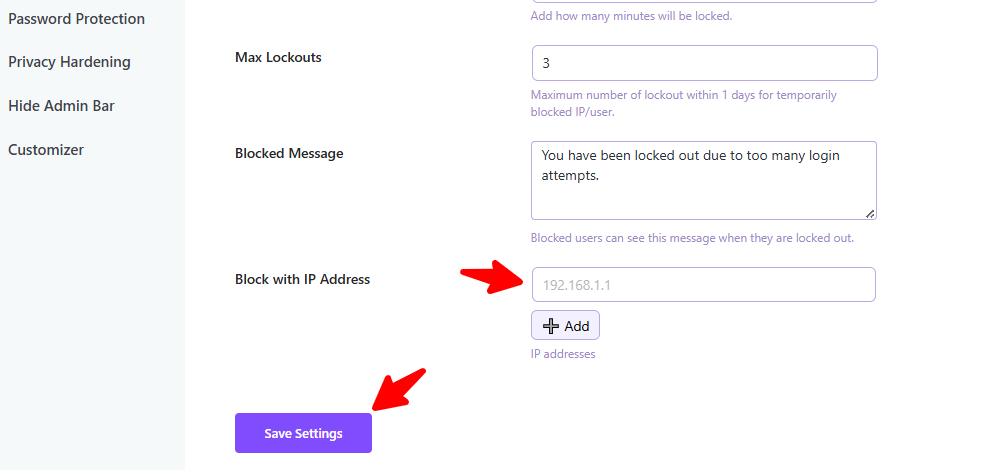
Result: If any user attempts to log in from that blocked IP address, they will be immediately unable to access the site, protecting your WordPress site admin login from known threats.
Implementing a defense with limit login attempts in WordPress is not just about security. This feature gives you strategic advantages like site performance and search engine optimization.
Google considers Core Web Vitals (loading speed, interactivity, and visual stability) as a ranking factor.
Hacked website brings in SEO disaster for a website. Hackers often inject malicious code that redirects visitors to spam sites, displays phishing content, or cloaks hidden spam links.
While setting a limit login attempts in WordPress is essential, true security requires a multi-layered defense. Combine rate-limiting with these robust measures:
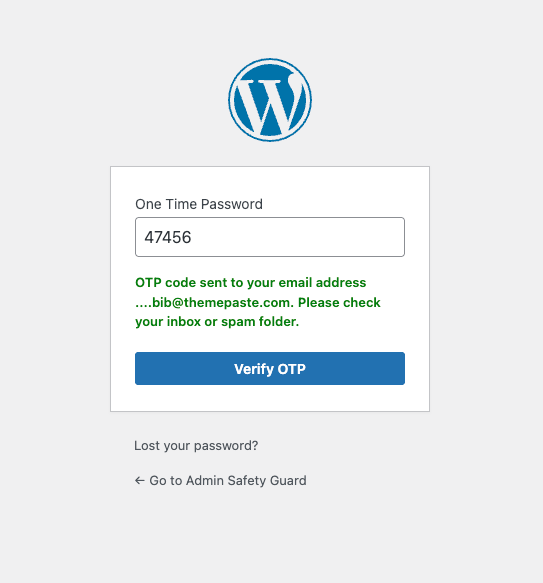
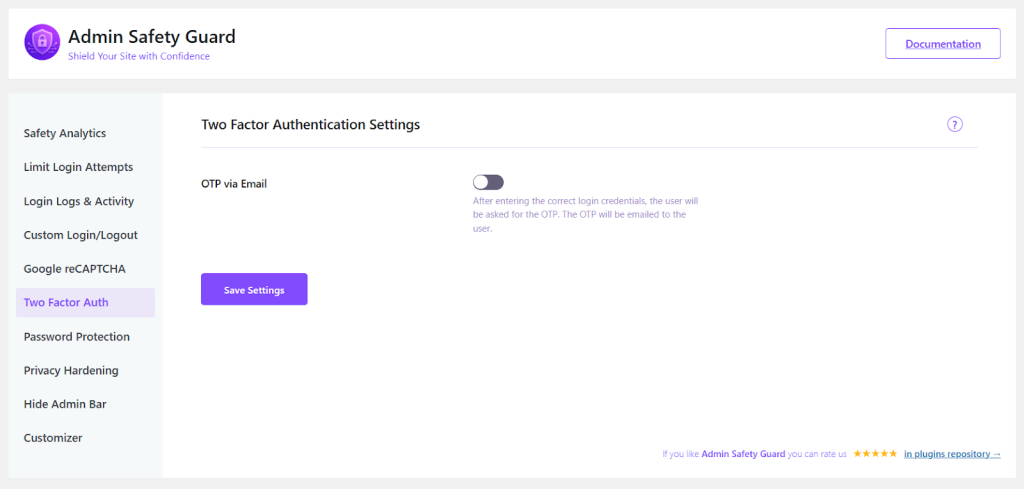
Ultimate Failsafe: If credentials are cracked, Two factor authentication prevents access. After entering the password, the user must provide a second, time-sensitive code from their physical mobile device (via an app like Google Authenticator).
The Power: Even with the correct username and password for your WordPress site admin login, the attacker is locked out. This makes brute force attacks nearly worthless.
Instant Bot Stopper: Default login paths (/wp-admin, /wp-login.php) are bot targets. Changing this URL stops automated attacks instantly.
Actionable Step: Use a security plugin to move your default login WordPress URL to a secret, unique address (e.g., /my-secret-admin-page). Bots can no longer find the form, making the majority of blocked malicious login attempts WordPress irrelevant.
Stop the Guessing Game: Bots primarily target common usernames like admin. Using these makes you highly vulnerable.
Best Practice: Never use ‘admin’. Use a unique, complex username that cannot be guessed. This forces the attacker to guess two unknowns (username and password), drastically reducing the chances of a successful attack.
As a WordPress site owner, you may face constant brute force onslaught. Therefore, you should never ingnore the power of the need to limit login attempts in WordPress.
Moreover, implementing advanced strategies like 2FA, renaming admin URL, and using a WAF makes your site hard target. You are not only blocking attackers but also preserving your site’s authority with these techniques. Take action today to secure your login WordPress page and avoid the pain of a post-hack recovery.
WordPress Two-Factor Authentication: Secure Login with Admin Safety Guard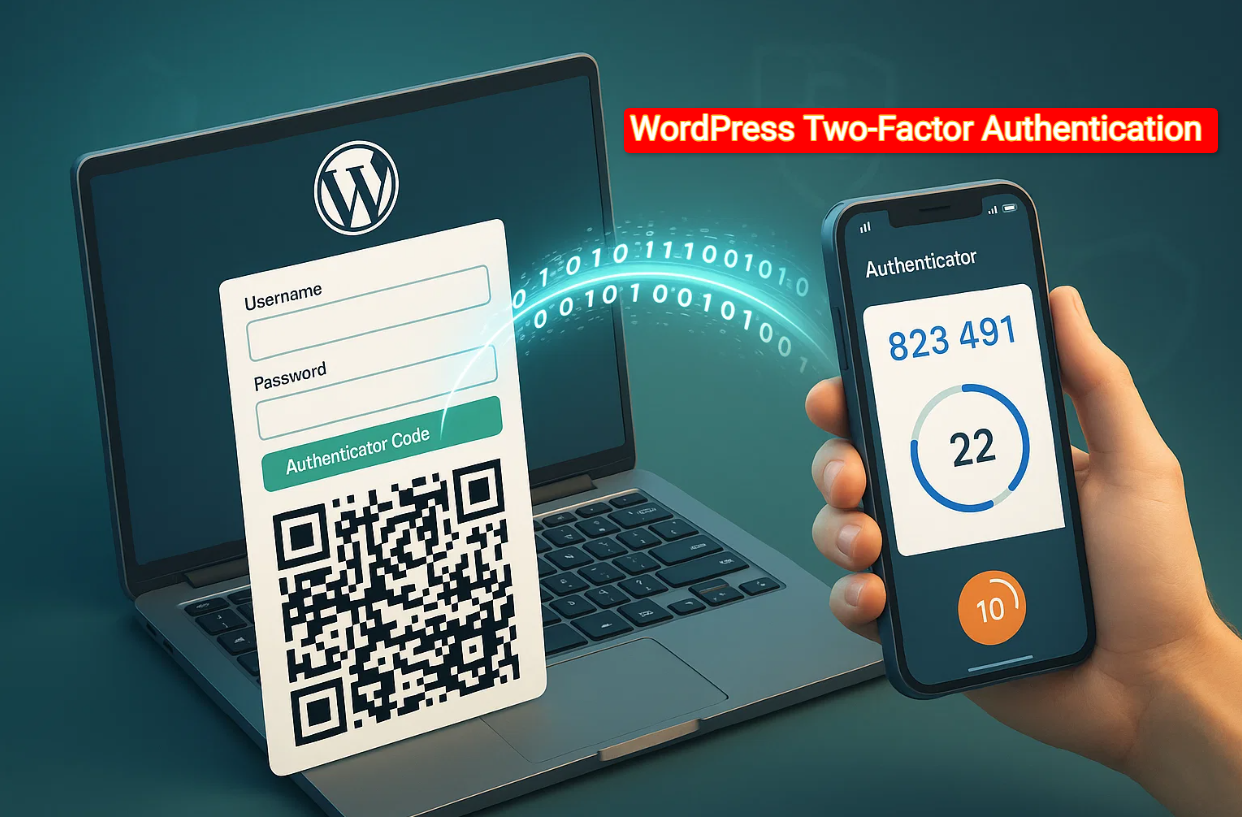
A simple password works like a single lock on a bank vault when it comes to today’s WordPress environment. This is where WordPress two-factor authentication becomes a mandatory security measure.
This detailed guide on WordPress two-factor authentication will soften the technical jargon. Plus, it will show you exactly why and how to deploy this critical defense layer. We’ll focus on using a mobile authenticator app and the Admin Safety Guard Pro.
Ultimately, you will have a flexible pathway to reinforce your site’s login security.
Before we explore the solution, we must acknowledge the severity of the problem. WordPress powers more than 40% sites on the web due to its popularity. Thus, it has become an attractive target for hackers and malicious bots.
Let’s not forget that the biggest threat to any WordPress login page is brute-force attacks.
Bute-force attack occurs from automated scripts that run on a vast network of compromised computers (botnets). It systematically uses thousands of username and password combinations per second until it finds the correct one.
Brute-force attacks are one of the most persistent and damaging threats. According to various security reports, brute-force attacks target WordPress sites regularly. Besides, some estimates suggest a site can face thousands of login attempts daily.
Over 80% of web application attacks occurs from brute-force attacks or stolen credentials. However, WordPress is especially vulnerable due to its well-known login structure.
Once a brute-force attack is successful, the consequences can be catastrophic:
A strong password alone provides a necessary but insufficient defense. This is where the power of WordPress’s two-factor authentication steps in. It adds a crucial, time-sensitive barrier that automated bots cannot bypass.
Two-Factor Authentication (2FA) is a verification process that requires two distinct, independent factors to prove a user’s identity. Think of it as needing two keys from two separate locations to open a single lock.
It’s not the typical one-factor authentication process, which you know as your password. WordPress two-factor authentication demands a second factor that only you have access to.
For the highest level of security in WordPress, the gold standard is the Time-Based One-Time Password (TOTP). You will get the password delivered via a mobile authenticator app.
How TOTP Works with Your Mobile App
Many services offer WordPress two factor authentication or 2FA codes via SMS text message or email. While better than nothing, these methods have significant security flaws that TOTP apps do not:
TOTP Advantage: The TOTP code is generated entirely offline on your device, making it immune to network-based interception or email account compromise.
The benefits of implementing WordPress two-factor authentication extend far beyond simply blocking hackers. WordPress two-factor authentication is a strategic tool for online businesses, agencies, and e-commerce platforms.

Here are the benefits of WordPress two-factor authentication beyond site protection:
For sites handling sensitive consumer data, 2FA is often a regulatory compliance requirement.
GDPR/CCPA: Protecting personal data is a legal mandate that your site must include. Robust authentication is a key part of demonstrating compliance and due diligence.
PCI-DSS: For processing credit card information, strong access control, including 2FA, is essential. It maintains compliance with the Payment Card Industry Data Security Standard.
Implementing a WordPress two-factor authentication plugin shows customers, auditors, and regulators that you take data protection seriously.
In the digital world, customer trust is your most valuable asset.
Membership & Subscription Sites: Users become confident about transactions and subscriptions when their payment data is secured via WordPress two-factor authentication.
Agency & Developer Sites: Offering a client WordPress two-factor authentication protection on their site is a professional differentiator. It reinforces your role as a diligent manager of their digital assets, bolstering your business reputation.
Brute-force attacks are often paired with a technique called Credential Stuffing. This is where hackers use lists of stolen username/password combinations from breaches on other, less secure websites. Then they “stuff” those credentials into your WordPress login area.
Because many people reuse passwords, a single breach on an unrelated site could compromise your WordPress login. WordPress two-factor authentication completely neutralizes this threat, as the attacker still lacks the mobile TOTP code needed to complete the login.
Deploying WordPress two-factor authentication is surprisingly straightforward, especially when using a dedicated and robust security plugin. The process centers around integrating your site with the mobile authenticator app.
Note: The following steps are based on a premium WordPress 2FA plugin – Admin Safety Guard Pro. It provides the most advanced and reliable implementation and support.
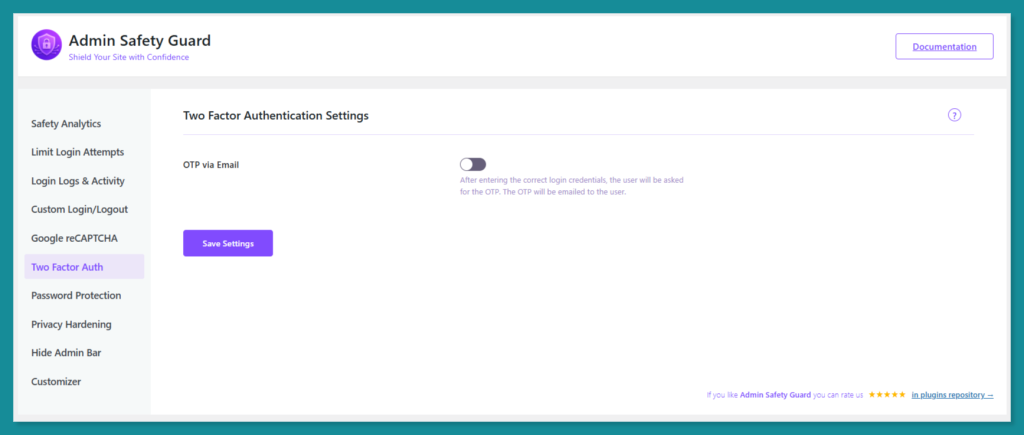
The initial step is to locate the 2FA feature within your security plugin’s dashboard.
In the Two Factor Auth area, you will find the specific option for app-based 2FA.
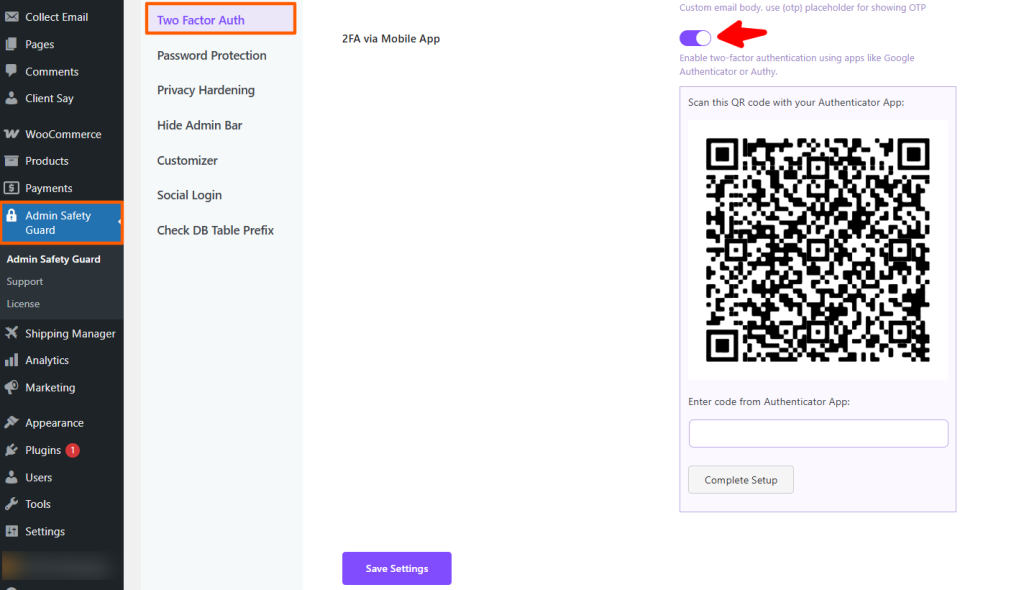
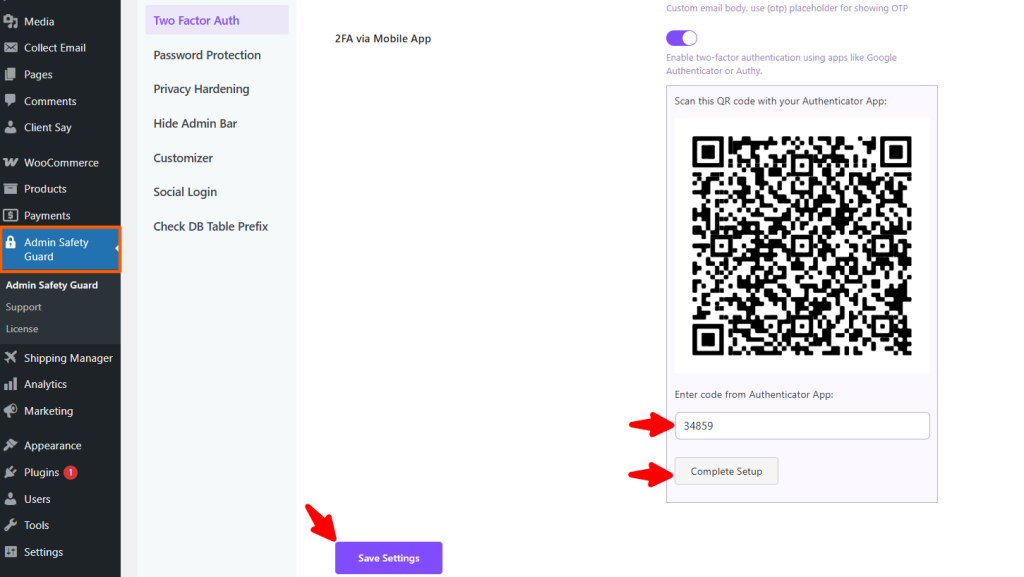
Once enabled, the plugin instantly generates the mechanism for pairing your site with your mobile authenticator app: the QR Code.
After scanning, your authenticator app will immediately display a 6-digit code for your WordPress site. This is where the time-sensitivity comes into play.
Note: For most high-value WordPress site managers, the backup/restore and biometric features of apps like Microsoft Authenticator or Authy are highly recommended, as they prevent accidental account lockouts if a phone is lost or damaged.
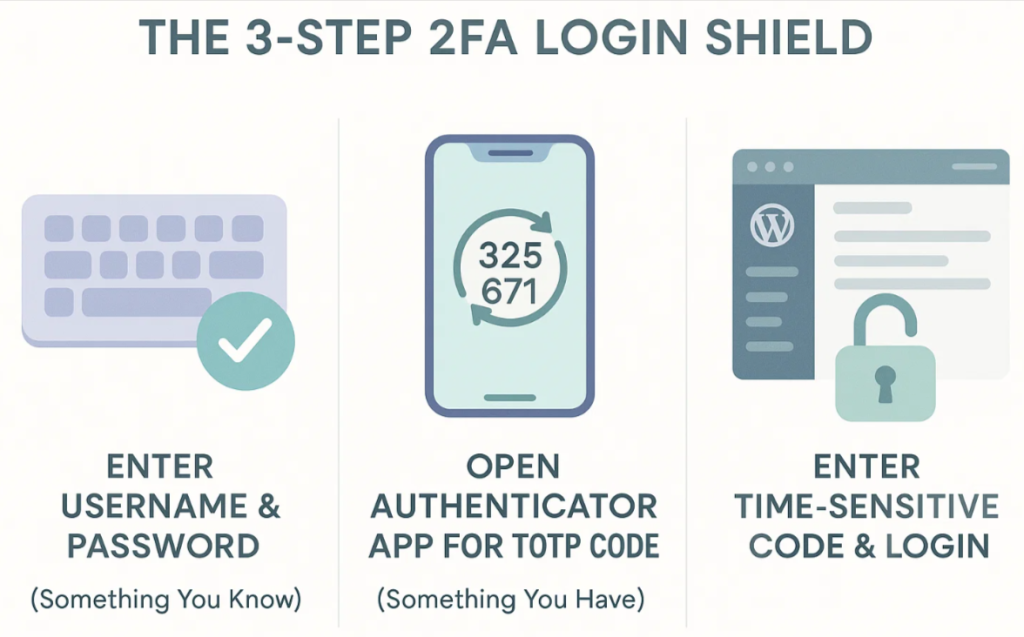
After successfully setting up WordPress two-factor authentication, your login screen will be instantly transformed. Here is how it happens:
When you or any user with 2FA enabled goes to the wp-login.php page, the process now requires three distinct pieces of information:
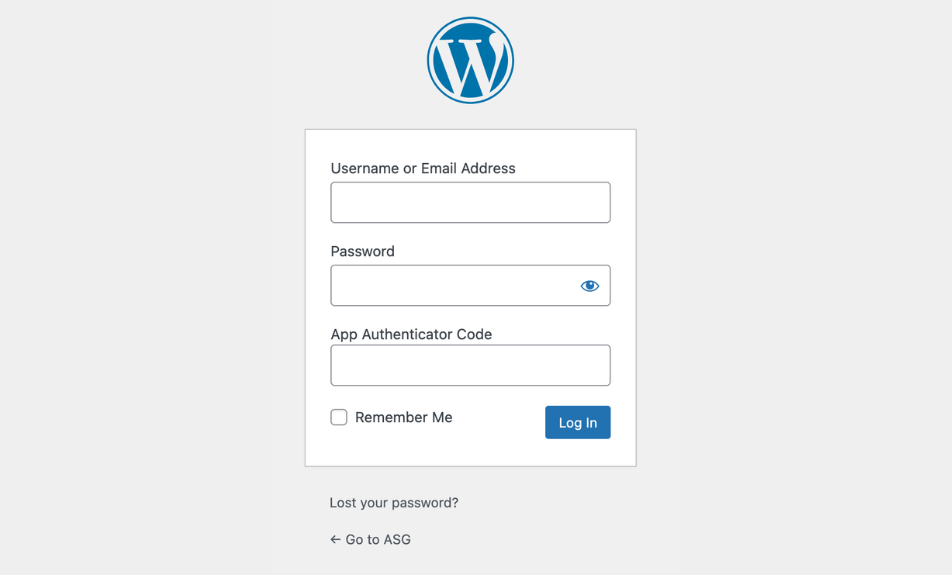
This simple addition makes a stolen password useless for hackers. Even if they have the correct username and password, they still need the live, time-sensitive code from the physical device. Entering the wrong login will instantly restrict the user to prevent unauthorized access to your site.
While you can (and should) require 2FA for all users, it is absolutely critical for certain roles:
This selective enforcement is a key feature of a professional WordPress 2FA plugin, allowing site owners to apply the highest security only where it is most needed.
For large sites, e-commerce platforms, and agencies, security must be robust, scalable, and manageable. Advanced WordPress 2FA plugin solutions offer features that make administration easier without compromising security.
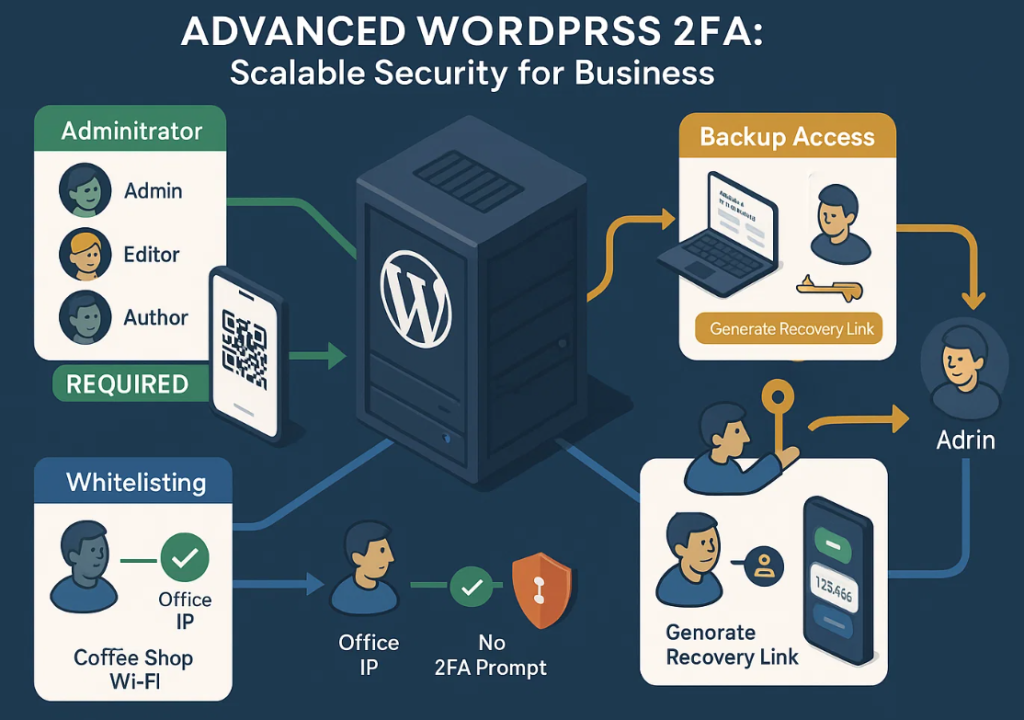
The best WordPress two-factor authentication plugin just won’t allow it; they make it mandatory. This means you can automatically force the Administrator role to set up 2FA upon their next login. This ensures no high-risk account is left exposed by choice or oversight.
What happens if a user loses their phone? A professional WordPress two-factor authentication process must include a fail-safe. Here goes those failsafe options:
Printable Backup Codes: Upon initial setup, users should be prompted to download and securely store a list of one-time backup codes. These codes are single-use and can be used to bypass the mobile code if the device is unavailable.
Administrative Override: In critical situations, a site administrator should be able to temporarily disable 2FA for a user or generate a unique recovery link, provided the administrator’s own account is fully secured.
For high-volume administrative users, constant 2FA prompts can slightly impact workflow. A beneficial feature offered by some WordPress two-factor authentication plugins is IP whitelisting.
When a login occurs from a different network (e.g., a coffee shop Wi-Fi or a remote location), the 2FA requirement is automatically enforced.
Relying solely on a password for your WordPress site is a risk that you can’t afford to take. A multi-layered defence is necessary due to the constant threat of brute-force and credential-stuffing attacks.
Implementing WordPress two-factor authentication via a mobile app is the single most impactful step you can take for your site. It is becoming the most trending approach to lock down your site and protect your digital assets.
This system seamlessly integrates with your workflow, providing an iron-clad layer of security. You get a time-based core that hackers can’t guess or intercept. Don’t wait for the inevitable attack to realize the value of this crucial protection.
Ready to stop brute-force attacks dead in their tracks? Choose a reliable WordPress 2FA plugin today, enable the mobile app feature, and take control of your site’s security destiny.
The security demands of WordPress sites are evolving fast. With automated attacks becoming increasingly frequent and sophisticated, relying solely on basic protection is no longer sufficient. Site administrators need to upgrade to layered authentication systems that go beyond surface-level defenses.
WPS Hide Login is a popular choice for adding an extra layer of security by obscuring access points like /wp-admin and /wp-login.php. However, modern threats require more than just hiding URLs. They necessitate deeper integration with advanced authentication methods, such as two-factor authentication, social login, and biometric access.
This is where Admin Safety Guard comes in, offering advanced features and all-in-one solutions. In this article, we will introduce you to some of the best WPS Hide login alternatives. In the process, you will also learn about exclusive features that Admin Safety Guard has to offer.
Hiding your login page is just a single part of ensuring security on your site. It is the foundation of WPS hide Login, which is security through obscurity. However, the defense standards in 2025 require more than hiding the login page.
Here are some reasons why going beyond WPS Hide Login becomes necessary:
WPS Hide is a lightweight and widely used plugin that allows you to hide the default /wp-login.php or /wp-admin URLs. This tweak is great for blocking basic brute-force bots that blindly scan for standard login paths.
Changing the Login URL won’t stop the denial-of-service (DOS) attacks, credential stuffing, or server-level threats. So WPS Hide helps you decide where attackers try to get in, but it doesn’t verify how they are trying to do it. This is where layered automation and intent-based checks become necessary.
Today’s attackers are using AI to scan, detect, and exploit vulnerabilities of a site. Thus, hiding the login URL is no longer a safe option. Attackers can find the hidden login path after learning that you are using a WordPress site.
Moreover, plugins relying on obscurity often create headaches for site owners. Sometimes, non-technical users get locked out after hiding their URL. Then they have to explore the phpMyAdmin or use WP-CLI to get access. This is another sign that you should explore WPS Hide Login alternatives.
WPS Hide Login’s previous track record creates an argument about its capability. Some security scanners have flagged it as unsafe due to flaws that exposed the login page. Previously, attackers could use the action=postpass parameter to bypass the core protection.
This failure proves that you should look for WPS Hide login alternatives and go beyond security-based plugins. In this way, admins will be able to implement a stronger and layered defense that your site deserves.
WordPress admin safety is not only about focusing beyond the hidden login page. It requires real defense that aligns with today’s security mandates. The focus now shifts from endpoint protection to application integrity, advanced authentication methods, and layered defense. This is how WPS Hide alternatives keep out bots and attackers.
Passwords remain the weakest link in online security. It’s vulnerable to brute-force attacks, phishing scams, and credential stuffing. That’s why the latest trend has moved towards passwordless authentication. We encourage you to explore WPS Hide Login alternatives to get features like passwordless authentication.
Modern WordPress security now offers support for FIDO2 and WebAuthn. These protocols use public-key cryptography and enable biometric login. This means users can log in without a password and use Face ID, fingerprints, and even Touch ID. This leads to a stronger barrier against phishing attacks, a smoother user experience, and safer retrieval of encryption keys.
The level of security threats has evolved and increased dramatically over time. The latest attackers are utilizing AI to scan for vulnerabilities and launch automated, intelligent login attacks. Thus, human response is not enough to keep pace with these attacks.
Modern solution comes with an advanced vulnerability scanner and SIEM (Security Information and Event Management) platforms. This makes the automated incident and effective threat management compulsory. However, a WPS login alternative like Admin Safety Guard has achieved an excellent success rate in blocking automated login attempts.
Attackers can bypass the visible login form by focusing on the core configuration and the accessible APIs. Thus, WPS hide alternatives can focus on structural hardening to block programmatic backdoors.
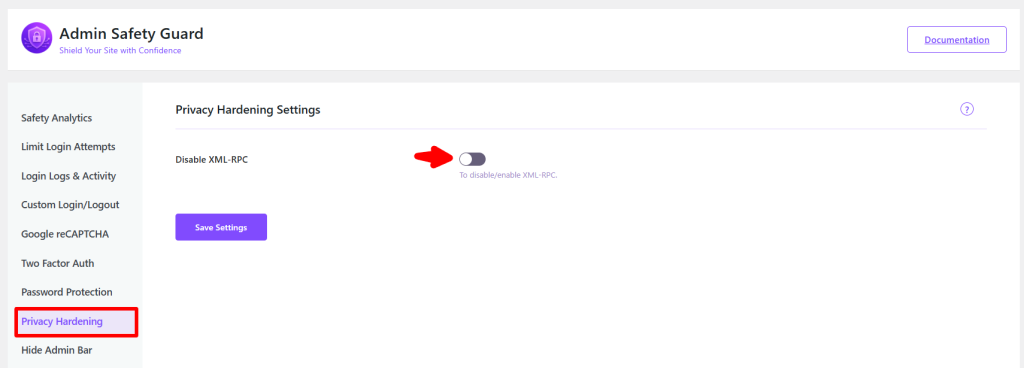
Firstly, turning off the XML-RPC interface is a critical step that you must ensure. Large-scale brute force and DDoS attacks can exploit this entry point.
Secondly, securing the REST API becomes mandatory, as WordPress sites are increasingly vulnerable to DDoS attacks. So, effective WPS Hide alternatives should provide granular admin control over unauthorized REST API requests. This restricts access unless it’s specific and the conditions are met.
Admin Safety Guard (ASG) has emerged as a superior WPS Hide Login Alternative. It comes with robust and multi-layered security features in both free and premium options. Users will get a comprehensive path to harden the security of their sites without compromising performance.
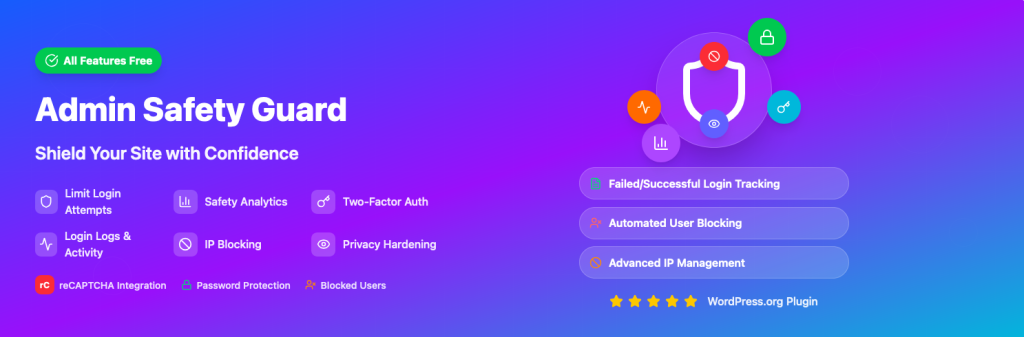
The free tier of Admin Safety Guard primarily provides foundational protection and essential hardening tools. Here is a breakdown of those features:
| Admin Safety Guard Free Feature | Security Layer | Function and Benefit |
| Change Login URL | Obscurity/Branding | Customizes the default login path, directly replacing WPS Hide Login’s core function. |
| Limit Login Attempts | Brute Force Protection | Restricts repeated failed attempts, automatically locking out suspicious users and reducing server load. |
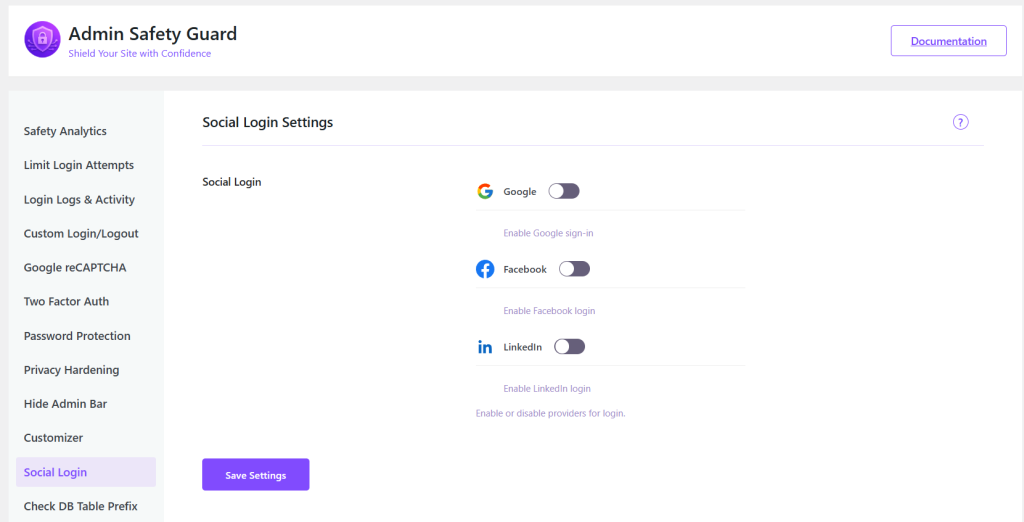
| Two-Factor Authentication (2FA) | Authentication Hardening | Adds an indispensable second layer of verification, mitigating credential stuffing risks. |
| IP Blocking | Access Control | Empowers the administrator to halt access for suspicious or hostile actors permanently. |
| Disable XML-RPC | Core Hardening | Closes a known, high-risk legacy vulnerability often exploited for programmatic attacks. |
| CAPTCHA Protection | Bot Mitigation | Adds visual challenges to the login form, ensuring attempts are human-initiated. |
| Login Logs & Activity Tracking | Auditing/Monitoring | Tracks all user login records and backend activity, essential for detecting anomalies or insider threats. |
| Hide Admin Bar (Conditional) | UX/Obscurity | Allows selective hiding of the admin bar for specific user roles or pages, improving control. |
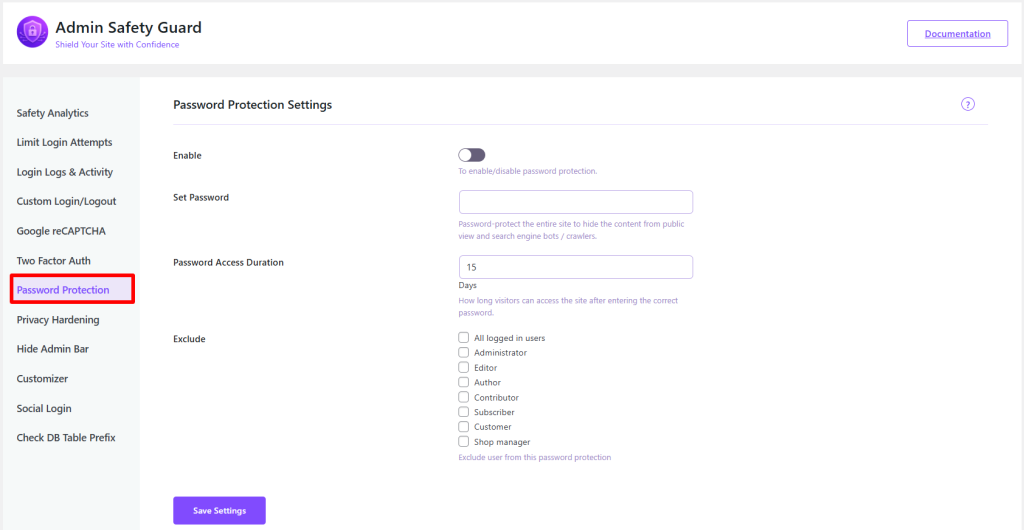
| Password Protection | Access Restriction | Enables password-based restrictions for specific pages or sections of the site. |
| Custom Logo & Branding | Professionalism | Offers extended branding options across admin and login pages for a consistent experience. |
Most of the WPS hide login alternatives include Two-Factor Authentication (2FA) and IP blocking. However, Admin Safety Guard gives you these features in the free tier. This is a plus point when transitioning from a basic obscurity plugin to a multi-layered defense model.
Moreover, the Login Logs & Activity Tracking provides the forensic capability essential for compliance and threat detection. The XML-RPC on the free tier ensures that the site is immediately secured against the most persistent attack vectors.
The Admin Safety Guard Pro exceed the requirements of enterprise-level security and 2025 trends. This WPS Hide login alternative offers advanced structural defense and next-generation authentication.
Here are those pro feature that gives your site true security maturity that moves beyond mere security hardening:
The Admin Safety Guard Pro plugin addresses the vulnerability of traditional passwords directly:
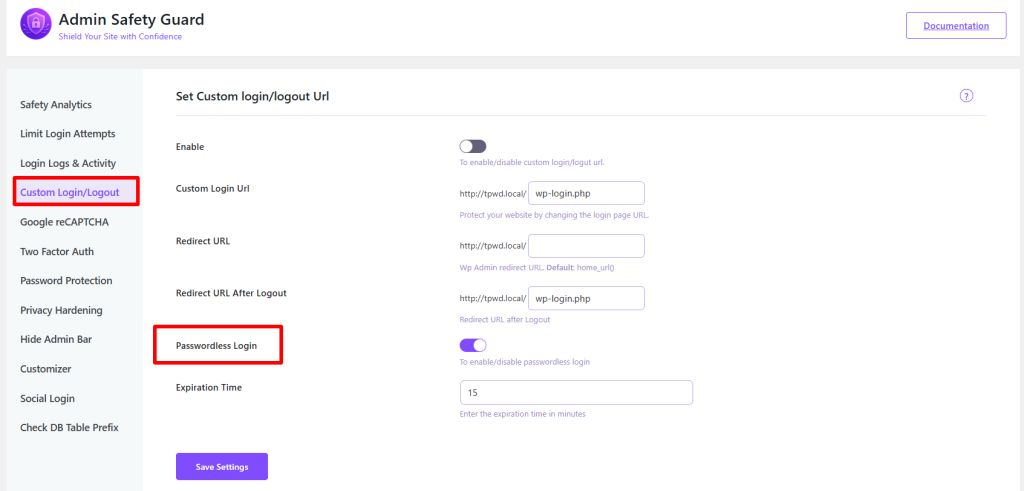
Passwordless Login: This allows users to bypass traditional password entry entirely, using secure email links or “magic links” for authentication. This feature directly aligns with the 2025 push to minimize password risk.3
2FA via Mobile App: This elevates the free 2FA by supporting dedicated applications like Google Authenticator or Authy, providing stronger, time-based one-time passwords (TOTP).
Social Login: Offers flexibility and improved user experience by allowing authentication via major social platforms. For example, Google, Facebook, and Twitter which is valuable for membership or e-commerce sites.
These features focus on application integrity, preventing attacks that exploit core configuration or trust relationships:
CSRF Protection (Cross-Site Request Forgery): Ensures that all sensitive requests include secure, unique tokens to verify they originate from trusted sources. This blocks a major class of hidden attacks that perimeter firewalls often miss, safeguarding user actions and data integrity.
Database Table Prefix Check: Detects the use of the default wp_ prefix and offers to change it to something less predictable. This adds a layer of obscurity that helps defend against automated SQL injection attacks targeting known table structures.
WP Directory File Permissions Check: Scans core WordPress directories to ensure file permissions are securely configured. This prevents unauthorized file changes or malicious uploads, reducing the risk of site compromise.
Whitelist IP Addresses: Restricts admin and login access to a predefined list of trusted IPs. This enforces a Zero Trust model that offers stronger protection than basic IP blocking by proactively limiting access to only approved sources.
Disallow Unauthorized REST Requests (Conditional): Restricts access to the WordPress REST API unless specific conditions are met. Thus, users will get fine-grained control over API exposure. This helps contain the growing attack surface created by expanded REST API usage, aligning with modern security standards for 2025.
Password Strength Tool: Enforces strong, complex passwords during registration and password updates to block weak credentials. This significantly reduces the risk of account breaches and improves overall site security.
Provide Login Template & Customize Design Pro: Offers ready-made login templates and advanced design customization for styles and layouts. Agencies benefit from seamless branding and a professional look without compromising on security standards.
Admin Safety Guard is one of the powerful WPS Hide Login alternatives. However, it’s important to fully understand its strengths and compare it with other top security suites. This helps evaluate how well it performs, what features it offers, and its overall effectiveness.
Wordfence is a top-tier WordPress security plugin known for its strong Web Application Firewall (WAF) and malware scanning capabilities. It’s backed by a 24/7 threat intelligence team, making it a trusted choice for serious protection. However, it can be resource-intensive on servers.

Key Features:
Solid Security is a beginner-friendly plugin offering a full suite of security tools with a simple setup process. It includes a custom login URL feature, making it a solid WPS Hide Login alternative for those who want quick protection and easy configuration.
Key Features:
AIOS delivers strong, all-around WordPress security without slowing down your site. It’s especially great for shared hosting environments and includes essential login protection features, making it a smart WPS Hide Login alternative for performance-conscious users.
Key Features:
Heavy-duty tools, such as WPS Hide login alternative like Wordfence, offer strong protection but use more server power. For most users on shared or budget hosting, lighter options like AIOS or Admin Safety Guard strike a better balance.
In 2025, relying on plugins that hide the login page, such as WPS Hide Login, is no longer sufficient. Multi-layered protection has become necessary as AI-driven attacks are becoming increasingly frequent. That’s why you have to look out for WPS Hide Login alternatives to go beyond obscurity.
These alternatives offer robust protection with features such as two-factor Authentication, passwordless login, and brute force defense, among others. Admin Safety Guard stands out as one of the top WPS Hide login alternatives. It offers some impressive features in its free version, despite being a relatively new player in the WordPress security domain.
The pro version includes more advanced features that make your site safer to prevent tomorrow’s evolving threats. However, you can even try other alternatives that we’ve curated and compare the differences.
Admin Safety Guard Pro Plugin – Enhance Your WordPress Security
If you’re running a site on WordPress, you know the backend is the most attractive target for hackers. In fact, it’s estimated that around 13,000 WordPress sites are hacked every single day.
You don’t have to be a large enterprise to be vulnerable since any site with a login portal can be compromised. This is where Admin Safety Guard Pro plugin steps in with a rich set of pro-features.
This plugin is designed to harden your WordPress admin access without significantly affecting usability or performance. In this blog post, we’ll dive deep into the features, the benefits, and why this plugin deserves your attention.
The login page and the admin area of WordPress represent highly visible attack vectors. Admin safety guard will protect those vulnerable entry points.
According to the official WordPress Developer Handbook, securing the /wp-admin directory and login endpoints is a key step in reducing risk.
Furthermore, security studies show that plugins account for over 97% according to one of the 2023 reports.
However, good core code matters, but how you secure your login, admin dashboard, and plugin/theme endpoints matters more. This is where Admin Safety Guard gives you full control and reliability with its flexible features.
Admin Safety Guard focuses on three core goals: Security Enhancement, customization and branding, and visibility and monitoring. Thus, you move beyond generic protection to a customized, rock-solid, and professional-grade security setup.
Admin Safety Guard was made with every type of WordPress user base in mind. Admin Safety Guard Pro version further enhances admin security features compared to its competitors. Here are those user base that benefits from Admin Safety Guard:
The primary goal of any security plugin is to secure the most critical access points. Admin Safety Guard Pro excels by offering multiple layers of advanced protection, making it exponentially harder for unauthorized users to gain access to your WordPress dashboard.
Here are some brief descriptions of the Admin Safety Guard Pro, from which you will learn how each contributes to enhanced security, usability, or branding.
Passwords alone are the weakest link in the security chain. Admin Safety Guard Pro version introduces modern, powerful authentication methods that dramatically reduce the risk of credentials being compromised.
In the pursuit of seamless security, the Passwordless Login feature allows users to log in instantly via email or a secure magic link. This innovative approach virtually eliminates the threats associated with weak, reused, or compromised passwords.
Benefit: Greatly reduces the likelihood of successful brute-force or dictionary attacks targeting passwords. It simplifies the user experience while simultaneously elevating security.
While the free version offers 2FA, the Admin Safety Guard Pro plugin goes a step further by supporting industry-standard mobile authenticator apps like Google Authenticator and Authy.
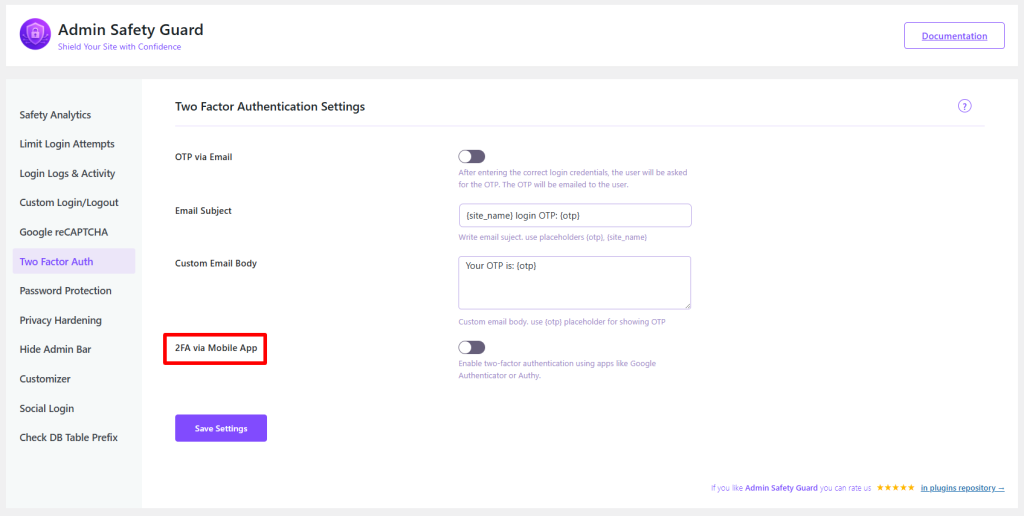
Benefit: This provides a time-based one-time password (TOTP), which is far more secure than email-based codes. It ensures that even if a password is stolen, the attacker cannot log in without the physical mobile device. It’s an absolute must for administrators and high-privilege users.
Weak passwords are a leading cause of security breaches. The Password Strength Tool proactively mitigates this risk by enforcing a strong, configurable password policy.
Benefit: It mandates complex passwords during user registration and password change processes, ensuring all user credentials meet a minimum security standard and directly countering the threat of easy-to-guess passwords.
This feature is ideal for securing the Infrastructure of your WordPress site. This Pro feature extends deep into the application layer, protecting core WordPress mechanisms that are often exploited by skilled attackers.
Cross-Site Request Forgery (CSRF) is a vulnerability where an attacker tricks a user’s browser into executing an unwanted action on a trusted site where the user is currently authenticated. The Admin Safety Guard Pro includes robust CSRF Protection by automatically adding secure, unique tokens to all relevant requests.
Benefit: This critical feature ensures that only legitimate, user-initiated requests are processed, effectively preventing a major class of vulnerability often leveraged for unauthorized data modifications or privilege escalations.
A secure WordPress environment requires proper configuration at the server and database levels. Admin Safety Guard Pro plugin helps identify and rectify common configuration pitfalls.
Incorrect file and folder permissions are a common oversight that leaves a site vulnerable. Admin Safety Guard Pro plugin will automatically verify and check secure file permissions for your core WordPress directories.
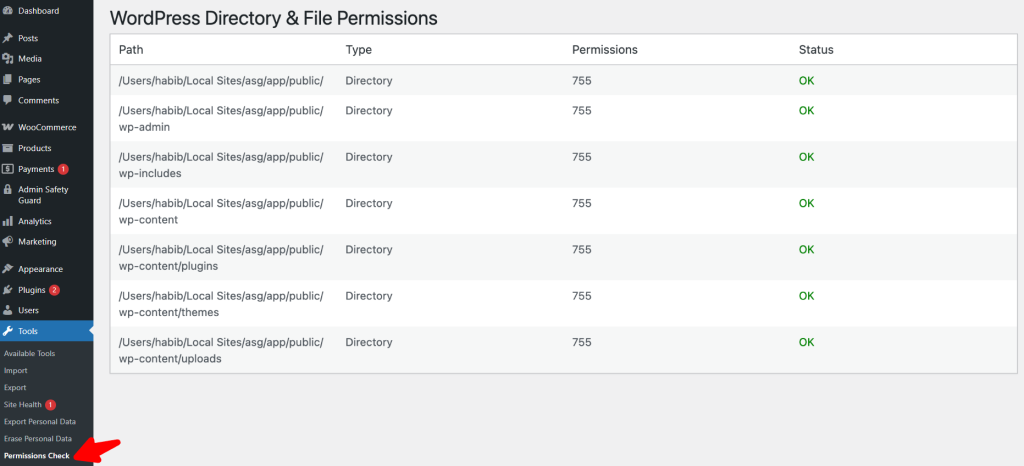
Benefit: Ensures that files are not writable by unauthorized users, closing a common loophole that hackers use to inject malicious code into your installation. For most WordPress sites, directories should be set to 755 and files to 644. However, the wp-config.php file often requires even stricter permissions, such as 400 or 440.
When you install WordPress, the default table prefix is wp_. While this provides basic organization, it’s a globally known value, which can be a target in specific SQL injection attacks. The Database Table Prefix Check detects and alerts you if the default wp_ is still in use.
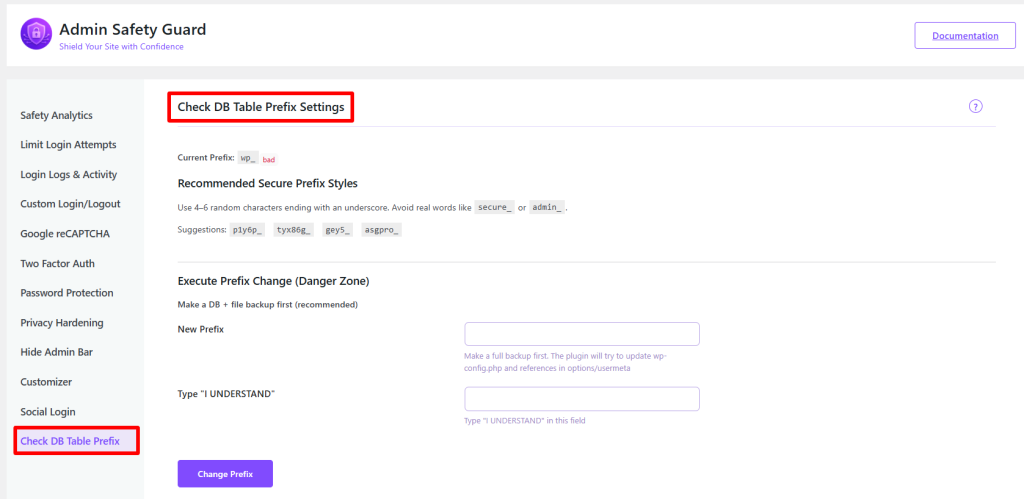
Benefit: It encourages the use of a unique, random prefix, adding a layer of security by obscurity that makes automated, generic SQL injection attempts less likely to succeed. Furthermore, Admin Safety Guard Pro version offers a safe and efficient option to change the database table prefix directly within the plugin interface, updating both the database and the wp-config.php file simultaneously.
Security shouldn’t come at the cost of usability or professional branding. Admin Safety Guard Pro plugin merges military-grade security with premium aesthetic and user experience features.
First impressions matter, even for the login screen. Agencies, developers, and businesses will find immense value in the customization features that allow them to brand and tailor the login experience.
Stop wasting time designing a login page from scratch. Admin Safety Guard Pro offers a selection of readymade, stylish login page templates that you can insert with a single click.
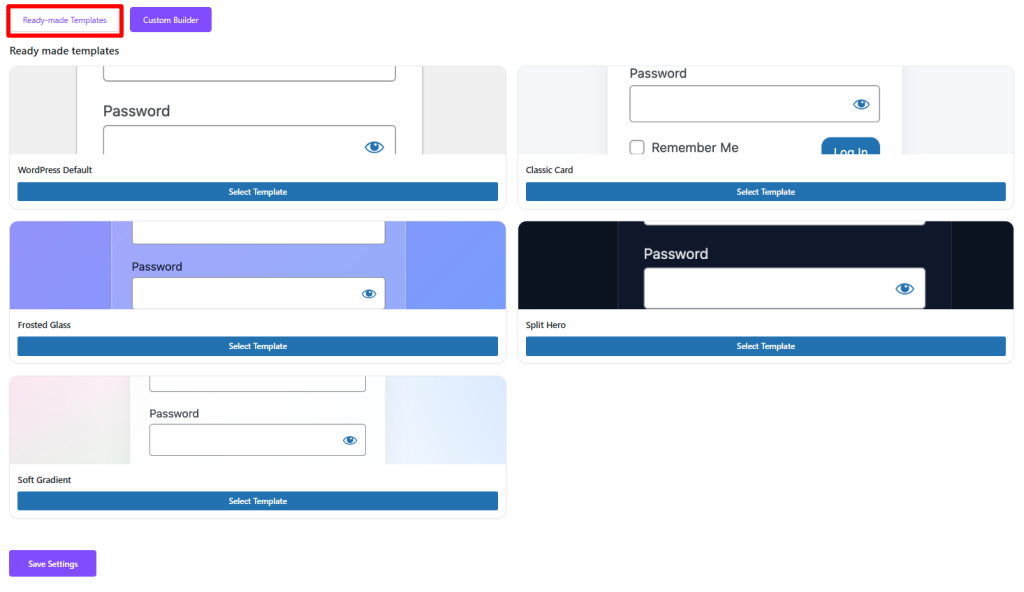
Benefit: Instantly upgrade the Admin Safety Guard Professionalism of your client sites or internal portals. This saves significant development time and ensures a polished, modern look.
For those who require granular control, the Customize Design Pro feature enables advanced customization of the login and admin page designs.
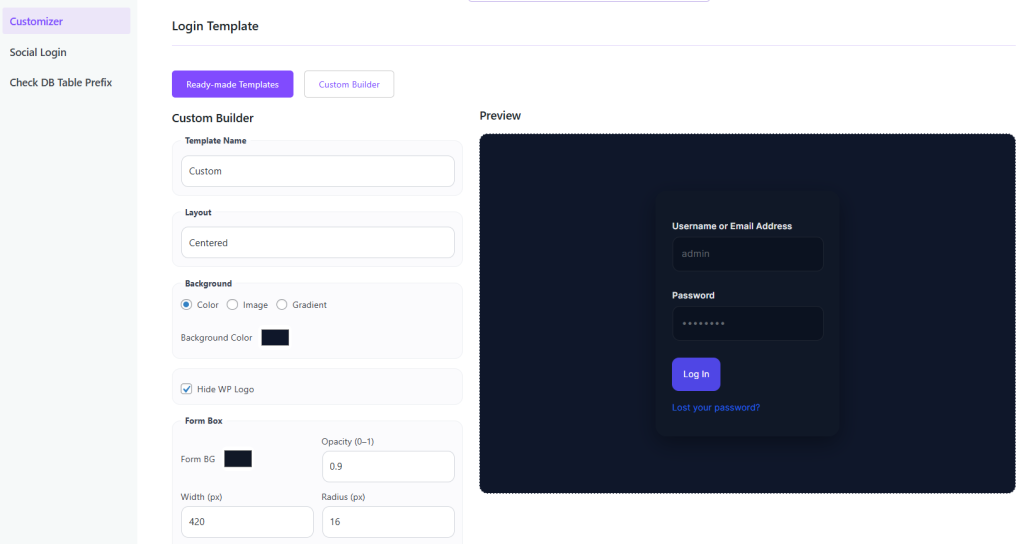
Benefit: Allows full creative freedom over styles, layouts, and elements, ensuring the admin area perfectly reflects your brand’s identity and provides a seamless user experience.
Improving the login process for legitimate users is key to a great UX.
The Social Login feature enables users to bypass manual registration and log in using their trusted accounts from platforms such as Google, Facebook, or Twitter.
Benefit: Enhances user convenience, reduces friction during sign-up/login, and simplifies password management for users, leading to better engagement.
For certain user roles or on specific pages, the default WordPress admin bar can be distracting or unnecessary. This Pro feature allows you to hide the admin bar based on specific roles, users, or page conditions.
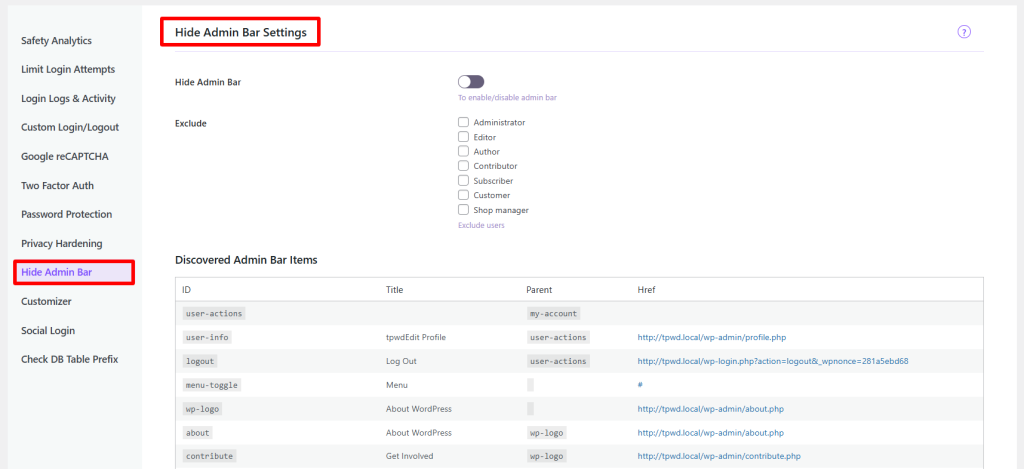
Benefit: Cleans up the front-end view for subscribers, customers, or specific editor roles, improving the site’s aesthetics and reducing potential distractions.
Visibility and control are the hallmarks of a professional security system. Admin Safety Guard Pro plugin provides administrators with the necessary tools to define strict access rules and stay informed.
For maximum security on the admin dashboard, the Whitelist IP Addresses feature is unparalleled. It allows you to restrict login or admin access only to a list of pre-approved IP addresses.
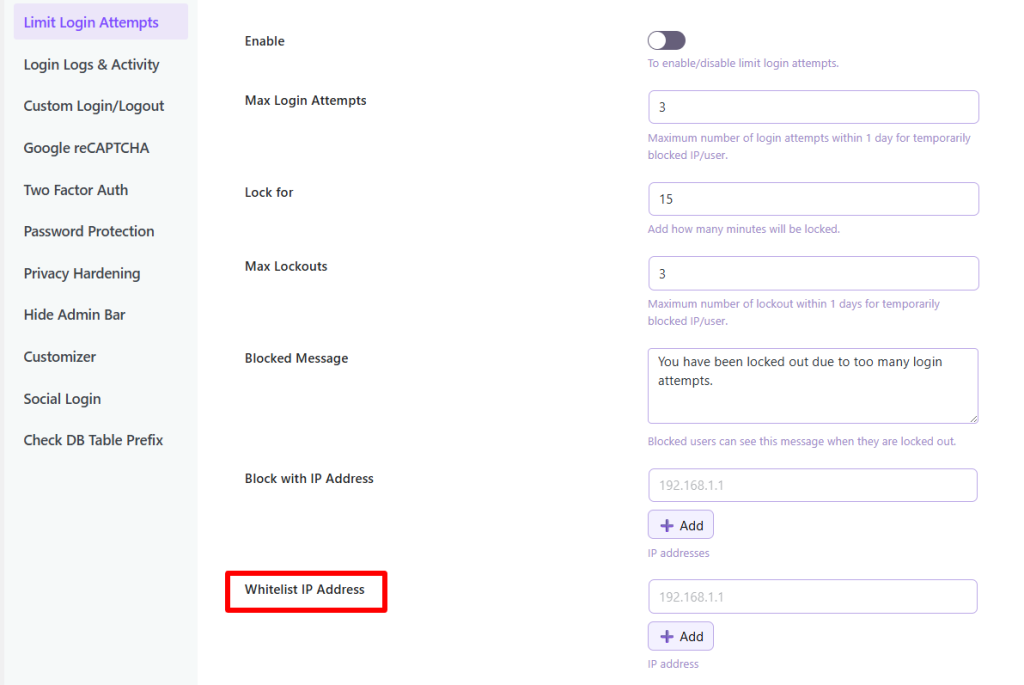
Benefit: Acts as a geographical or network lock, instantly blocking brute-force attacks and unauthorized access attempts originating from non-approved locations. This is highly effective for internal company sites or client development environments.
Knowing about critical events the moment they happen is crucial. The Email Notification feature sends real-time alerts with fully editable subject and body templates.
Benefit: Administrators can customize alerts for specific events, such as failed login attempts, successful logins from new IP addresses, or system file changes. Full customization allows for clear, brand-specific, and action-oriented notifications, ensuring you never miss a critical security event.
To get the most out of this plugin, consider the following best-practice steps:
Relying solely on basic protection is a gamble where 90% of security vulnerabilities are related to plugins and themes. Additionally, unauthorized access remains a persistent threat, particularly through the admin or login panel.
The Admin Safety Guard Pro plugin is the definitive answer for those ready to stop gambling and start securing. It provides a comprehensive, professional toolkit that not only implements top-notch protection without compromising your site’s performance
From 2FA via Mobile App and CSRF Protection to IP Whitelisting, but also allows you to refine your brand’s image with stylish login templates and advanced design customization. Secure your backend, professionalize your brand, and simplify your user experience simultaneously.
The Ultimate Guide to WordPress Admin Security in 2025: Limit Login Attempts, 2FA, IP Blocking & More
In recent years, one of the biggest challenges of WordPress site management has been relentless digital threats. It has become the prime target for hackers due to its massive popularity. Patchstack has reported over 7000 new vulnerabilities in recent times, and the number is increasing.
A breach in your WordPress admin area can result in massive damage to your site. It can lead to data theft, reputation loss, and revenue downfall. Thus, you need to implement multi multi-layered approach to WordPress admin security. It ensures that your digital assets are safe with proactive security.
This guide will walk you through the latest threats that WordPress is facing and their possible prevention methods. We’ll also introduce you to a powerful plugin called Admin Safety Guard. This plugin gives you essential security measures in a single and user-friendly solution.
You must understand the threats before taking any WordPress admin security measures. Cyber threats are evolving every day with new risks. However, there are a few weak points that attackers focus on when targeting WordPress sites. Let’s learn those key weaknesses:
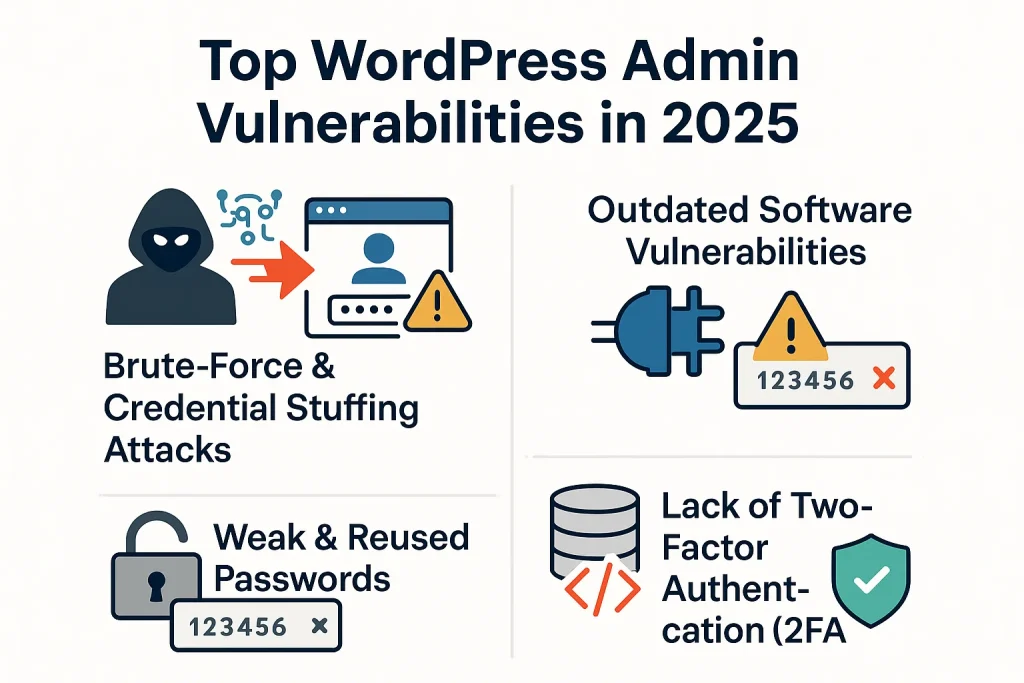
A brute force attack means a relentless break-in attempt on a website. In this attempt, automated bots utilize different combinations of usernames and passwords relentlessly to find the right one. Credential stuffing is an upgraded version of a brute force attack.
In this method, attackers use a list of usernames and passwords they’ve stolen from other data breaches. Currently, AI is powering up these bots and making them smarter and efficient in the guesswork.
Outdated software is the biggest gateway for hackers that outsmarts WordPress admin security. Most of the attacks don’t affect the WordPress core. Instead, they affect significantly in plugins and themes installed in it significantly.
Each security patch release of a plugin announces a security capability against a vulnerability. This indicates to attackers the perfect time to scan the web for sites that aren’t updated. So, if you aren’t updating your software, you are just leaving the site wide open for attackers.
The human touch in passwords still remains the weakest when it comes to ensuring security. Using passwords like “123456,” “password,” or “admin” is a common trait. Even a strong password becomes useless when a same password is used on another breached site. So, using a weak password and reusing the password is like handing the key to the attackers.
Cross-Site Scripting (XSS) and SQL Injection (SQLi) hurt WordPress admin security with malicious code. It breaches your site through the contact form and search bars.
An XSS attack usually steals your admin session cookies. It allows attackers to hijack a logged-in session that doesn’t even require a password. The SQLi attack is designed to exploit the database and automatically create a new admin user.
In 2025, you need to think beyond passwords for ensuring WordPress admin security. Since passwords are getting stolen, two-factor Authentication has gained attention. IT adds a second layer to secure your site. After the password, users need to provide a second piece of information, such as time time-sensitive code from the mobile.
Recent studies show that many businesses are missing out on 2FA on their business website. This is a significant security gap that you must address with proper WordPress security measures.
After learning about the threats, let’s examine the defense mechanisms.
You can block most of the automated attacks using five essential security measures on your site. Here are the tactics that will secure your site from potential threats:
Limiting the failed login attempts is the simplest way to prevent brute-force attacks. Let’s say too many incorrect login attempts are coming from the same IP address. So, the system should block the user temporarily or permanently and lock out the IP.
This method cuts off bots before they can utilize endless username and password combinations. Thus, the attack becomes meaningless, and your site stays safe.
Two-factor authentication adds a secondary protective layer to your site. This method should be mandatory for all admin-level users. Even hackers with your valid username and password can’t enter your site due to the second verification step.
The second step is tied to the user’s smartphone or other device. It adds a strong defense mechanism to your WordPress admin security.
Why wait for hackers to harm your site? A strong security strategy can prevent them from accessing your login page before they even attempt to use it. This is possible by blocking their malicious IP addresses and whitelisting the trustworthy ones.
The entire control of user accessibility is in your hands. Moreover, you can use geoblocking to block an entire region where you don’t want to do business.
Hackers and bots already know that they need to target wp-admin and wp-login.php. These are the default access points to enter a WordPress site. You can add security through obscurity by changing the default login URL to something unique.
For example: yourwebsite.com/my-secret-portal.
However, this won’t completely stop determined hackers from entering your site. It dramatically stops the automated bot from attempting to hit your server constantly.
With enough information, you can take proactive measures for Wordpres admin security. Therefore, you need a detailed report of successful and failed login attempts to learn what’s happening on your site. The activity log provides insights into suspicious login patterns and IP addresses, enabling you to quickly detect unauthorized access.
Implementing all the essential security measures that we’ve mentioned is a complex task. Admin safety guard has made this complex task easier by combining all these features. Most importantly, the plugin offers the above-mentioned features in its free version.
Let’s see how Admin Safety Guard caters to WordPress admin security with its proactive defense measures:
Limit Login Attempts: Admin Safety Guard allows you to easily set the number of allowed retries, the duration of the lockout (temporary or permanent), and even notify you of lockouts.
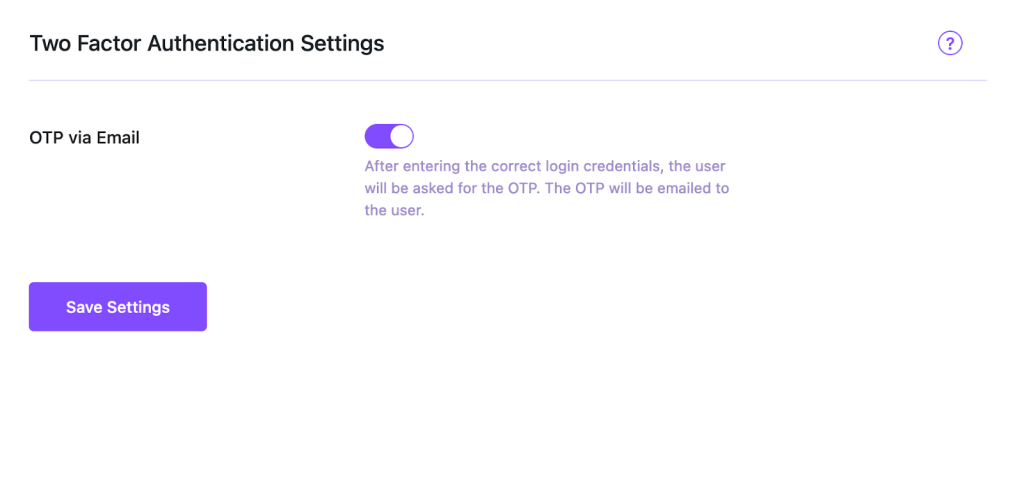
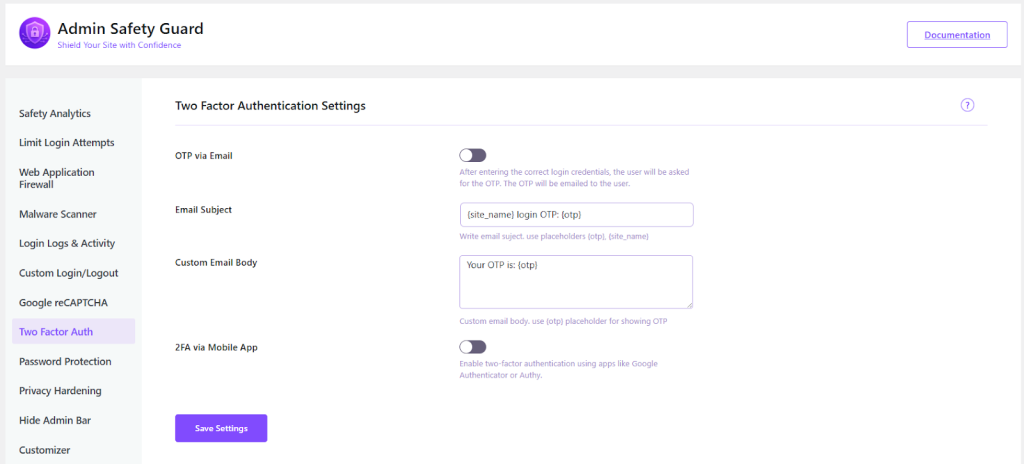
Two-Factor Authentication (2FA): The plugin comes with built-in 2FA via email. You can enable it for all users or specific user roles with a single click, instantly adding that critical second layer of security.
IP Blocking & Whitelisting: This feature provides a simple interface for manually blocking or whitelisting specific IP addresses or entire IP ranges, giving you granular control over who can access your site.
Change Login URL: Forget editing .htaccess files. Admin Safety Guard lets you change your WP-Admin login URL from the dashboard in seconds, instantly hiding it from bots.
CAPTCHA Protection: Google CAPTCHA adds a visual challenge to your login form, filtering out bots and automated scripts. Admin Safety Guard integrates seamlessly without disrupting the user experience.
Disable XML-RPC: The XML-RPC is often exploited for brute-force and DDoS attacks. Disabling it closes a major loophole without affecting most modern workflows.
Login Logs & Activity Tracking: The plugin maintains a detailed log of every login attempt, capturing the username, IP address, time, and status (success or failure). This provides the crucial oversight needed for effective security monitoring.
Note: Check out our detailed documentation about Admin Safety Guard.
You can ensure WordPress admin security with Admin Safety Guard within 5 minutes. Here is how to do it:
These are some simple steps to install the Admin safety guard in your WordPress site:
Navigate to the Admin Safety Guard settings page to set up your WordPress admin security:
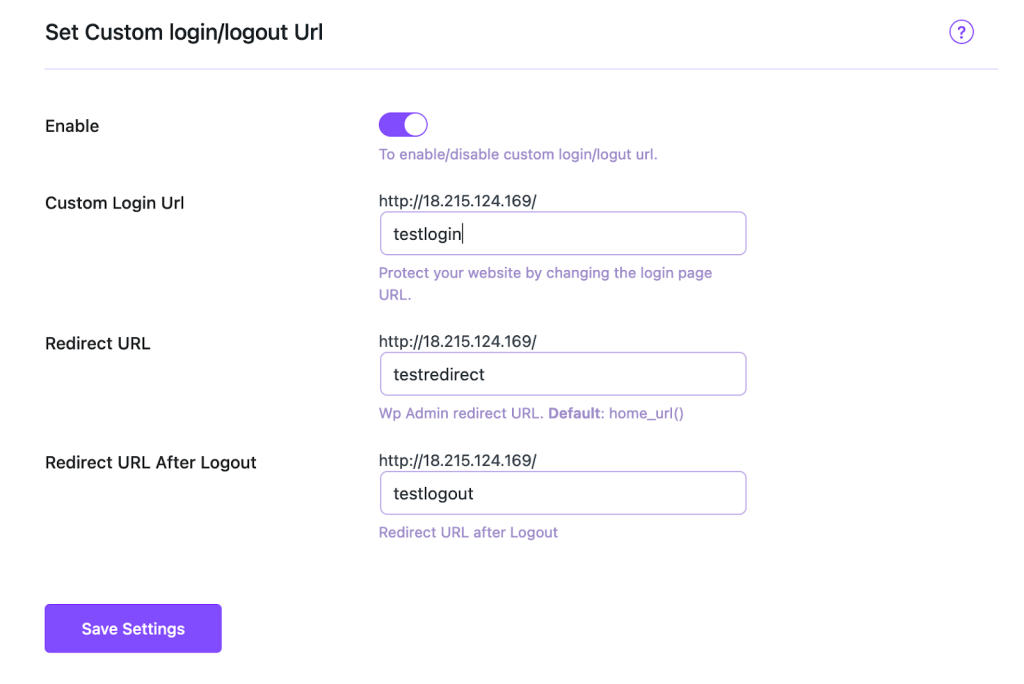
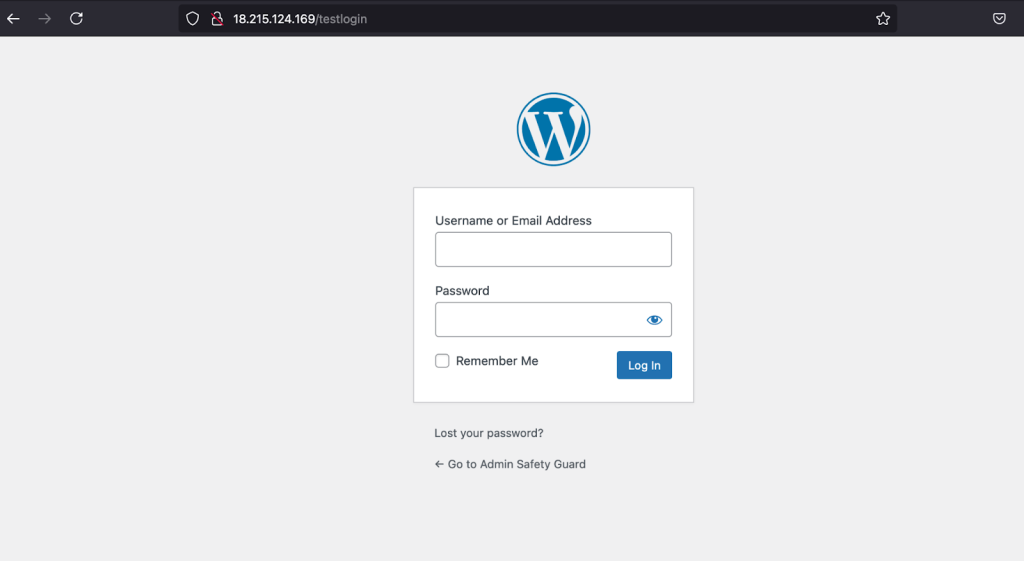
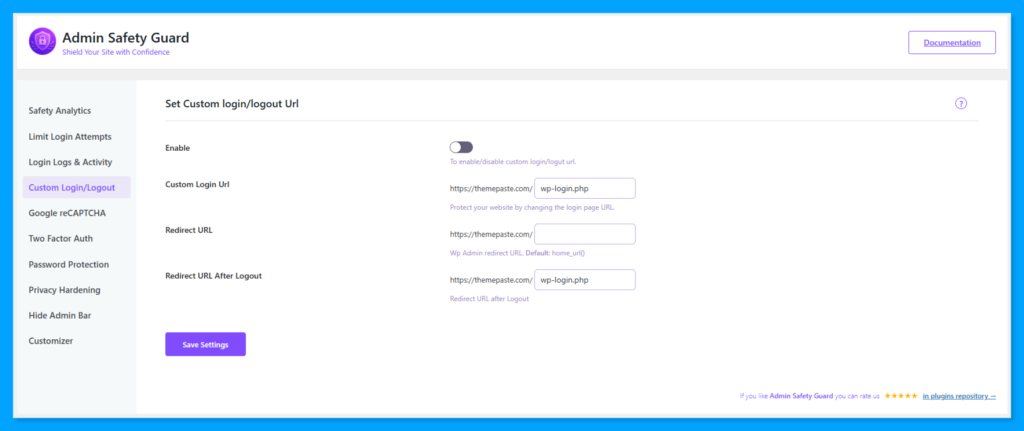
Change Login URL: Go to the “Change Login URL” tab. Enter your new desired slug (e.g., “secret-login”) and hit “Save Changes.” You will be logged out and redirected to your new login page. Bookmark it.
Limit Login Attempts: In the “Limit Login Attempts” tab, you can configure the lockouts. A good starting point is 5 retries, a 30-minute lockout duration, and 3 lockouts before a permanent ban.
Two-Factor Authentication (2FA): Under the “Two-Factor Authentication” tab, simply check the box to enable it. You can then select which user roles (e.g., Administrator, Editor) are required to use two-factor authentication (2FA). The next time those users log in, they will be prompted to set it up.
IP Management: Use the “IP Blocking” tab to add any suspicious IP addresses you’ve found in your logs to the blocklist. You can also add your own IP to the whitelist to ensure you never get locked out.
Beyond the core essential WordPress admin security, Admin Safety Guard also offers:
Note: Try Admin Safety Guard Pro to get next level WordPress admin security with advanced automation and customization option. You can purchase the plugin at a discounted price from the official website.
You can’t compromise WordPress admin security when it comes to ensuring data safety and user experience. You just need to understand the primary threats and establish some basic security measures.
You no longer need to rely on premium plugins or multiple plugins to achieve WordPress admin security. Plugins like Admin Safety Guard give you a comprehensive and budget-friendly solution.
Let’s not wait to see the message: “Your Site Has Been Hacked.” Take a few minutes to protect your website’s data and reputation. Install Admin Safety Guard to ensure the security your site deserves.
Best Loginizer Alternatives in 2026: Secure Your WordPress Login with Better Options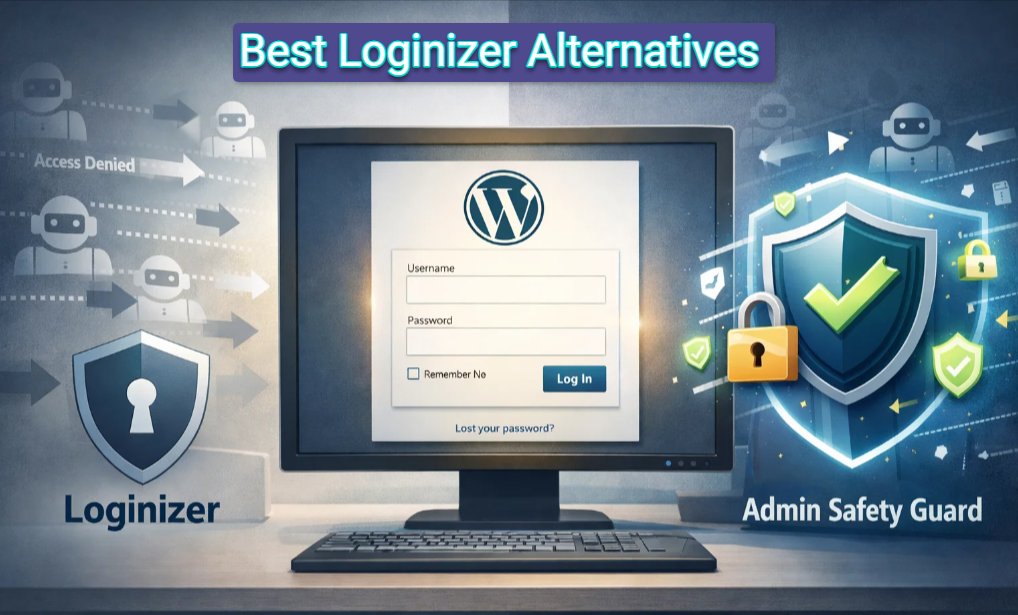
Your WordPress login page is the entry point of your valuable digital asset. Leaving that point insecure is not an option when millions of brute force attacks occur every hour. So, having a strong login security plugin is not just a nice-to-have option. This is where the Loginizer alternative comes in.
Over millions of users, including website owners, trust the Loginizer plugin to ensure their admin security. But the question is, is there any better alternative that offers more powerful features or is effective? We are here to introduce you to a new contender: Admin Safety Guard.
In this guide, we will put the two plugins head-to-head and show you why Admin Safety Guard is a better alternative. So let’s start.
Cyberthreats in WordPress are becoming more relentless and sophisticated. Thus, you must change your security measures in every possible way in the coming years. Here is why login security demands more care than ever before:
Traditional security measures are not capable of today’s AI-enhanced attack strategies. So, login pages are vulnerable due to threats like:
The shift towards remote work, mobile accessibility, and collaborative platforms has transformed business operations. Therefore, new challenges have been introduced to the security that must adopt a smarter and more flexible login system. Here’s why:
Compliance and data protection regulations like GDPR and CCPA mandate strong access control and data integrity. Thus, organizations must ensure that they are securing user data. Here is why:
A compromised login can massively damage your brand’s reputation. Here is why:
Before talking about Loginizer alternatives, let’s take a look at what the Loginizer plugin has to offer.
Loginizer is a lightweight WordPress login security plugin that protects against login-based attacks. It has a long-standing reputation and over 1 million active installations. The plugin combats brute-force login attempts to safeguard your WordPress site.

Key Features of Loginizer Free verison:
Pros:
Cons:
We will now focus on the best Loginizer alternative available in the WordPress plugin marketplace.
Admin safety guard is one of the most ideal Loginzer alternatives with a comprehensive admin login protection suite. It offers a powerful range of premium-tier features without any upgrade.

The plugin enters the market with a clear intention: to offer exclusive WordPress security features that other plugins charge for. All current threats are taken into consideration to safeguard your site without asking for your credit card.
Key Features:
Let’s compare both plugins to check whether Admin Safety Guard is a better Loginizer alternative.
This is where the actual comparison begins to determine the best Loginizer alternative. Here is a feature breakdown that will help you select the one that offers better protection and value.
| Feature | Loginizer | Admin Safety Guard | Winner |
| Brute Force Protection | Yes | Yes | Tie |
| IP Blacklisting/Whitelisting | Yes | Yes | Tie |
| Two-Factor Authentication (2FA) | Premium Feature | Free | Admin Safety Guard |
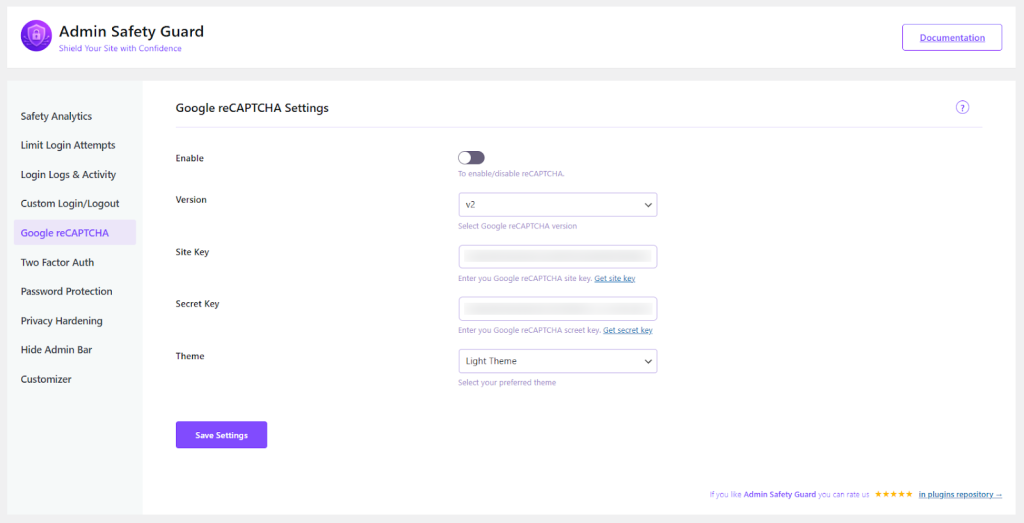
| reCAPTCHA (v2 / v3) | Premium Feature | Free | Admin Safety Guard |
| Rename Login URL | Premium Feature | Free | Admin Safety Guard |
| Disable XML-RPC | Premium Feature | Free | Admin Safety Guard |
| Login Logs & Activity | Yes | Yes | Tie |
| User Interface (UI) | Standard WP Interface | Modern, Intuitive Dashboard | Admin Safety Guard |
| Overall Value | Freemium Model | Completely Free | Admin Safety Guard |
Now we will dive into the specifics to clarify why Admin Safety Guard is an ideal logniizer alternative. The free feature of Admin Safety Guard offers valuable perks that are the foundation of modern web security. Let’s check those specific features:
Safeguarding the admin and website with a password is a bit of an old method. Two-Factor Authentication (2FA) adds an extra layer of protection to your site. Thus, it becomes harder for hackers to breach your site. So, one can’t access your account even if you lose your password due to this feature.
Loginizer: Loginizer requires you to upgrade to the pro version to enable 2FA via email or an authenticator app.
Admin Safety Guard: This Loginizer alternative gives you the two-factor authenticator feature for free. Two-factor authenticator is a real game-changer since it can block more than 99.9% of the risk of cyberattacks. So, Admin safety guard won’t hurt your wallet to give your site a premium protection.
The Verdict: Getting the 2FA feature for free is a massive win when it comes to a Loginzer alternative like Admin Safety Guard.
The default login URL (wp-login.php) of WordPress is vulnerable to bots that attack the login URL. One way to prevent it is to hide the page from general users, and another is to ensure users can’t submit the form.
Loginizer: Renaming your login URL and adding Google reCAPTCHA to your site via Loginizer requires a premium subscription. This means you must pay to implement these defensive mechanisms on your site.
Admin Safety Guard: Fortunately, this Loginizer alternative offers these powerful features for free. You can change the site URL by renaming it to something unique (e.g., my-secret-portal). Plus, you can enable reCAPTCHA and ensure real humans are logging in. This combination alone removes the possibility of automated attacks.
The Verdict: The Admin Safety Guard offers free access to two of the most essential bot attack blocking mechanisms. On the other hand, Loginizer requires payment for these features, which is a minus.
Security is the primary goal of the loginzer alternative named Admin Safety Guard. However, a confusing user interface can ruin the usability and lead to misconfiguration. This damages the main purpose and keeps your site vulnerable, even with advanced features.
Loginizer: Uses a functional interface, which is a bit conventional. It is lucrative and functional yet lacks a modern vibe. You won’t get the full view unless you install the premium version.
Admin Safety Guard: Admin safety guard gives you a clean user interface with a modern dashboard. You can get an overall insight into different security and login-related statuses from the dashboard. Even non-technical users can configure their security settings with minimal hassle.
The Verdict: If you are a user with a taste for modern UI, then Admin Safety Guard will meet your expectations.
The login page creates the first impression for clients, team members, or stakeholders who can enter your site. When your login page is professional and comes with a brand identity, it gains user trust and uniqueness.
Loginizer: Loginizer comes with limited login page customization options. Thus, your login screen comes with a generic outlook without any uniqueness.
Admin Safety Guard: Loginizer alternative like Admin Safety Guard allows you to add a logo, change color, and style in the login page. So, you can showcase and match your brand identity. The feature is especially helpful for agencies managing multiple client sites or businesses willing to present a unique brand image.
The Verdict: Admin Safety Guard stands out if you are concerned about your brand uniqueness. It offers you some effective customization options that Loginizer lacks.
You can’t ignore the fact that Loginizer has more than 1 million active installations and thousands of reviews. Though Admin Safety Guard is the new contender in the block, the amazing free features make it an ideal Loginizer alternative. Here’s how you can look at it:
Massive User Base (Loginizer): The review, rating, and comments on Loginizer indicate that it has a stable and long history. However, it also indicates slower feature release and a rigid development path. Supporting millions of customers is not an easy thing to maintain.
New and Agile (Admin Safety Guard): Admin Safety Guard is created with the latest code base and security practices in mind. This Loginizer alternative developers are agile and eager to prove the value for money.
The developer team is providing direct and responsive support to its early adopters. So, by selecting Admin Safety Guard, you are investing in the future of WordPress security.
Loginizer has been serving WordPress users for many years with trust and reliability. However, the security features of recent and coming years demand more. Users shouldn’t pay for fundamental security features that Admin Safety Guard is focusing on.
Admin Safety Guard clearly stands as a winner and the best Loginizer alternative in the marketplace. It currently provides modern security with its unbeatable free tier and is working on its pro version as well.
How to Fix Common WooCommerce Shipping Issues: A Comprehensive Troubleshooting Guide for E-commerce Success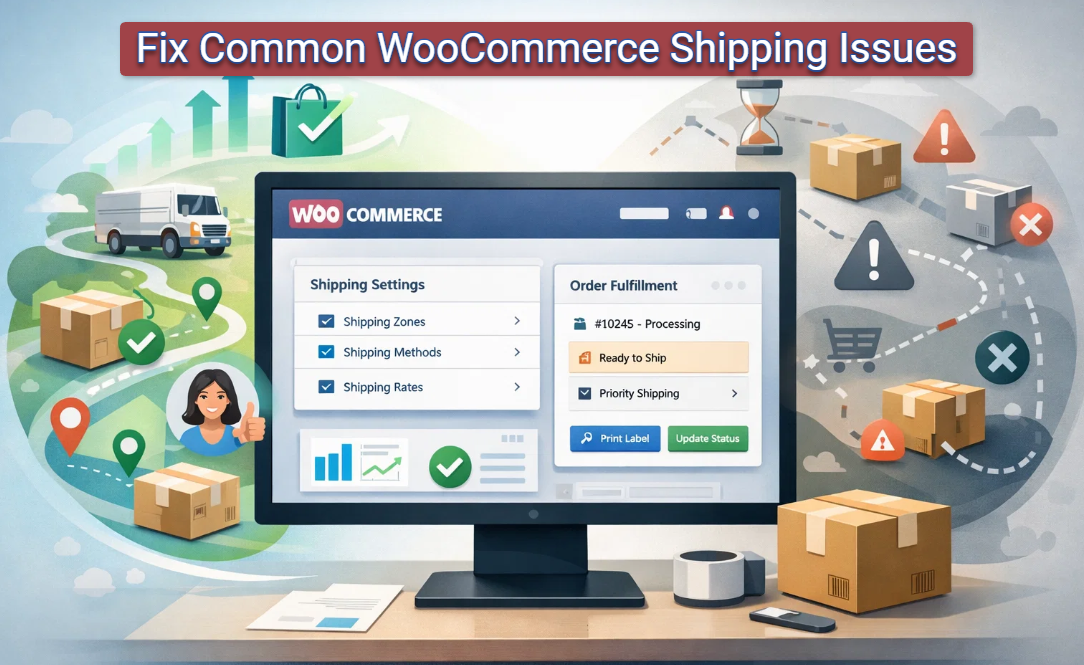
Shipping is more than a logistical step in the eCommerce journey of a customer. It significantly affects customer satisfaction when applied properly. A smooth shipping process encourages repeat purchases and improves brand reputation.
Conversely, shipping issues can hurt your business with cart abandonment, negative reviews, and loss of revenue. Therefore, you must understand the issues and mitigate those to overcome the challenges.
This guide will be your valuable resource for exploring the complexities of shipping in Woocommerce. You will learn the common issues and their fixes alongside advanced optimization strategies. So, let’s turn shipping headaches into a competitive advantage.
Before fixing the issues, you must have a solid understanding of the core concepts of WooCommerce shipping. Understanding the basics will help you avoid any misconfiguration in your WooCommerce shipping settings.
WooCommerce defines geographic areas via shipping zones that are essential for international customers. Then, specific methods and rates apply to those zones and are presented to customers at the checkout.
To set up:
When the customer’s address doesn’t match a zone, WooCommerce shows the error message – “No shipping options found.” The zone is the foundation layer of the WooCommerce shipping logic hierarchy. So, making an error will disrupt other shipping settings under that zone.
WooCommerce offers three common shipping methods to meet standard shipping needs. Here are the methods:
Ways to activate these methods:
You must assign shipping methods to a specific zone. Usually, each zones have its designated methods which you can set on WooCommerce. When a zone lacks methods, customers of that zone won’t see any shipping options.
Note: Shipping Manager makes the entire process easier. It syncs perfectly with WooCommerce and prevents all possible shipping issues. Thus, you can create a zone and then set free shipping, rules, and class-based methods for that zone.
Shipping classes allow store owners to group products according to different attributes. Thus, they can classify products according to size, weight, or type and then apply a shipping fee.
Common Use Cases:
How to set up:
Note: Each product can belong only to one shipping class.
How does it integrate with Shipping Method?
Shipping classes don’t define shipping fees directly. They are utilized via methods such as Flat Rate. In Flat rate settings, you can choose between two options:
Shipping classes offer more segmented control over the shipping fee. The problem is that incorrect rate configuration can lead to inaccurate shipping fees.
Accurate product data, such as weight and dimensions, is essential for showing a precise shipping fee. This becomes more important when you want to showcase weight-based real-time carrier rates.
Where to Enter Product Data:
Missing the weight or dimension data is another reason for showing the “NO Shipping Options Found” error. It also results in incorrect shipping rates.
Pro Tip: Check the product data first and then look into complex rules before fixing shipping issues. It’s a simple check, yet an effective solution that may seem complex.
We’ve already gone through the foundational understanding of WooCommerce shipping. Now, we’ll address the common shipping issues and their step-by-step troubleshooting.
The “No Shipping Options Found” error is one of the most common shipping issues in WooCommerce. It blocks customers from completing their purchase process. The error occurs when WooCommerce is unable to match the customer’s address with available shipping methods. This requires attention in every layer of shipping configuration, such as:
Misconfigured shipping zones and methods are the root cause of most of the shipping issues in WooCommerce. It occurs when the customer’s location isn’t clearly set in a shipping zone. It also appears when the zone lacks shipping methods like flat Rate, free shipping, or local pickup. In this case, WooCommerce won’t display the shipping option.
Solution:
Information gaps in the state or postcode can also create shipping issues, even if the zones are present. It’s possible that the customer’s address is not available in the zone you’ve set up.
Solution:
A mismatch in shipping class can also trigger this shipping issue. Let’s say you are applying shipping methods to a specific class, like bulky items requiring freight. WooCommerce won’t find a valid shipping method if the product in the cart doesn’t belong to a matching class.
Solution:
You must provide accurate product data for applying accurate shipping strategies. It’s particularly important when it comes to carrier integration or table rates. WooCommerce won’t show shipping charges when product info is missing or specified inaccurately.
Solution:
Note: Keep in mind that WooCommerce consists of a chain of dependencies, which includes zones, methods, classes, and product data. Any misconfiguration or inaccurate data at any level of these data will create the “No Shipping Options Found” shipping issue.
Customers mostly abandon their carts due to frustration and distrust when they see abnormal shipping prices. The shipping fee can be high, cheap, or not updated dynamically.
This shipping issue occurs when they modify the address or items in the cart. It requires you to go beyond simple shipping settings and apply an extensive troubleshooting approach.
The most common causes of this shipping issue are outdated shipping data. The data includes WooCommerce transients, caching plugins, CDNs, or several-level caches. The old data in the cache blocks the system from calculating and displaying an accurate shipping fee.
Solutions:
Plugin and theme conflicts are a common problem that can trigger various shipping issues. Custom themes, plugins, and codes can interfere with the shipping calculations.
Solutions:
API communication failure with WooCommerce or carrier-based (e.g., USPS, DHL, UPS) shipping plugins. This failure usually happens due to incorrect credentials, network blocks, and carrier outage.
Solutions:
Incorrect tax settings or hidden handling fees can show inaccurate shipping costs. In this case, you may see too high or too low shipping costs. This shipping issue raises distrust in your shipping method and leads to cart abandonment.
Solution:
The default customer location detection of WooCommerce decides the shipping rates at checkout. Thus, properly configured zones are essential to display the correct shipping rates.
Solution:
Shipping issues can come from invisible technical factors like caching, plugin conflicts, and API failure. To fix those errors, you need to have deeper WooCommerce debugging skills and proactive site monitoring.
As a store owner, you should have a thorough understanding of troubleshooting to ensure accurate shipping rates. Besides, you can rely on professional WordPress maintenance services to handle these shipping issues.
Shipping issues that happen due to customer addresses can derail customers’ motivation to purchase. You may have configured the shipping rates properly in WooCommerce. However, inaccurate address handling can ruin your sales outcome. This issue arises due to a mix of inaccurate user input and technical conflict.
The address-related shipping issue can occur when the user inputs an incorrect, incomplete, or unrecognized address.
Solution:
Checkout forms can malfunction or showcase inaccurate addresses. This can cause shipping issues due to plugin conflicts, custom codes, or misconfigured required fields.
Solution:
Using a theme that is not responsive or has CSS issues can cause checkout field errors. This causes an incorrect shipping fee at checkout on mobile devices.
Solution:
Shipping issues due to address impact customers’ buying journey directly. Broken or invalid form fields can impact user experience similarly to misconfigured shipping zones. Thus, you must ensure robust address validation and a mobile-friendly design.
When a customer places an order, your next challenge is to fulfill that order. Shipping issues in this stage can be label generation errors, customs documentation issues, and tracking delays. Let’s learn how you can overcome these issues:
Label printing failure occurs when the payment details are absent, the origin address is incorrect, or the contact number is incorrect.
Solution:
Proper identification must be submitted while shipping dangerous items. Otherwise, the shipping will be delayed or rejected.
Solutions:
For international shipments, you must ensure that customs forms are correctly filled with the necessary information. Otherwise, it becomes a shipping issue with blocked international shipments.
Solution:
Manual tracking numbers are prone to errors and cause client frustration during delays. Customers always expect real updates about their shipped products.
Solution:
You shouldn’t overlook compliance requirements to avoid shipping issues, such as fulfillment challenges. Missing a crucial detail like a phone number can halt your shipment entirely. Thus, rely on tools that prevent shipping issues by maintaining legal compliance.
WooCommerce shipping isn’t just a backend task of your online store. It’s the part where customer satisfaction and business success are related. This guide addresses all the common shipping issues and their easy solutions.
The focus on fixing shipping issues transforms from reactive troubleshooting to proactive optimization. By following this guide, you will be able to maintain a smooth shipping flow. Go for premium plugins to fulfill advanced shipping needs.
Treat your shipping as an evolving system that will eventually turn into a growth engine by satisfying customers.
WooCommerce Shipping Classes Explained: How to Set Up Class-Based Shipping Fees the Smart Way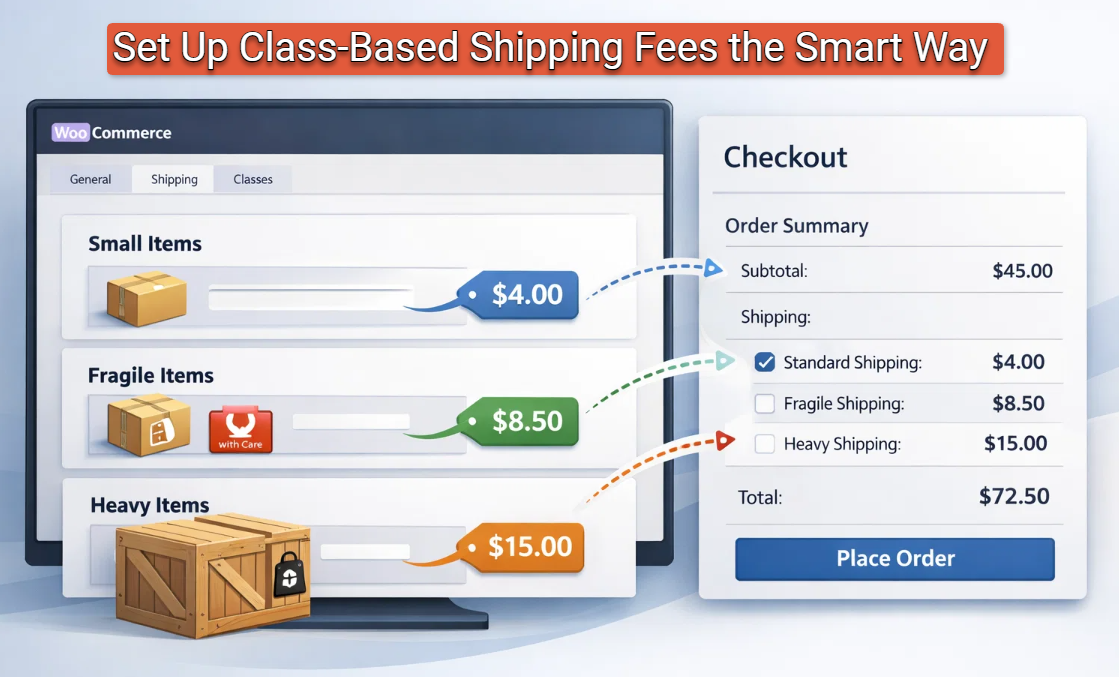
One of the most important details of the customer experience at WooCommerce checkout is having transparent shipping options. Shipping can be complicated in many cases, particularly when handling various types of products. They require separate handling with accurate shipping charges. This is where the WooCommerce shipping classes come in.
WooCommerce shipping classes allow store owners to categorize products into groups and set distinct shipping costs for each class. This makes offering small and light, fragile, or heavy machinery easier with shipping classes.
In this article, we’re going to share with you a step-by-step process for setting up class-based shipping fees on your WooCommerce store. This will make your store’s shipping process more efficient and customized. It will surely benefit both you and your customers.
WooCommerce shipping classes are a great way to categorize products based on their similar shipping requirements. Each class is a collection of your shipping rules, which you can use to effectively administer your delivery costs.
You might, for instance, have a “Heavy Items” category for large products that incur higher shipping costs, or a “Fragile Items” category for products that require careful packaging.
You can apply shipping classes to different products, which are added to the shipping rules for various products. Let’s say a customer purchases products from multiple woocommerce shipping classes. In that case, a dynamic calculation is applied to determine the shipping cost for each product based on its class.
For example, if a customer adds a breakable item to their shopping cart along with a heavy item, WooCommerce will calculate the shipping cost based on each item’s class, ensuring pricing is as accurate as possible.
You can easily categorize products based on shipping classes to fit different business scenarios. Let’s take a look at some core benefits of using WooCommerce shipping classes:
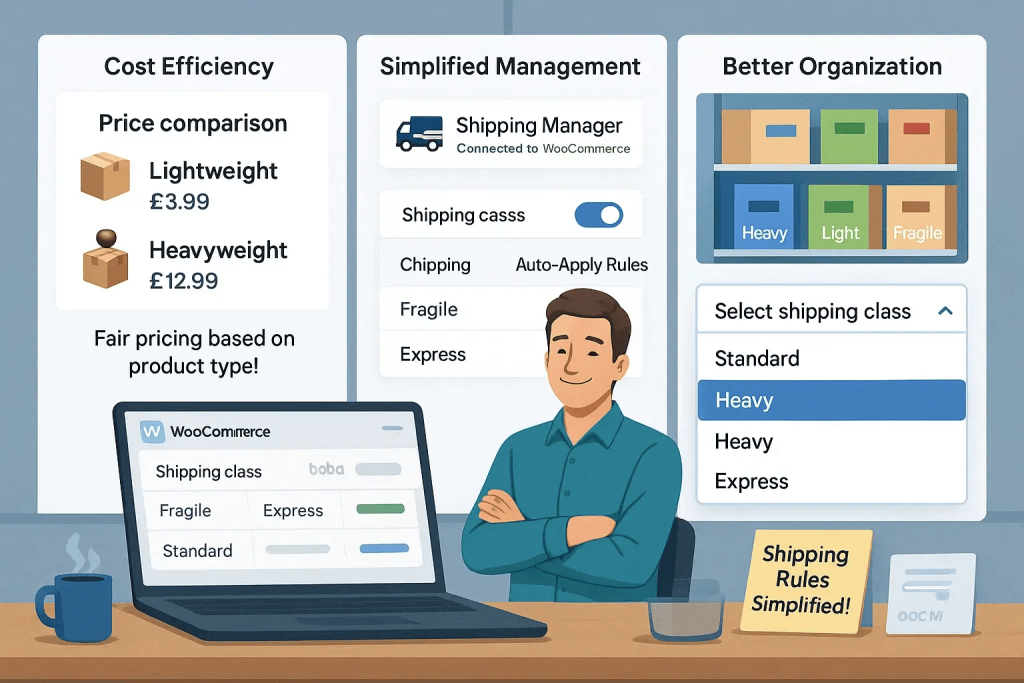
Ensuring Cost Efficiency: WooCommerce Shipping classes enable the offering of different shipping costs for various product types. For instance, lightweight goods will be cheaper to send since they are less bulky.
However, heavier items can be more expensive than lighter ones. This way, customers are billed accurately for the product they’re buying. Additionally, they receive extra information as needed.
Enabling Better Organization: WooCommerce Shipping classes categorize products based on their shipping requirement. This helps store owners manage shipping settings more efficiently and quickly. It is especially beneficial if you have a vast stock and are involved in shipping products to multiple destinations.
Simplified Shipping Management: Custom shipping methods can be applied to product groups using WooCommerce shipping classes. This reduces the hassle of manually setting rates on a per-product basis. Additionally, it enables a more streamlined and automated shipping process.
In summary, WooCommerce shipping classes provide a straightforward way to modify shipping fees in WooCommerce. It can ease any complex shipping process for both vendors and customers.
Creating WooCommerce shipping classes is pretty simple and can make your store’s shipping process more manageable. You can use it to group products of a similar type and utilize it to perform tasks such as calculating shipping rates based on the shipping class.
However, things become problematic when the store becomes large and has complex requirements. WooCommerce has a paid plugin to manage class-based shipping with advanced options. We are offering a free option named Shipping Manager – Table Rate, Weight-Based, and WooCommerce Advanced Shipping.
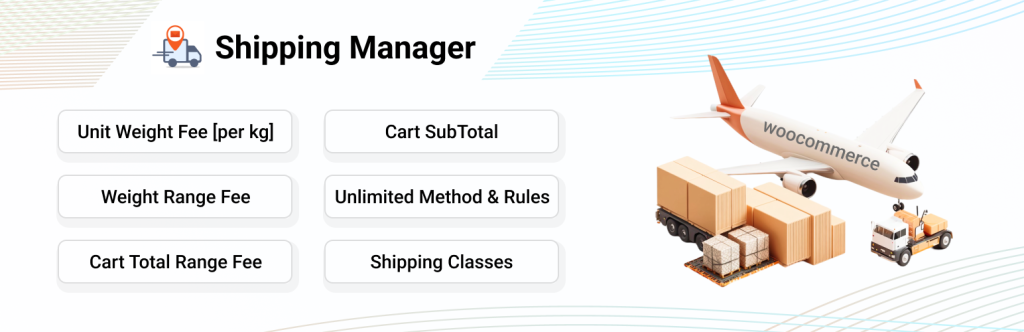
Here is how to add shipping classes without any paid option while using the Shipping Manager plugin for WooCommerce stores:
Shipping classes allow you to group products with similar shipping requirements, making it easier to set accurate shipping fees. Here’s how to create them:
Go to WooCommerce Settings:
Navigate to WooCommerce → Settings → Shipping → Shipping Classes in your WordPress dashboard.
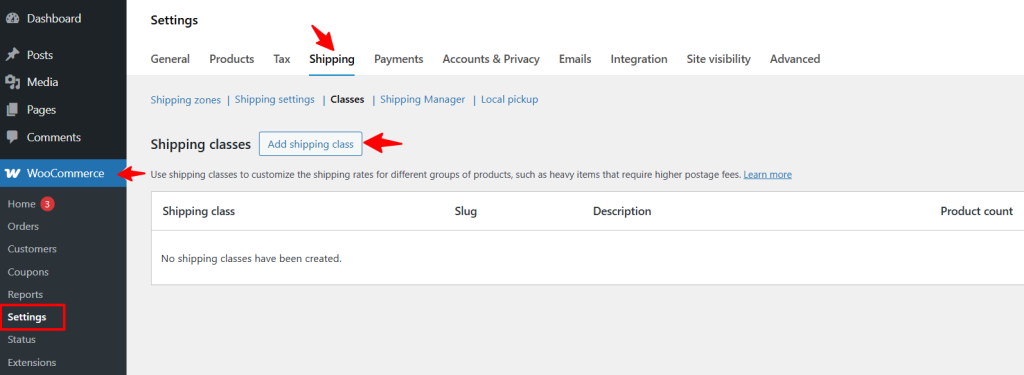
Add New WooCommerce Shipping Classes:
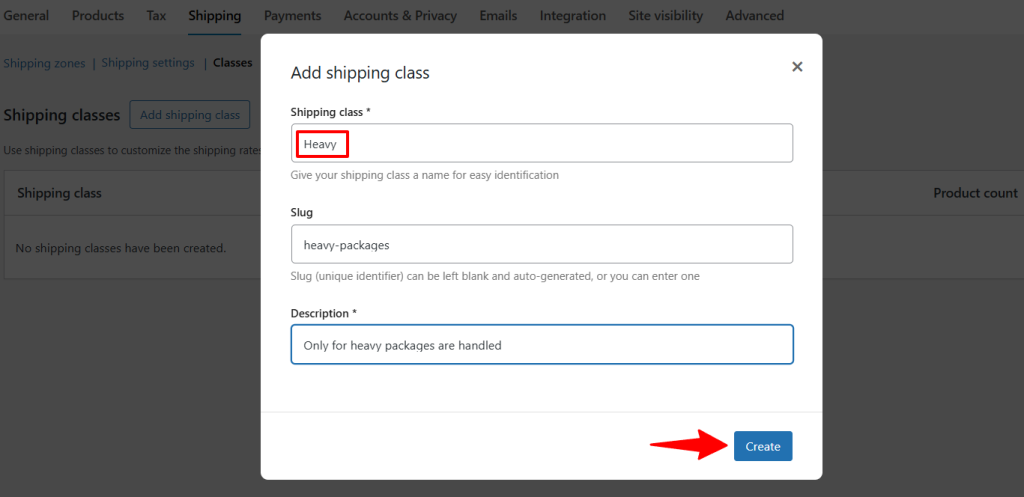
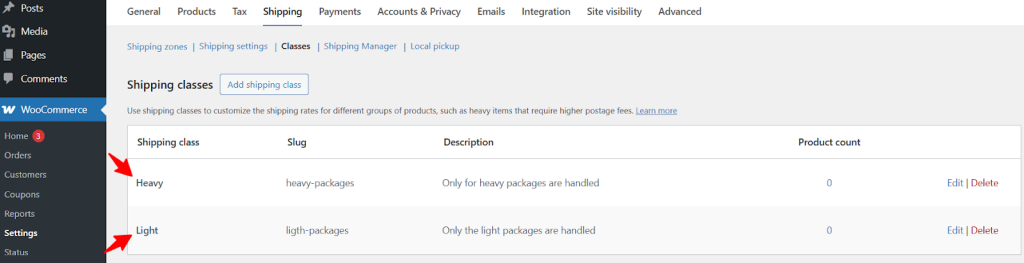
Now that your WooCommerce shipping classes are set up, the next step is assigning them to your products.
After creating WooCommerce shipping classes, you need to assign them to relevant products to apply the correct shipping fees.
Edit a Product to assign a shipping class:
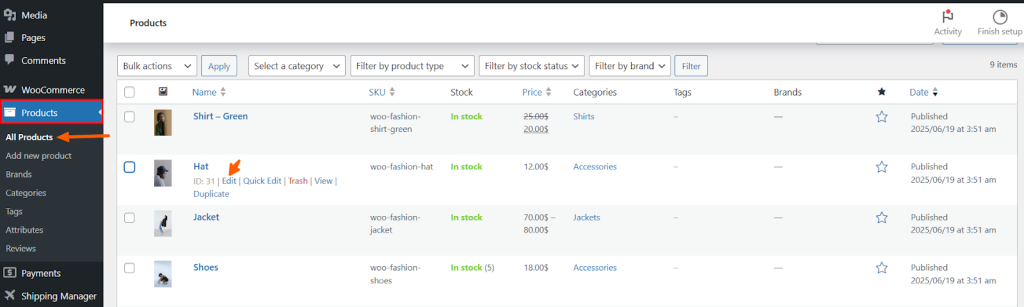
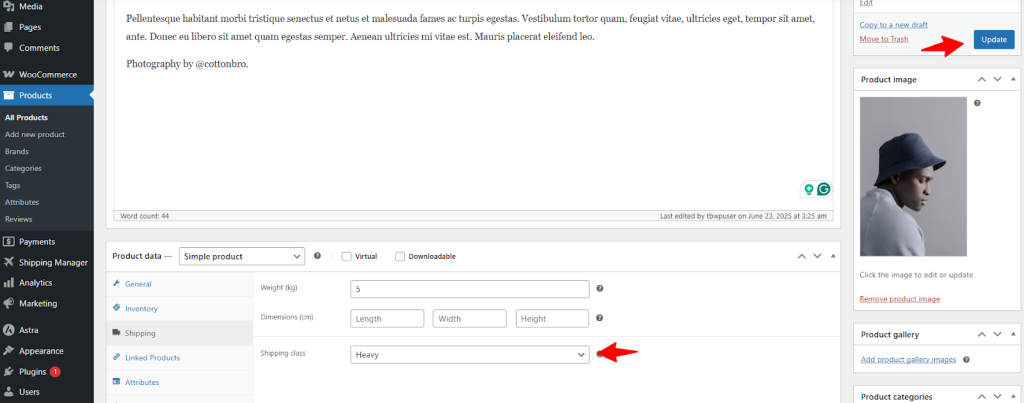
For Variable Products (e.g., different sizes/weights):
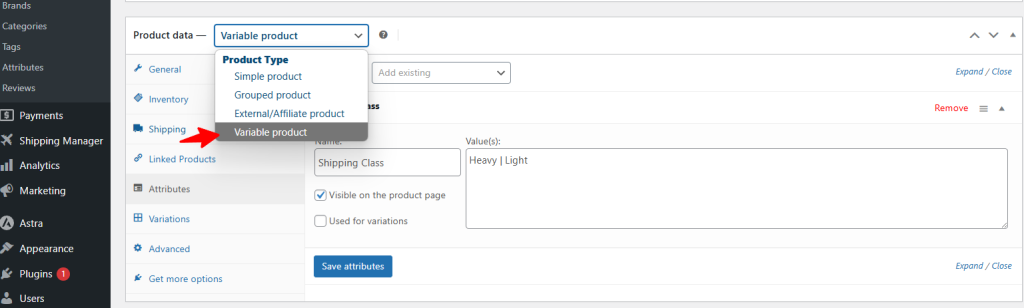
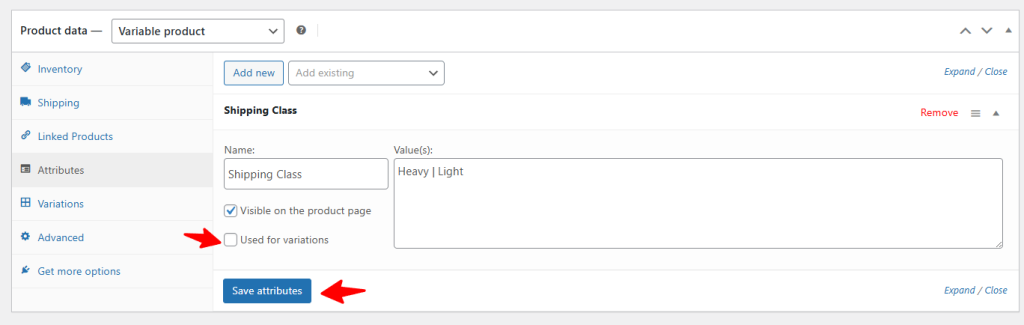
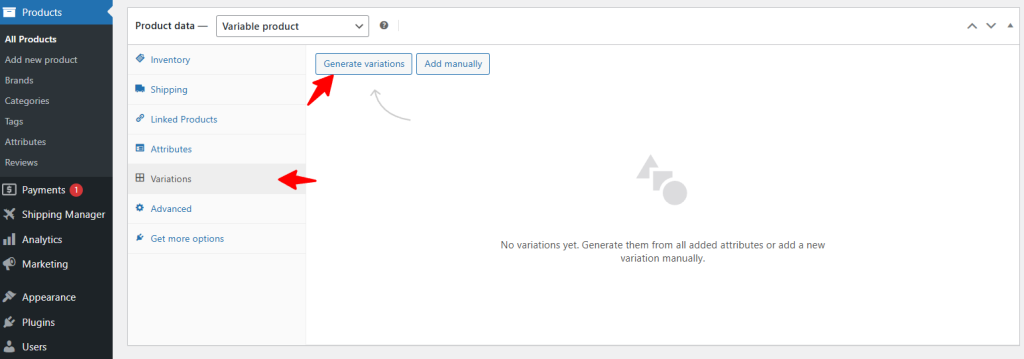
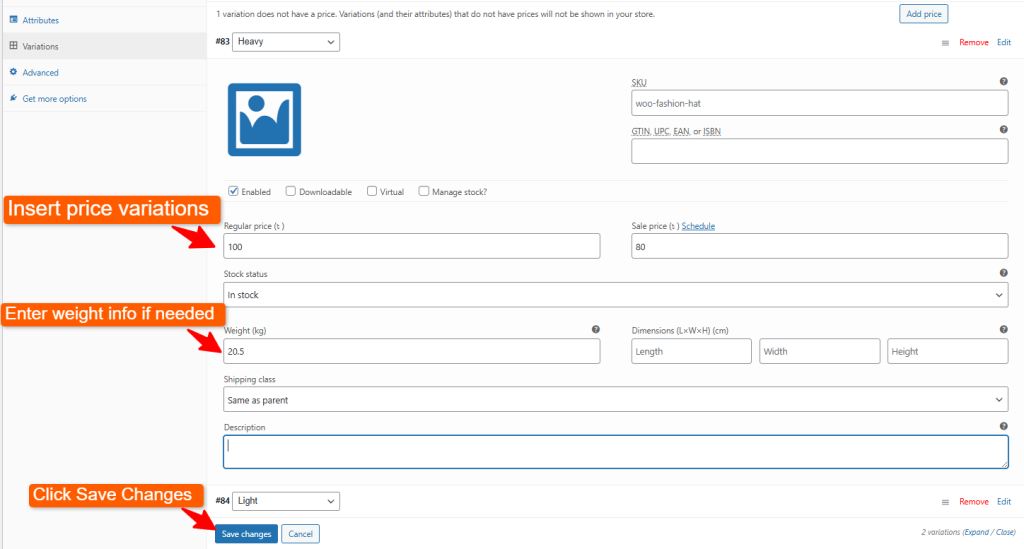
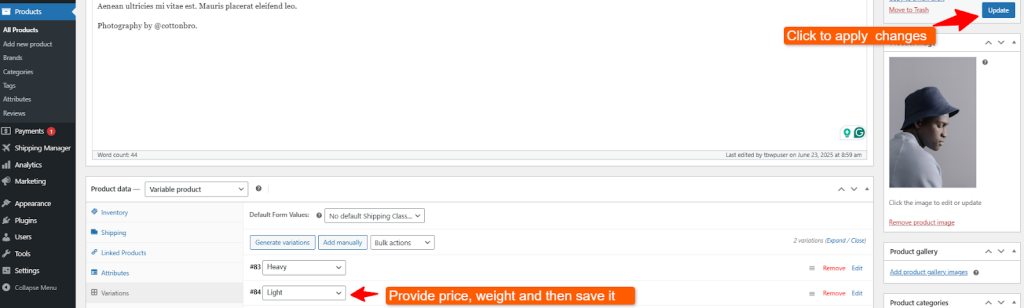
Once products are assigned to WooCommerce shipping classes, you can configure the actual shipping fees.
Now that products are categorized, you can define shipping costs for each class within your shipping zones.
Set Up Shipping Zones (If Not Done Already):

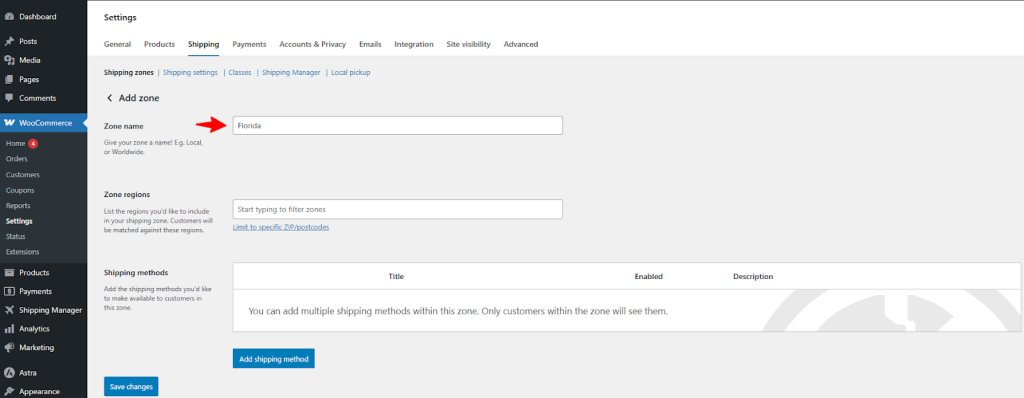
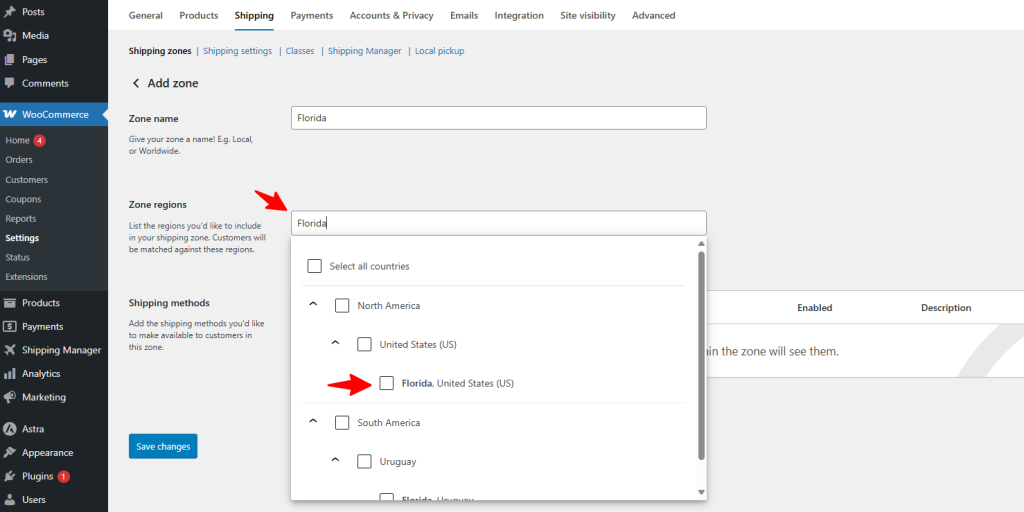
Add a Shipping Method:
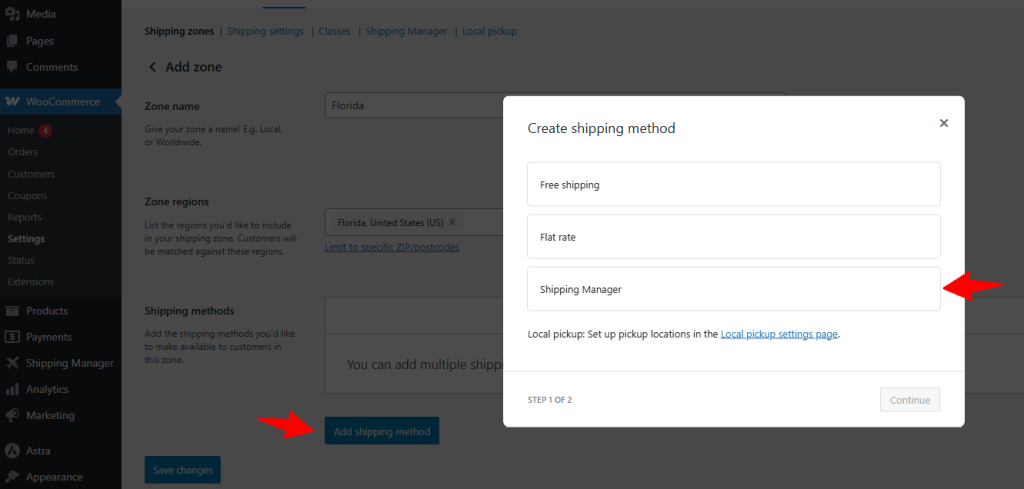
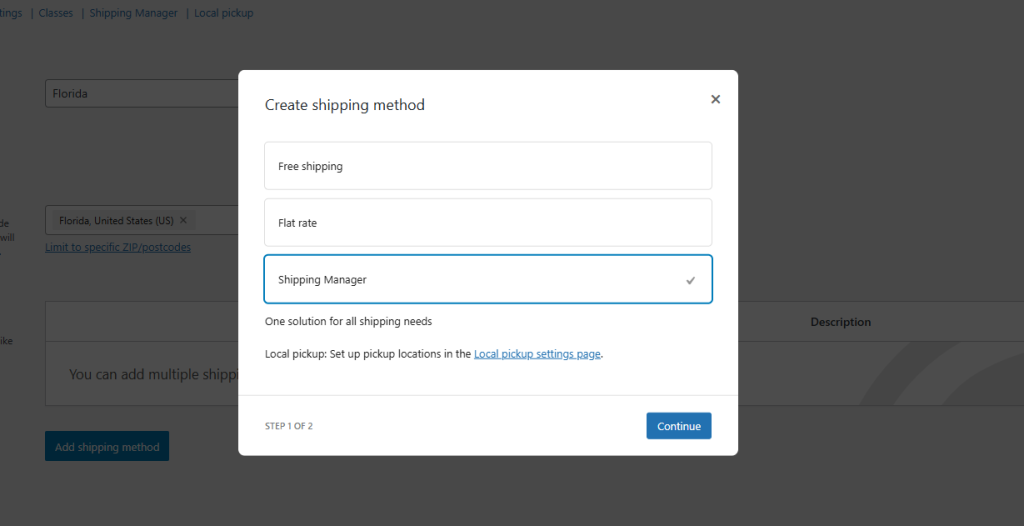
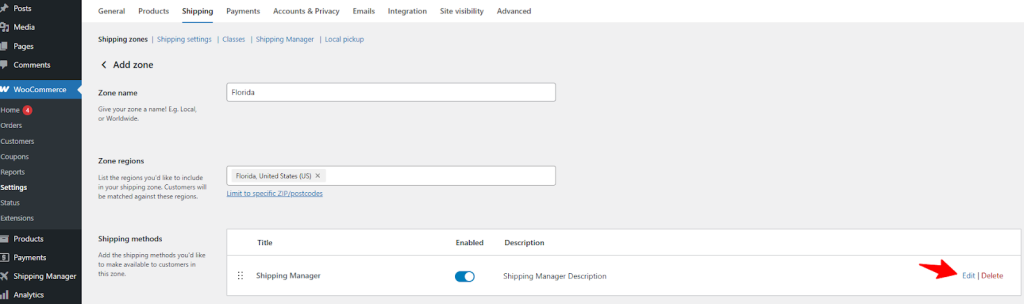
Configuring Shipping Manager:
As you can see, zone-specific shipping methods are now available for Florida.
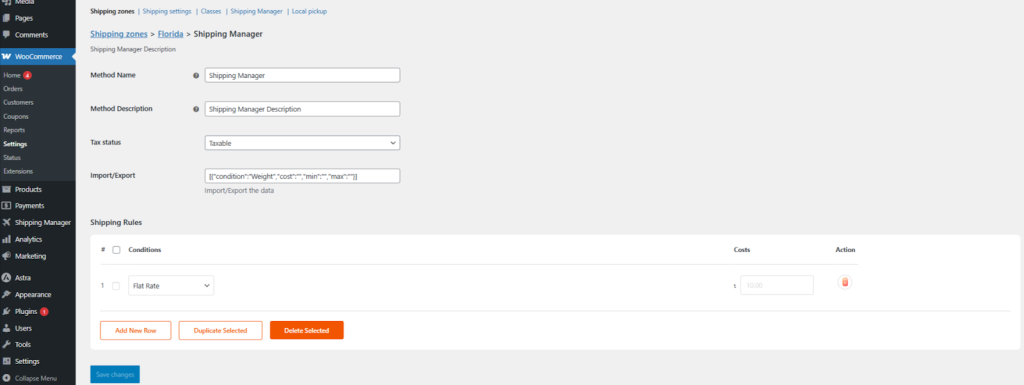
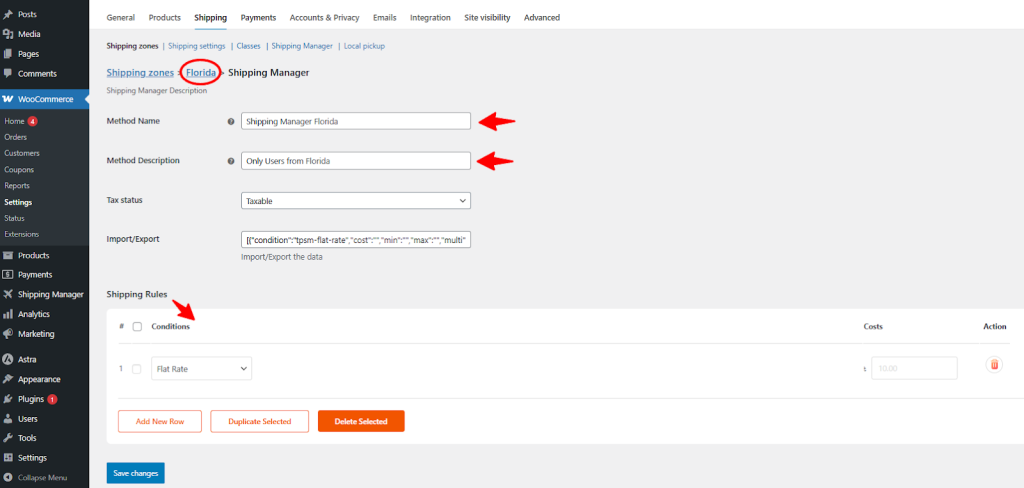
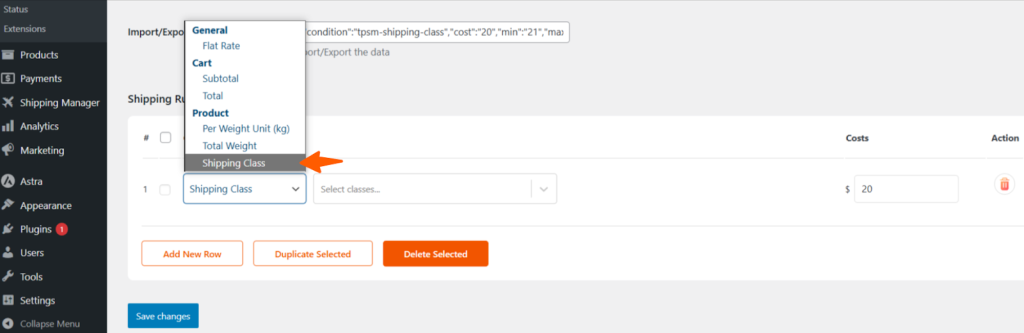
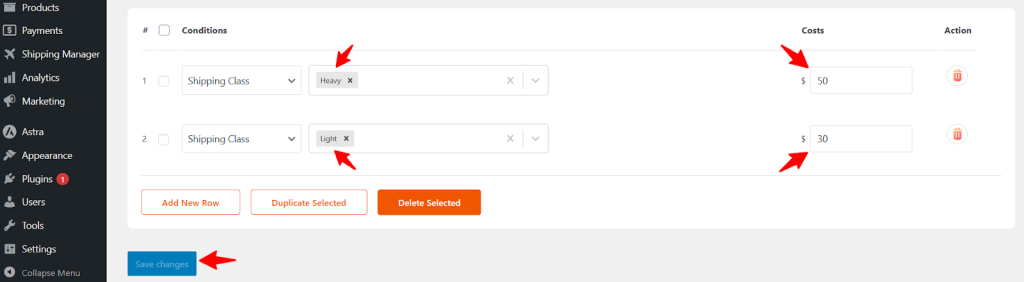
Now, we will verify that the class-based shipping fees are functioning correctly at checkout.
Let’s take a recap before proceeding to this step. We’ve taken the following steps already:
Let’s verify if our WooCommerce shipping classes and related fees are functioning correctly.

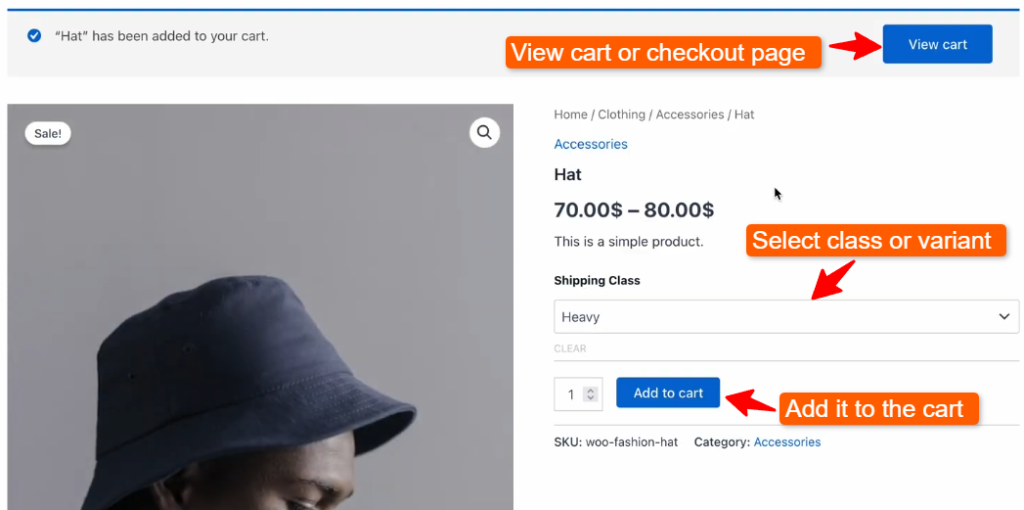
Now you can see the shipping fee is $50, which was set on the Shipping Manager plugin. This means the shipping fee is working as expected.
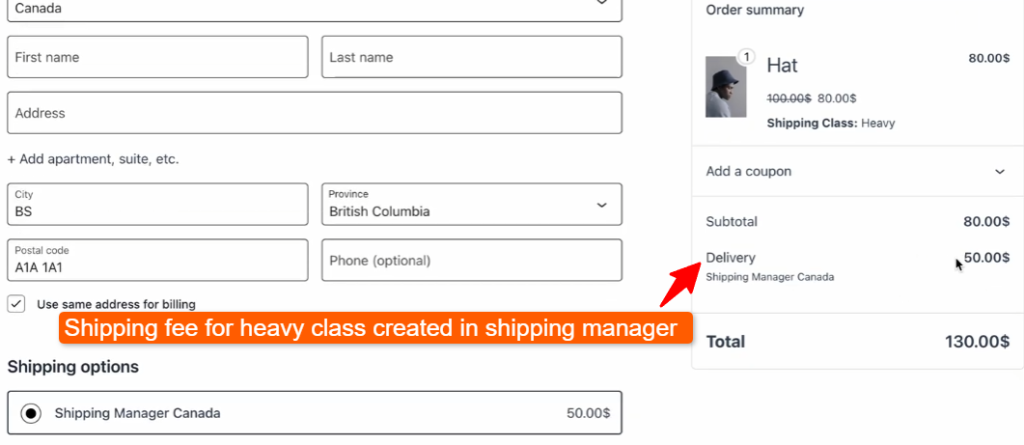
Creating WooCommerce shipping classes and rules is just half the equation. Managing them effectively is the key to maintaining long-term efficiency, accuracy, and customer loyalty. Following the best practices can help prevent confusion, overcharges, or lost profit opportunities.

Here’s how you can take the smarter approach to managing WooCommerce shipping classes:
Keep your setup simple: avoid classes you don’t need. Stick to clear, functionalist categories that correspond to the central shipping differences. For example:
You can consistently classify products into different classes within your WooCommerce store. The shipping manager makes the entire process easier by assigning accurate shipping fees to different classes.
Name your WooCommerce shipping classes in such a way that everyone can easily understand them. Avoid creating generic or internal-only names such as “Class A” or “Class B.” Instead, provide intuitive names such as:
Provide a descriptive name to reduce confusion and minimize the risk of human error. This is helpful when you have multiple administrators for your store.
As your store grows, it becomes increasingly difficult to keep track of which classes have specific shipping rules. Keep a basic spreadsheet or an in-house document that includes:
Your entire team should have this list as a reference for managing the store more flexibly.
Products are changing frequently, and vendors are changing the packaging process. With that, shipping companies are changing their shipping fee. That’s why it’s crucial to take the following steps:
The Shipping Manager plugin makes this easy by allowing you to revisit and adjust rules zone-by-zone and class-by-class without having to redo everything.
Combine Shipping Classes with Zone-Specific Logic
Shipping costs often vary depending on your location. Don’t use a one-size-fits-all rule, and use Shipping Manager to combine class-based logic with shipping that is specific to a certain zone.
This way, you can charge:
This level of precision ensures your pricing remains competitive and profitable across all regions.
WooCommerce shipping class is a powerful way to automate shipping costs, secure margins, and keep your buyers happy! When you use it via the Shipping Manager plugin, you get an intelligent shipping system that scales with your WooCommerce store.
If you invest the time and effort to set up your shipping classes correctly from the outset, you will receive fewer customer complaints. Additionally, you can focus on other crucial business aspects rather than dealing with unnecessary cart abandonment due to inaccurate costs.
Start by checking your best-selling items and categorizing them into different WooCommerce shipping classes. Feel free to contact our support team if you are unable to set a class-based shipping fee using Shipping Manager.
We will reply within 2 hours