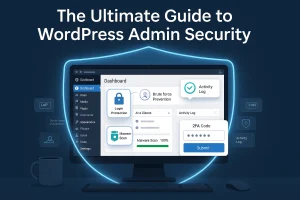
Hackers are constantly probing for weak spots in websites through automated bots. You are a target, whether you run a small blog or a business site. Especially WordPress sites are prime targets, as they power 43% of sites on the web. Thus, a web application firewall for WordPress sites becomes an essential security option.
Most site owners believe that a strong password and updating the site are sufficient. WAF works as a digital bouncer for your site. It screens every visitor and blocks malicious activity before it harms your server. In this guide, we dive deep into why you need a web application firewall as the first line of defense for your WordPress site.
What Exactly is a Web Application Firewall for WordPress?
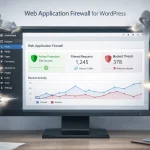
A web application firewall for WordPress (WAF) is a security tool designed to monitor, filter, and block HTTP traffic as it travels to your web application. Think of it as a sophisticated filter sitting between the open internet and your website’s database.
Table of Contents
A web application firewall for WordPress won’t work like a standard network firewall that blocks ports. WAF is “application-aware which understands the specific language of WordPress.
This security mechanism recognizes a legitimate login from a hacker attempting to inject malicious code into your comment section. Besides, it identifies and blocks sophisticated attacks by inspecting the “Payload” of every request. This is where traditional antivirus software might miss the catch.
How a WAF Works in Real-Time
- Incoming Request: A user (or bot) tries to access your site.
- Inspection: The WAF analyzes the request against a massive database of known “attack signatures.”
- Validation: It checks for anomalies, such as whether this user is trying to access a file they shouldn’t. Are they sending 1,000 requests per second?
- Action: If the request is safe, it passes through. If it’s malicious, the WAF drops the connection immediately.
The Rising Stakes: WordPress Security Statistics 2026
If you think your small blog or local business site is “too small to hack,” the data suggests otherwise. Hackers rarely target individuals; they use “botnets” to scan the entire internet for vulnerabilities. This is where a web application firewall for WordPress becomes essential.
- 96% of WordPress security incidents are traced back to vulnerabilities in third-party plugins and themes.
- In a recent 2025-2026 survey, nearly 64% of WordPress site owners reported suffering a full security breach at least once.
- There was a 34% increase in new vulnerabilities found in the WordPress ecosystem over the last year, largely driven by AI-automated scanning tools used by attackers.
These numbers highlight a sobering reality: manual security cannot keep up with the speed of automated attacks. You need a proactive system like Admin Safety Guard, Malcare that works 24/7.
Sources for these stats: Patchstack, Buddyboss, AutomataLabs.
Critical Attacks WAF Can Stop Right Away
A web application firewall for WordPress is specifically developed to defend against the top three web vulnerabilities.
SQL Injection (SQLi)
SQL injection is one of the most dangerous threats. A hacker inserts malicious SQL code into a form field. The field can be a search bar or a contact form. This is used to “trick” your database into revealing sensitive information.
For example, admin passwords or customer credit card data. Web application firewall for WordPress identifies these patterns and neutralizes the code before it reaches your database.
Cross-Site Scripting (XSS)
A hacker injects a malicious script into your website through an XSS attack. The script executes in the user’s browser whenever an innocent visitor loads your page.
Next, the script steals the user’s login cookies or redirects them to a phishing site. The web application firewall for WordPress filters out these scripts at the entry point.
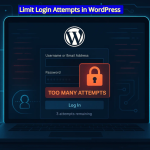
Brute Force & Credential Stuffing
Bots can attempt to guess your password thousands of times per minute. The web application firewall for WordPress can detect this “high-velocity” behavior. Then it blocks the IP address entirely, even before the bot gets to its tenth attempt.
Cloud-Based vs. Endpoint WAF: Which Should You Choose?
When looking for a web application firewall for WordPress, you’ll generally find two flavors. Choosing the right one depends on your technical comfort level and your site’s traffic.
| Feature | Cloud-Based WAF (DNS-Level) | Endpoint WAF (Plugin-Level) |
| Location | Sits at the network edge (e.g., Cloudflare) | Lives on your WordPress server |
| Performance | Reduces server load by blocking traffic early | Uses your server’s CPU/RAM to scan |
| Setup | Requires DNS changes | Easy “Install Plugin” setup |
| Best For | High-traffic sites and DDoS protection | Small to medium sites and deep site-scanning |
The Case for Cloud-Based Firewalls
Cloud firewalls (like Sucuri or Cloudflare) are often preferred because they stop the “garbage” traffic before it even reaches your hosting environment. This keeps your site fast and prevents your server from crashing whenever a bot attack takes place.
The Case for Endpoint Firewalls
Plugins like Admin Safety Guard Pro or MalCare provide an “Endpoint” web application firewall for WordPress. These are excellent because they have “context.” They know exactly which user is logged in and what their permissions are, allowing for much more granular security rules.
Why “Virtual Patching” is the WAF’s Secret Weapon
One of the biggest headaches for WordPress users is the constant stream of plugin updates. Sometimes, a vulnerability is discovered, but a patch isn’t released for days. Or worse, you’re on vacation and can’t update your site immediately.
Virtual Patching is a feature found in high-quality web application firewalls for WordPress. Let’s say a new vulnerability is discovered in a popular plugin like WooCommerce or Elementor. The Web application firewall for WordPress provides a way to write a rule to block any attempt to exploit that specific flaw.
This is how WAF protects your site instantly, even if you haven’t updated the actual plugin yet. It buys you time and provides peace of mind.
Setting Up Your Web Application Firewall for WordPress
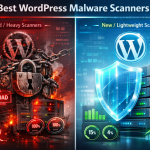
Setting up a web application firewall for WordPress may sound complex. However, it’s an easy task when you have the best WordPress malware scanner installed.
While most of the security plugins are cluttered with complex features, the latest solutions like Admin Safety Guard Pro prioritize a “set it and forget it” approach that begins protecting you the moment it’s activated.
Note: Learn about the best WordPress malware scanner to get the features that fit your site’s requirements.
The Pro version of Admin Safety Guard offers the WAF, and the Malware Scanner works together to provide a proactive shield. Here is how to manage your defense system effectively:
Activation and Global Protection
Once you have the Pro version of your security plugin installed, the first step is to wake up the guardian.
- Navigate to Admin Safety Guard in your WordPress sidebar.
- Select the Web Application Firewall section.
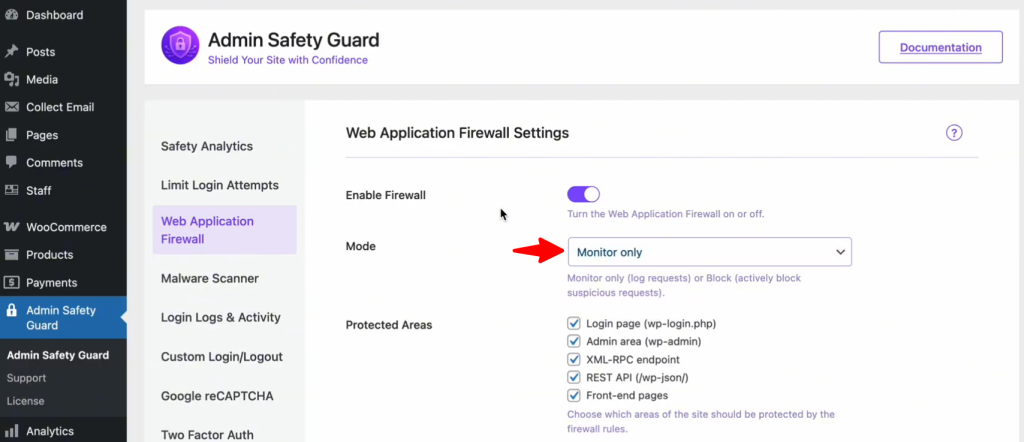
- Toggle the “Enable Firewall” option and click Save Settings.
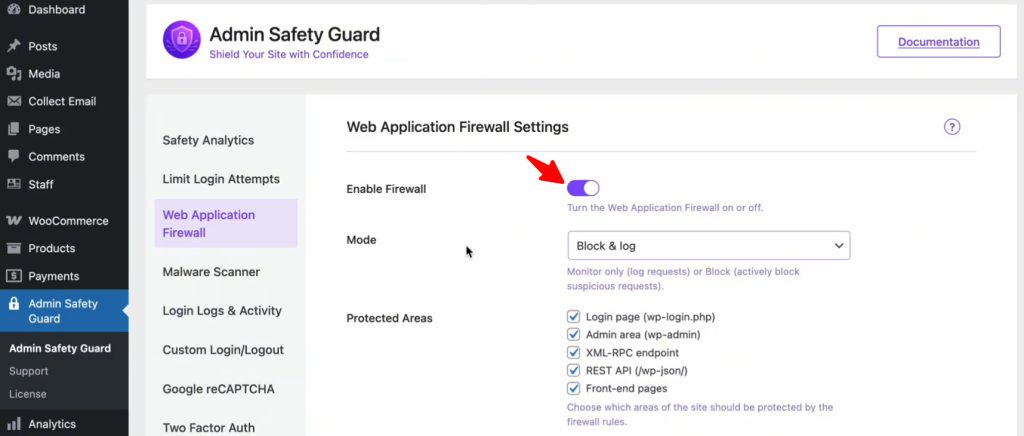
This instantly activates a protective layer that filters every incoming request, checking for common attack signatures like SQL Injections and XSS payloads.
Step 2: Choose Your Defensive Mode
Choose Your Defensive Mode
Depending on your comfort level, you can decide how the WAF reacts when it spots trouble:
- Monitor Only: This is perfect for a “learning phase.” The WAF will watch for threats and log them, but it won’t block anyone. Use this if you want to ensure no legitimate traffic is accidentally caught.
- Block & Log (Recommended): This is the “active duty” mode. If the system detects a malicious pattern, it blocks the IP address immediately and logs the event for your review. This provides the highest level of real-time security.

Secure Your High-Value Targets
Not all pages on your site are equal. Hackers focus on specific “doors” to gain entry. In your WAF settings, ensure you have enabled protection for these critical areas:
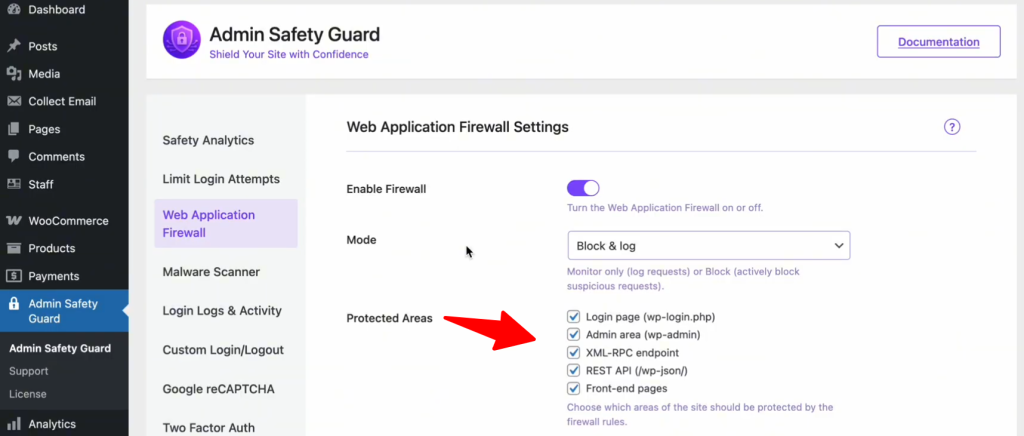
- Login Page (wp-login.php): Stops brute-force bots from guessing your password.
- Admin Area (wp-admin): Prevents unauthorized users from escalating their privileges.
- XML-RPC & REST API: These are often exploited by automated scripts to inject data or steal information. Closing these unless necessary is a security best practice in 2026.
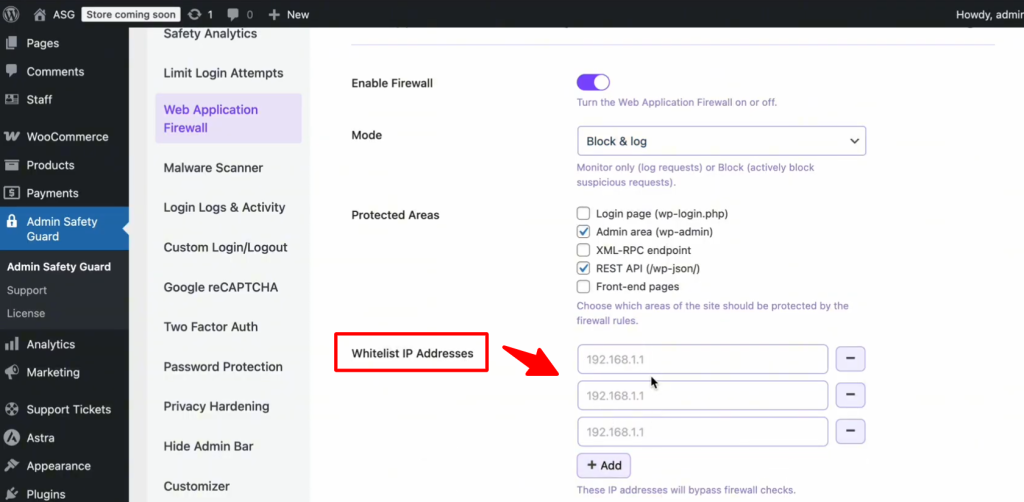
The “Safety Net” – Whitelisting Your IP
One of the most common fears is being “locked out” of your own website. To prevent this, always use the Whitelist IP Address feature. By adding your home or office IP address to this list, you tell the firewall: “This is the owner; never block this person.” This ensures that even if you accidentally trigger a security rule while making heavy edits, your access remains uninterrupted.
Advanced Filtering (User Agents & Request Size)
For those who want granular control, look into these specialized settings:
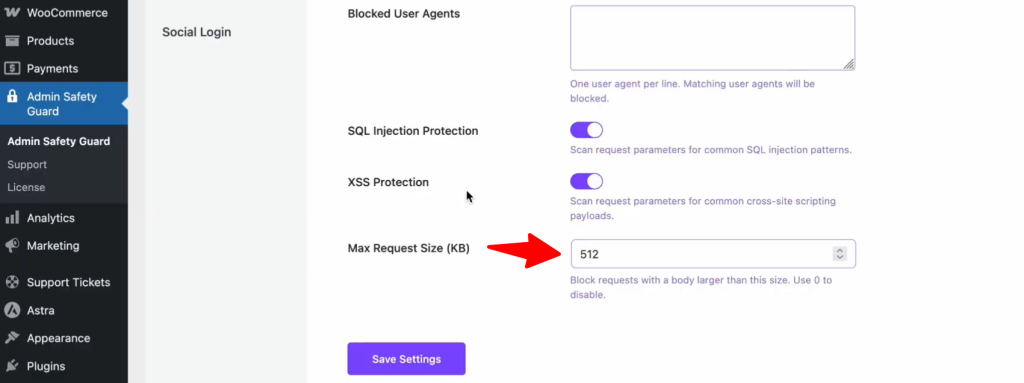
- Blocked User Agents: If you notice a specific “bad bot” or outdated browser (like an old version of Firefox) consistently scraping your content, you can block that entire browser type here.
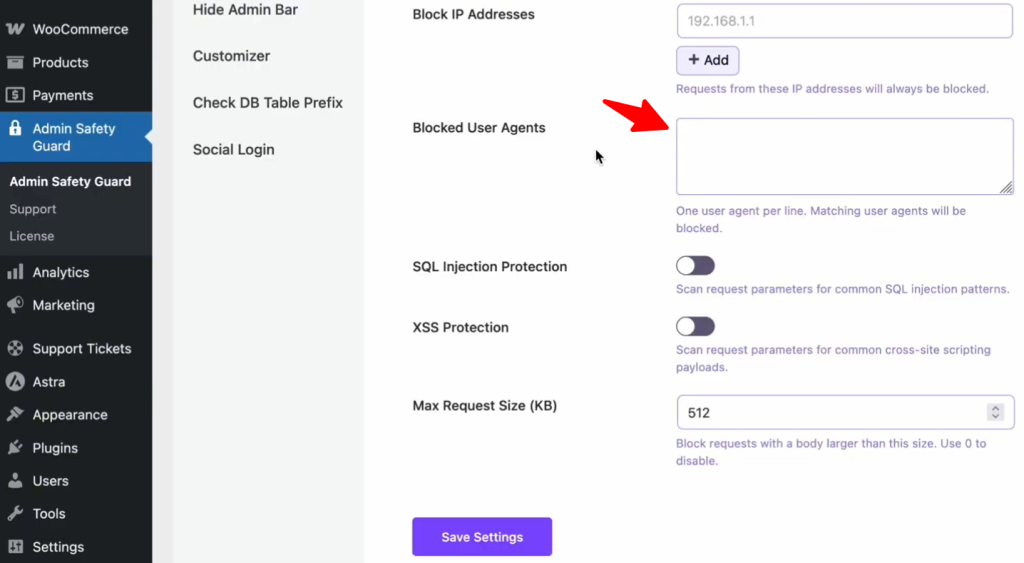
- Max Request Size: To prevent DDoS or “Buffer Overflow” attacks, set a limit (like 512 KB) on how large an incoming request can be. This stops attackers from trying to overwhelm your server with massive, junk data packets.
SQL Injection (SQLi) Protection
SQL Injection is a devastating attack where malicious actors insert SQL code into your input fields to “query” your database without permission. If successful, they could download your entire user list or even delete your site’s content.
The SQL Injection Protection section in Admin Safety Guard blocks common patterns used in these attacks. By detecting and neutralizing these malicious queries, the web application firewall for WordPress ensures that your database remains protected from unauthorized access and data breaches.
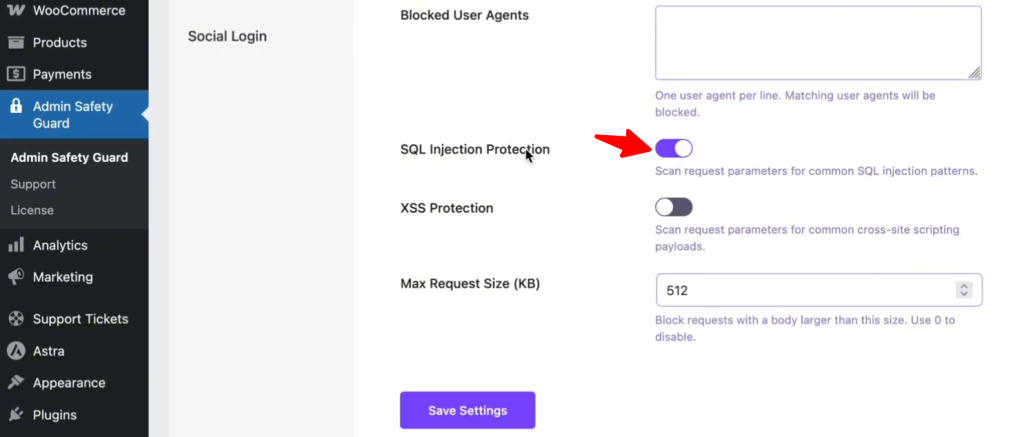
How to Enable SQL Injection Protection:
- Open the Admin Safety Guard dashboard.
- Go to the Web Application Firewall tab.
- Locate the SQL Injection Protection toggle.
- Switch it to Enable and save your changes.
XSS Protection
Cross-Site Scripting (XSS) is a front-end attack. In this scenario, a hacker injects a script into your site so that when other users visit the page, the script runs in their browser. This is often used to steal session cookies or redirect your customers to malicious websites.
Enabling the XSS Protection option ensures that these scripts are effectively blocked. The firewall scans all request parameters for common XSS payloads, preventing malicious code from being injected and executed. As a result, your website remains secure from potential vulnerabilities, safeguarding both your sensitive data and your user experience.
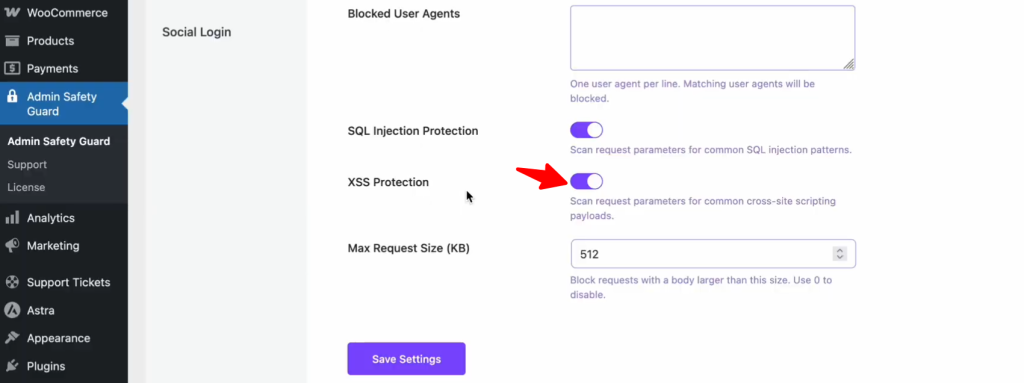
How to Enable XSS Protection:
- Inside the Web Application Firewall settings, find the XSS Protection section.
- Toggle the switch to the On position.
- Click Save Settings to push the rule live.
Conclusion — Don’t Wait Till You’re Hacked
Protecting your website with a web application firewall for WordPress isn’t just a one-time task; it’s an ongoing journey. There is no such thing as a “100% hack-proof” site or solution since the types of threats are constantly evolving. Implementing a web application firewall for WordPress is the single most effective step you can take to protect your hard work.
The WAF allows you to focus on your content and business growth by filtering out malicious traffic. Therefore, don’t wait for the “Site Hacked” notification to appear and fortify your site today.